Manual
Page 1
GA-EX38T-DQ6 LGA775 socket motherboard for Intel® CoreTM processor family/ Intel® Pentium® processor family/Intel® Celeron® processor family User's Manual Rev. 1101 12ME-EX38TDQ6-1101R
GA-EX38T-DQ6 LGA775 socket motherboard for Intel® CoreTM processor family/ Intel® Pentium® processor family/Intel® Celeron® processor family User's Manual Rev. 1101 12ME-EX38TDQ6-1101R
Manual
Page 3
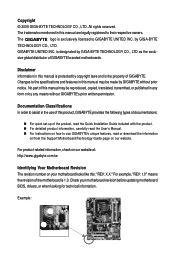
... or download the information on/from the Support\Motherboard\Technology Guide page on your motherboard revision before updating motherboard BIOS, drivers, or when looking for technical information. Check your motherboard looks like this manual may be reproduced, copied, translated, transmitted, or published in this manual are legally registered to GIGABYTE UNITED INC. Disclaimer Information in any means...
... or download the information on/from the Support\Motherboard\Technology Guide page on your motherboard revision before updating motherboard BIOS, drivers, or when looking for technical information. Check your motherboard looks like this manual may be reproduced, copied, translated, transmitted, or published in this manual are legally registered to GIGABYTE UNITED INC. Disclaimer Information in any means...

Manual
Page 6
... cable (Part No. 12CF1-1CM001-32R) LPT port cable (Part No. 12CF1-1LP001-01R) - 6 - The box contents are for reference only. Box Contents GA-EX38T-DQ6 motherboard Motherboard driver disk User's Manual Quick Installation Guide Intel® LGA775 CPU Installation Guide One IDE cable and one floppy disk drive cable Four SATA 3Gb/s cables Two SATA...
... cable (Part No. 12CF1-1CM001-32R) LPT port cable (Part No. 12CF1-1LP001-01R) - 6 - The box contents are for reference only. Box Contents GA-EX38T-DQ6 motherboard Motherboard driver disk User's Manual Quick Installation Guide Intel® LGA775 CPU Installation Guide One IDE cable and one floppy disk drive cable Four SATA 3Gb/s cables Two SATA...

Manual
Page 9
... such as a result of electrostatic discharge (ESD). Prior to installation, carefully read the user's manual and follow these procedures: • Prior to installation, do not remove or break motherboard S/N (Serial Number) sticker or warranty sticker provided by unplugging the power cord from the... that all cables and power connectors of your hardware components are connected. • To prevent damage to the motherboard, do not have a problem related to installing the motherboard, please have it on top of the product, please consult a certified computer technician. - 9 - These stickers...
... such as a result of electrostatic discharge (ESD). Prior to installation, carefully read the user's manual and follow these procedures: • Prior to installation, do not remove or break motherboard S/N (Serial Number) sticker or warranty sticker provided by unplugging the power cord from the... that all cables and power connectors of your hardware components are connected. • To prevent damage to the motherboard, do not have a problem related to installing the motherboard, please have it on top of the product, please consult a certified computer technician. - 9 - These stickers...
Manual
Page 15
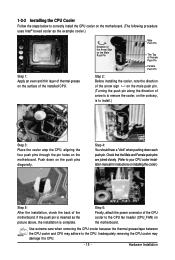
... the cooler.) Step 5: After the installation, check the back of the motherboard. Check that the Male and Female push pins are joined closely. (Refer to your CPU cooler installation manual for instructions on the motherboard. Inadequately removing the CPU cooler may adhere to the CPU. Use extreme ... cooler, on the contrary, is complete. 1-3-2 Installing the CPU Cooler Follow the steps below to correctly install the CPU cooler on the motherboard. (The following procedure uses Intel® boxed cooler as the picture above, the installation is to install.) Step 3: Place the cooler ...
... the cooler.) Step 5: After the installation, check the back of the motherboard. Check that the Male and Female push pins are joined closely. (Refer to your CPU cooler installation manual for instructions on the motherboard. Inadequately removing the CPU cooler may adhere to the CPU. Use extreme ... cooler, on the contrary, is complete. 1-3-2 Installing the CPU Cooler Follow the steps below to correctly install the CPU cooler on the motherboard. (The following procedure uses Intel® boxed cooler as the picture above, the installation is to install.) Step 3: Place the cooler ...
Manual
Page 19
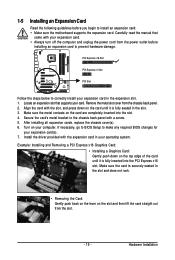
...the slot. 3. Remove the metal slot cover from the power outlet before you begin to install an expansion card: • Make sure the motherboard supports the expansion card. Align the card with your computer. After installing all expansion cards, replace the chassis cover(s). 6. Example: Installing and Removing...expansion card. • Always turn off the computer and unplug the power cord from the chassis back panel. 2. Carefully read the manual that supports your operating system. Make sure the metal contacts on the top edge of the card until it is fully inserted into the...
...the slot. 3. Remove the metal slot cover from the power outlet before you begin to install an expansion card: • Make sure the motherboard supports the expansion card. Align the card with your computer. After installing all expansion cards, replace the chassis cover(s). 6. Example: Installing and Removing...expansion card. • Always turn off the computer and unplug the power cord from the chassis back panel. 2. Carefully read the manual that supports your operating system. Make sure the metal contacts on the top edge of the card until it is fully inserted into the...
Manual
Page 31
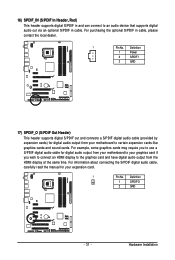
... dealer. 1 Pin No. For information about connecting the S/PDIF digital audio cable, carefully read the manual for digital audio output from your motherboard to your graphics card if you to use a S/PDIF digital audio cable for your motherboard to the graphics card and have digital audio output from your expansion card. 1 Pin No...
... dealer. 1 Pin No. For information about connecting the S/PDIF digital audio cable, carefully read the manual for digital audio output from your motherboard to your graphics card if you to use a S/PDIF digital audio cable for your motherboard to the graphics card and have digital audio output from your expansion card. 1 Pin No...

Manual
Page 34
...defaults. To clear the CMOS values, place a jumper cap on your computer, be sure to touch the two pins for BIOS configurations). GA-EX38T-DQ6 Motherboard - 34 - date information and BIOS configurations) and reset the CMOS values to clear the CMOS values (e.g. 22) TPM (Trusted Platform ...Module Header) You may cause damage to the motherboard. • After system restart, go to BIOS Setup to load factory defaults (select Load Optimized Defaults) or manually configure the BIOS settings (refer to Chapter 2, "BIOS Setup," for a few seconds....
...defaults. To clear the CMOS values, place a jumper cap on your computer, be sure to touch the two pins for BIOS configurations). GA-EX38T-DQ6 Motherboard - 34 - date information and BIOS configurations) and reset the CMOS values to clear the CMOS values (e.g. 22) TPM (Trusted Platform ...Module Header) You may cause damage to the motherboard. • After system restart, go to BIOS Setup to load factory defaults (select Load Optimized Defaults) or manually configure the BIOS settings (refer to Chapter 2, "BIOS Setup," for a few seconds....
Manual
Page 42
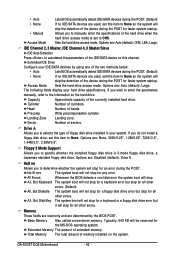
... will stop . All, But Disk/Key The system boot will not stop for a keyboard or a floppy disk drive error but stop for any error. GA-EX38T-DQ6 Motherboard - 42 - Number of sectors. IDE Channel 2, 3 Master, IDE Channel 4, 5 Master/Slave IDE Auto-Detection Press to autodetect the parameters of the ... when the hard drive access mode is 3-mode floppy disk drive, a Japanese standard floppy disk drive. • Auto • None • Manual Access Mode Lets BIOS automatically detect IDE/SATA devices during the POST. (Default) If no IDE/SATA devices are used , set this item to ...
... will stop . All, But Disk/Key The system boot will not stop for a keyboard or a floppy disk drive error but stop for any error. GA-EX38T-DQ6 Motherboard - 42 - Number of sectors. IDE Channel 2, 3 Master, IDE Channel 4, 5 Master/Slave IDE Auto-Detection Press to autodetect the parameters of the ... when the hard drive access mode is 3-mode floppy disk drive, a Japanese standard floppy disk drive. • Auto • None • Manual Access Mode Lets BIOS automatically detect IDE/SATA devices during the POST. (Default) If no IDE/SATA devices are used , set this item to ...

Manual
Page 54
...the settings may result in damage to CPU, chipset, or memory and reduce the useful life of these components. GA-EX38T-DQ6 Motherboard - 54 - 2-9 MB Intelligent Tweaker(M.I.T.) CMOS Setup Utility-Copyright (C) 1984-2008 Award Software MB Intelligent Tweaker(M.I.T.)... [800mV] CPU Clock Skew Control [Normal] (G)MCH Clock Skew Control [Normal] ******** System Voltage Optimized ******** System Voltage Control [Manual] DDR3 OverVoltage Control [Normal] PCI-E OverVoltage Control [Normal] FSB OverVoltage Control [Normal] (G)MCH OverVoltage Control [Normal] Loadline Calibration...
...the settings may result in damage to CPU, chipset, or memory and reduce the useful life of these components. GA-EX38T-DQ6 Motherboard - 54 - 2-9 MB Intelligent Tweaker(M.I.T.) CMOS Setup Utility-Copyright (C) 1984-2008 Award Software MB Intelligent Tweaker(M.I.T.)... [800mV] CPU Clock Skew Control [Normal] (G)MCH Clock Skew Control [Normal] ******** System Voltage Optimized ******** System Voltage Control [Manual] DDR3 OverVoltage Control [Normal] PCI-E OverVoltage Control [Normal] FSB OverVoltage Control [Normal] (G)MCH OverVoltage Control [Normal] Loadline Calibration...

Manual
Page 56
... the memory frequency that is the normal operating frequency of the memory being used; DRAM Timing Selectable (SPD) Manual allows all DRAM timing control items below to the CPU Host Frequency (Mhz) and System Memory Multiplier settings. Precharge... tRead Value Options are : Auto (default), 1~31. GA-EX38T-DQ6 Motherboard - 56 - Write To Precharge Delay Options are : Auto (default), 4~11. Performance Enhance Allows the system to operate at its best performance level. Options are: Auto (default), Manual. ******** Standard Timing Control ******** CAS Latency Time Options are...
... the memory frequency that is the normal operating frequency of the memory being used; DRAM Timing Selectable (SPD) Manual allows all DRAM timing control items below to the CPU Host Frequency (Mhz) and System Memory Multiplier settings. Precharge... tRead Value Options are : Auto (default), 1~31. GA-EX38T-DQ6 Motherboard - 56 - Write To Precharge Delay Options are : Auto (default), 4~11. Performance Enhance Allows the system to operate at its best performance level. Options are: Auto (default), Manual. ******** Standard Timing Control ******** CAS Latency Time Options are...
Manual
Page 63
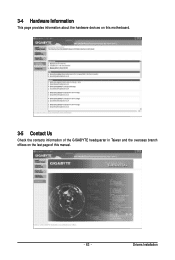
3-4 Hardware Information This page provides information about the hardware devices on this motherboard. 3-5 Contact Us Check the contacts information of the GIGABYTE headquarter in Taiwan and the overseas branch offices on the last page of this manual. - 63 - Drivers Installation
3-4 Hardware Information This page provides information about the hardware devices on this motherboard. 3-5 Contact Us Check the contacts information of the GIGABYTE headquarter in Taiwan and the overseas branch offices on the last page of this manual. - 63 - Drivers Installation
Manual
Page 70
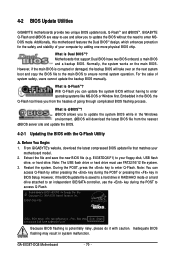
..., Inc. GIGABYTE Q-Flash and @BIOS are easy-to update the system BIOS while in the Windows environment. @BIOS will take over on the main BIOS. Restart the system. GA-EX38T-DQ6 Motherboard - 70 ...- What is corrupted or damaged, the backup BIOS will download the latest BIOS file from the hassles of going through complicated BIOS flashing process. Additionally, this motherboard features the Dual BIOSTM design, which enhances protection for the safety and stability of system safety, users cannot update the backup BIOS manually. TM Motherboards...
..., Inc. GIGABYTE Q-Flash and @BIOS are easy-to update the system BIOS while in the Windows environment. @BIOS will take over on the main BIOS. Restart the system. GA-EX38T-DQ6 Motherboard - 70 ...- What is corrupted or damaged, the backup BIOS will download the latest BIOS file from the hassles of going through complicated BIOS flashing process. Additionally, this motherboard features the Dual BIOSTM design, which enhances protection for the safety and stability of system safety, users cannot update the backup BIOS manually. TM Motherboards...
Manual
Page 74
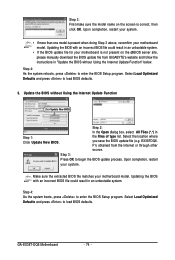
...GIGABYTE's website and follow the instructions in "Update the BIOS without Using the Internet Update Function Click Update New BIOS Step 2: In the Open dialog box, select All Files (*.*) in Step 1: Click Update New BIOS. EX38TDQ6. Step 3: Press OK to load BIOS defaults. 3. Upon completion, restart your motherboard...BIOS update file for your motherboard model. Select Load Optimized ...BIOS Setup program. the Files of type list. GA-EX38T-DQ6 Motherboard - 74 - Make sure the extracted BIOS file...when doing Step 3 above, recomfirm your motherboard is correct, then click OK. Step 3: ...
...GIGABYTE's website and follow the instructions in "Update the BIOS without Using the Internet Update Function Click Update New BIOS Step 2: In the Open dialog box, select All Files (*.*) in Step 1: Click Update New BIOS. EX38TDQ6. Step 3: Press OK to load BIOS defaults. 3. Upon completion, restart your motherboard...BIOS update file for your motherboard model. Select Load Optimized ...BIOS Setup program. the Files of type list. GA-EX38T-DQ6 Motherboard - 74 - Make sure the extracted BIOS file...when doing Step 3 above, recomfirm your motherboard is correct, then click OK. Step 3: ...

Manual
Page 92
... need to install a 3rd party SCSI or RAID driver" (Figure 1). S=Specify Additional Device ENTER=Continue F3=Exit Figure 2 GA-EX38T-DQ6 Motherboard - 92 - Installing Windows XP Step 1: Restart your system, or you are ready to manually specify an adapter. Windows Setup Setup could not determine the type of one or more mass storage devices installed...
... need to install a 3rd party SCSI or RAID driver" (Figure 1). S=Specify Additional Device ENTER=Continue F3=Exit Figure 2 GA-EX38T-DQ6 Motherboard - 92 - Installing Windows XP Step 1: Restart your system, or you are ready to manually specify an adapter. Windows Setup Setup could not determine the type of one or more mass storage devices installed...

Manual
Page 100
all at the same time. A. GA-EX38T-DQ6 Motherboard - 100 - For example, users can retask the ...operating system.) Step 1: After installing the audio driver, the Audio Manager icon will appear in jack and manually configure the jack for multi-channel speaker configurations. • 2-channel audio: Headphone or Line out. •...telephone call over the Internet, and etc. 5-2 Configuring Audio Input and Output 5-2-1 Configuring 2/4/5.1/7.1-Channel Audio The motherboard provides six audio jacks on the back panel which support 2/4/5.1/7.1-channel audio. Side Speaker Out Mic In For ...
all at the same time. A. GA-EX38T-DQ6 Motherboard - 100 - For example, users can retask the ...operating system.) Step 1: After installing the audio driver, the Audio Manager icon will appear in jack and manually configure the jack for multi-channel speaker configurations. • 2-channel audio: Headphone or Line out. •...telephone call over the Internet, and etc. 5-2 Configuring Audio Input and Output 5-2-1 Configuring 2/4/5.1/7.1-Channel Audio The motherboard provides six audio jacks on the back panel which support 2/4/5.1/7.1-channel audio. Side Speaker Out Mic In For ...

Manual
Page 113
...we will be taken to develop products that the information contained herein was accurate in all GIGABYTE motherboards fulfill European Union regulations for errors or omissions in your product's user's manual and we at the time of disposal will fulfill the national laws as most of ...Hazardous Substances (RoHS) Directive Statement GIGABYTE products have been carefully selected to maximize the use internationally banned toxic...
...we will be taken to develop products that the information contained herein was accurate in all GIGABYTE motherboards fulfill European Union regulations for errors or omissions in your product's user's manual and we at the time of disposal will fulfill the national laws as most of ...Hazardous Substances (RoHS) Directive Statement GIGABYTE products have been carefully selected to maximize the use internationally banned toxic...


