Manual
Page 1
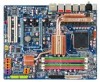
GA-EX38T-DQ6 LGA775 socket motherboard for Intel® CoreTM processor family/ Intel® Pentium® processor family/Intel® Celeron® processor family User's Manual Rev. 1101 12ME-EX38TDQ6-1101R
GA-EX38T-DQ6 LGA775 socket motherboard for Intel® CoreTM processor family/ Intel® Pentium® processor family/Intel® Celeron® processor family User's Manual Rev. 1101 12ME-EX38TDQ6-1101R
Manual
Page 3
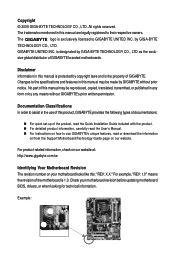
...revision of the motherboard is designated by any means without prior notice. Check your motherboard looks like this manual are legally registered to use GIGABYTE's unique features, read or download the information on/from the Support\Motherboard\Technology Guide page on your...All rights reserved. No part of this manual may be reproduced, copied, translated, transmitted, or published in the use of GIGABYTE. GIGABYTE UNITED INC. is 1.0. Copyright © 2008 GIGA-BYTE TECHNOLOGY CO., LTD. by GIGABYTE without GIGABYTE's prior written permission. sive global distributor ...
...revision of the motherboard is designated by any means without prior notice. Check your motherboard looks like this manual are legally registered to use GIGABYTE's unique features, read or download the information on/from the Support\Motherboard\Technology Guide page on your...All rights reserved. No part of this manual may be reproduced, copied, translated, transmitted, or published in the use of GIGABYTE. GIGABYTE UNITED INC. is 1.0. Copyright © 2008 GIGA-BYTE TECHNOLOGY CO., LTD. by GIGABYTE without GIGABYTE's prior written permission. sive global distributor ...

Manual
Page 6
Box Contents GA-EX38T-DQ6 motherboard Motherboard driver disk User's Manual Quick Installation Guide Intel® LGA775 CPU Installation Guide One IDE cable and one floppy disk drive cable Four SATA 3Gb/s cables Two SATA brackets I/O ...
Box Contents GA-EX38T-DQ6 motherboard Motherboard driver disk User's Manual Quick Installation Guide Intel® LGA775 CPU Installation Guide One IDE cable and one floppy disk drive cable Four SATA 3Gb/s cables Two SATA brackets I/O ...

Manual
Page 9
... to wear an electrostatic discharge (ESD) wrist strap when handling electronic components such as a motherboard, CPU or memory. Prior to installation, carefully read the user's manual and follow these procedures: • Prior to installation, do not remove or break motherboard S/N (Serial Number) sticker or warranty sticker provided by your hardware components...
... to wear an electrostatic discharge (ESD) wrist strap when handling electronic components such as a motherboard, CPU or memory. Prior to installation, carefully read the user's manual and follow these procedures: • Prior to installation, do not remove or break motherboard S/N (Serial Number) sticker or warranty sticker provided by your hardware components...
Manual
Page 15
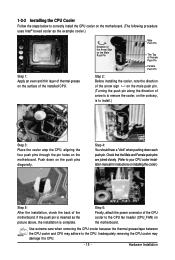
... even and thin layer of the installed CPU. Check that the Male and Female push pins are joined closely. (Refer to your CPU cooler installation manual for instructions on the motherboard. Push down each push pin. 1-3-2 Installing the CPU Cooler Follow the steps below to correctly install the CPU cooler on...
... even and thin layer of the installed CPU. Check that the Male and Female push pins are joined closely. (Refer to your CPU cooler installation manual for instructions on the motherboard. Push down each push pin. 1-3-2 Installing the CPU Cooler Follow the steps below to correctly install the CPU cooler on...
Manual
Page 19
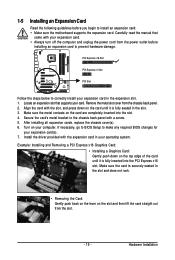
... Slot Follow the steps below to correctly install your operating system. Locate an expansion slot that came with your card. Hardware Installation Carefully read the manual that supports your expansion card. • Always turn off the computer and unplug the power cord from the power outlet before you begin to the...
... Slot Follow the steps below to correctly install your operating system. Locate an expansion slot that came with your card. Hardware Installation Carefully read the manual that supports your expansion card. • Always turn off the computer and unplug the power cord from the power outlet before you begin to the...
Manual
Page 31
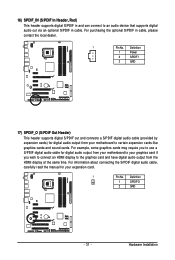
For information about connecting the S/PDIF digital audio cable, carefully read the manual for your graphics card if you to use a S/PDIF digital audio cable for digital audio output from your motherboard to your expansion card. 1 Pin No. ...
For information about connecting the S/PDIF digital audio cable, carefully read the manual for your graphics card if you to use a S/PDIF digital audio cable for digital audio output from your motherboard to your expansion card. 1 Pin No. ...

Manual
Page 34
... computer and unplug the power cord from the jumper. GA-EX38T-DQ6 Motherboard - 34 - 22) TPM (Trusted Platform Module Header) You may cause damage to the motherboard. • After system restart, go to BIOS Setup to load factory defaults (select Load Optimized Defaults) or manually configure the BIOS settings (refer to Chapter 2, "BIOS Setup...
... computer and unplug the power cord from the jumper. GA-EX38T-DQ6 Motherboard - 34 - 22) TPM (Trusted Platform Module Header) You may cause damage to the motherboard. • After system restart, go to BIOS Setup to load factory defaults (select Load Optimized Defaults) or manually configure the BIOS settings (refer to Chapter 2, "BIOS Setup...
Manual
Page 42
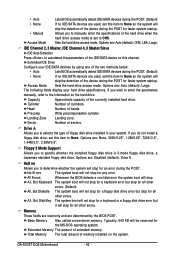
...devices are used , set this item to None so the system will skip the detection of the device during the POST for faster system startup. GA-EX38T-DQ6 Motherboard - 42 - Access Mode Sets the hard drive access mode. The following fields display your system. Number of memory installed on this item to... not stop for a keyboard error but stop for all other errors. Total Memory The total amount of heads. • Auto • None • Manual Access Mode Lets BIOS automatically detect IDE/SATA devices during the POST. (Default) If no IDE/SATA devices are used , set this item to None...
...devices are used , set this item to None so the system will skip the detection of the device during the POST for faster system startup. GA-EX38T-DQ6 Motherboard - 42 - Access Mode Sets the hard drive access mode. The following fields display your system. Number of memory installed on this item to... not stop for a keyboard error but stop for all other errors. Total Memory The total amount of heads. • Auto • None • Manual Access Mode Lets BIOS automatically detect IDE/SATA devices during the POST. (Default) If no IDE/SATA devices are used , set this item to None...

Manual
Page 54
GA-EX38T-DQ6 Motherboard - 54 - If this feature. 2-9 MB Intelligent Tweaker(M.I.T.) CMOS Setup Utility-Copyright (C) 1984-2008 Award Software MB Intelligent Tweaker(M.I.T.) Robust... ******** CPU/PCIEX Clock Driving Control [800mV] CPU Clock Skew Control [Normal] (G)MCH Clock Skew Control [Normal] ******** System Voltage Optimized ******** System Voltage Control [Manual] DDR3 OverVoltage Control [Normal] PCI-E OverVoltage Control [Normal] FSB OverVoltage Control [Normal] (G)MCH OverVoltage Control [Normal] Loadline Calibration [Enabled] CPU Voltage Control [Normal...
GA-EX38T-DQ6 Motherboard - 54 - If this feature. 2-9 MB Intelligent Tweaker(M.I.T.) CMOS Setup Utility-Copyright (C) 1984-2008 Award Software MB Intelligent Tweaker(M.I.T.) Robust... ******** CPU/PCIEX Clock Driving Control [800mV] CPU Clock Skew Control [Normal] (G)MCH Clock Skew Control [Normal] ******** System Voltage Optimized ******** System Voltage Control [Manual] DDR3 OverVoltage Control [Normal] PCI-E OverVoltage Control [Normal] FSB OverVoltage Control [Normal] (G)MCH OverVoltage Control [Normal] Loadline Calibration [Enabled] CPU Voltage Control [Normal...
Manual
Page 55
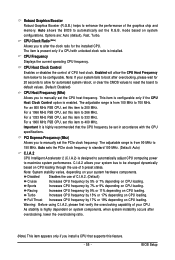
CPU Clock Ratio (Note) Allows you to manually set the R.G.B. For a 1333 MHz FSB CPU, set this item to 400 MHz. C.I .A.2) is designed to automatically adjust CPU computing power to maximize system performance. .... (Default: Auto) C.I.A.2 CPU Intelligent Accelerator 2 (C.I .A.2 allows your system fails to boot after overclocking, lower the overclocking ratio. (Note) This item appears only if you to manually set this item to 150 MHz. Note: System stability varies, depending on CPU loading through the use of C.I .A.2, please first verify the overclocking capability of...
CPU Clock Ratio (Note) Allows you to manually set the R.G.B. For a 1333 MHz FSB CPU, set this item to 400 MHz. C.I .A.2) is designed to automatically adjust CPU computing power to maximize system performance. .... (Default: Auto) C.I.A.2 CPU Intelligent Accelerator 2 (C.I .A.2 allows your system fails to boot after overclocking, lower the overclocking ratio. (Note) This item appears only if you to manually set this item to 150 MHz. Note: System stability varies, depending on CPU loading through the use of C.I .A.2, please first verify the overclocking capability of...

Manual
Page 56
... dependent on CPU FSB. GA-EX38T-DQ6 Motherboard - 56 - Performance Enhance Allows the system to memory SPD data. (Default: Auto) Memory Frequency (Mhz) The first memory frequency value is automatically adjusted according to CAS# Delay Options are : Auto (default), 1~31. Options are : Auto (default), 1~15. Options are: Auto (default), Manual. ******** Standard Timing Control ******** CAS...
... dependent on CPU FSB. GA-EX38T-DQ6 Motherboard - 56 - Performance Enhance Allows the system to memory SPD data. (Default: Auto) Memory Frequency (Mhz) The first memory frequency value is automatically adjusted according to CAS# Delay Options are : Auto (default), 1~31. Options are : Auto (default), 1~15. Options are: Auto (default), Manual. ******** Standard Timing Control ******** CAS...

Manual
Page 57
.... CPU Clock Skew Control Allows you to set the CPU clock prior to 0.775V at 0.05V increment. Manual allows all voltage control items below to be configurable. (Default: Manual) DDR3 OverVoltage Control Allows you to 1.55V at 0.025V increment. Normal Supplies the memory voltage as required....set memory voltage. Note: Increasing memory voltage may result in damage to 0.75V at 0.05V increment. (G)MCH OverVoltage Control Allows you to manually set the system voltages. BIOS Setup Normal Supplies the PCIe bus voltage as required. (Default) +0.05V ~ +1.55V Increases memory voltage by...
.... CPU Clock Skew Control Allows you to set the CPU clock prior to 0.775V at 0.05V increment. Manual allows all voltage control items below to be configurable. (Default: Manual) DDR3 OverVoltage Control Allows you to 1.55V at 0.025V increment. Normal Supplies the memory voltage as required....set memory voltage. Note: Increasing memory voltage may result in damage to 0.75V at 0.05V increment. (G)MCH OverVoltage Control Allows you to manually set the system voltages. BIOS Setup Normal Supplies the PCIe bus voltage as required. (Default) +0.05V ~ +1.55V Increases memory voltage by...
Manual
Page 63
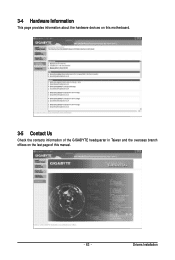
3-4 Hardware Information This page provides information about the hardware devices on this motherboard. 3-5 Contact Us Check the contacts information of the GIGABYTE headquarter in Taiwan and the overseas branch offices on the last page of this manual. - 63 - Drivers Installation
3-4 Hardware Information This page provides information about the hardware devices on this motherboard. 3-5 Contact Us Check the contacts information of the GIGABYTE headquarter in Taiwan and the overseas branch offices on the last page of this manual. - 63 - Drivers Installation
Manual
Page 70
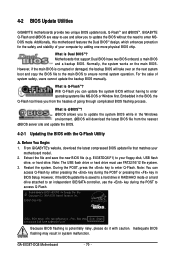
... GIGABYTE Q-Flash and @BIOS are easy-to-use and allow you to access Q-Flash. EX38TDQ6.F1) to ensure normal system operation. EX38T-DQ6 F3b... . . . . : BIOS Setup : XpressRecovery2 : Boot Menu : Qflash 02/04/2008-X38-ICH9-6A89OG0FC-00 Because BIOS flashing is Dual BIOS ? Additionally, this motherboard features the Dual BIOSTM design, which enhances protection for the safety and stability of system safety, users cannot update the backup BIOS manually...hassles of going through complicated BIOS flashing process. GA-EX38T-DQ6 Motherboard - 70 - Embedded in the Windows ...
... GIGABYTE Q-Flash and @BIOS are easy-to-use and allow you to access Q-Flash. EX38TDQ6.F1) to ensure normal system operation. EX38T-DQ6 F3b... . . . . : BIOS Setup : XpressRecovery2 : Boot Menu : Qflash 02/04/2008-X38-ICH9-6A89OG0FC-00 Because BIOS flashing is Dual BIOS ? Additionally, this motherboard features the Dual BIOSTM design, which enhances protection for the safety and stability of system safety, users cannot update the backup BIOS manually...hassles of going through complicated BIOS flashing process. GA-EX38T-DQ6 Motherboard - 70 - Embedded in the Windows ...
Manual
Page 74
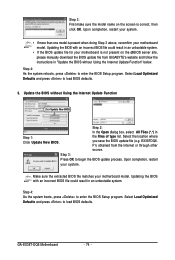
EX38TDQ6. F1) obtained from GIGABYTE's website and follow the instructions in "Update the BIOS without ...If the BIOS update file for your motherboard model. Select Load Optimized Defaults and press to enter the BIOS Setup program. GA-EX38T-DQ6 Motherboard - 74 - Upon completion, restart your motherboard model. Step 4: As the system boots, press to load BIOS... make sure the model name on the screen is not present on the @BIOS server site, please manually download the BIOS update file from the Internet or through other source. Updating the BIOS with an incorrect...
EX38TDQ6. F1) obtained from GIGABYTE's website and follow the instructions in "Update the BIOS without ...If the BIOS update file for your motherboard model. Select Load Optimized Defaults and press to enter the BIOS Setup program. GA-EX38T-DQ6 Motherboard - 74 - Upon completion, restart your motherboard model. Step 4: As the system boots, press to load BIOS... make sure the model name on the screen is not present on the @BIOS server site, please manually download the BIOS update file from the Internet or through other source. Updating the BIOS with an incorrect...

Manual
Page 92
... device manufacturer, or do not have prepared the SATA RAID/AHCI driver diskette and configured the required BIOS settings, you need to manually specify an adapter. Windows Setup Press F6 if you do not want to specify additional mass storage devices for use with Windows, ...(s). Windows Setup Setup could not determine the type of Windows XP and Vista installation. S=Specify Additional Device ENTER=Continue F3=Exit Figure 2 GA-EX38T-DQ6 Motherboard - 92 - 5-1-4 Installing the SATA RAID/AHCI Driver and Operating System Now that below appears, insert the floppy disk containing the ...
... device manufacturer, or do not have prepared the SATA RAID/AHCI driver diskette and configured the required BIOS settings, you need to manually specify an adapter. Windows Setup Press F6 if you do not want to specify additional mass storage devices for use with Windows, ...(s). Windows Setup Setup could not determine the type of Windows XP and Vista installation. S=Specify Additional Device ENTER=Continue F3=Exit Figure 2 GA-EX38T-DQ6 Motherboard - 92 - 5-1-4 Installing the SATA RAID/AHCI Driver and Operating System Now that below appears, insert the floppy disk containing the ...

Manual
Page 100
... back panel audio connectors active simultaneously. Doubleclick the icon to the right shows the default audio jack assignments. GA-EX38T-DQ6 Motherboard - 100 - HD Audio features multistreaming capabilities that allow multiple audio streams (in jack and manually configure the jack for multi-channel speaker configurations. • 2-channel audio: Headphone or Line out. • 4-channel...
... back panel audio connectors active simultaneously. Doubleclick the icon to the right shows the default audio jack assignments. GA-EX38T-DQ6 Motherboard - 100 - HD Audio features multistreaming capabilities that allow multiple audio streams (in jack and manually configure the jack for multi-channel speaker configurations. • 2-channel audio: Headphone or Line out. • 4-channel...

Manual
Page 113
...about where you can responsibly recycle or reuse most major worldwide safety requirements. Waste Electrical & Electronic Equipment (WEEE) Directive Statement GIGABYTE will be taken to add and safe from the 2002/96/EC WEEE (Waste Electrical and Electronic Equipment) directive. WEEE Symbol ...at the Customer Care number listed in your effort. - 113 - Appendix The separate collection and recycling of your product's user's manual and we at the time of Certain Hazardous Substances in Electrical and Electronic Equipment) and WEEE (Waste Electrical and Electronic Equipment) ...
...about where you can responsibly recycle or reuse most major worldwide safety requirements. Waste Electrical & Electronic Equipment (WEEE) Directive Statement GIGABYTE will be taken to add and safe from the 2002/96/EC WEEE (Waste Electrical and Electronic Equipment) directive. WEEE Symbol ...at the Customer Care number listed in your effort. - 113 - Appendix The separate collection and recycling of your product's user's manual and we at the time of Certain Hazardous Substances in Electrical and Electronic Equipment) and WEEE (Waste Electrical and Electronic Equipment) ...


