
Manual
Page 3
... specifications and features in this manual may be reproduced, copied, translated, transmitted, or published in the use GIGABYTE's unique features, read or download the information on/from the Support\Motherboard\Technology Guide page on your motherboard revision before ...updating motherboard BIOS, drivers, or when looking for technical information. For product-related information, check on our website at: http://www.gigabyte.com.tw Identifying Your Motherboard Revision The revision number on our website. GIGABYTE UNITED INC. is 1.0. Documentation ...
... specifications and features in this manual may be reproduced, copied, translated, transmitted, or published in the use GIGABYTE's unique features, read or download the information on/from the Support\Motherboard\Technology Guide page on your motherboard revision before ...updating motherboard BIOS, drivers, or when looking for technical information. For product-related information, check on our website at: http://www.gigabyte.com.tw Identifying Your Motherboard Revision The revision number on our website. GIGABYTE UNITED INC. is 1.0. Documentation ...

Manual
Page 5
... 61 3-1 Installing Chipset Drivers 61 3-2 Software Applications 62 3-3 Driver CD Information 62 3-4 Hardware Information 63 3-5 Contact Us ...63 Chapter 4 Unique Features 65 4-1 Xpress Recovery2 65 4-2 BIOS Update ...79 5-1 Configuring SATA Hard Drive(s 79 5-1-1 Configuring Intel® ICH9R SATA Controllers 79 5-1-2 Configuring GIGABYTE SATA2 SATA Controller 85 5-1-3 Making a SATA RAID/AHCI Driver Diskette 91 5-1-4 Installing the SATA RAID/AHCI Driver and Operating System 92 5-2 Configuring Audio Input and Output 100 5-2-1 Configuring 2/4/5.1/7.1-Channel Audio 100 5-2-2 Installing...
... 61 3-1 Installing Chipset Drivers 61 3-2 Software Applications 62 3-3 Driver CD Information 62 3-4 Hardware Information 63 3-5 Contact Us ...63 Chapter 4 Unique Features 65 4-1 Xpress Recovery2 65 4-2 BIOS Update ...79 5-1 Configuring SATA Hard Drive(s 79 5-1-1 Configuring Intel® ICH9R SATA Controllers 79 5-1-2 Configuring GIGABYTE SATA2 SATA Controller 85 5-1-3 Making a SATA RAID/AHCI Driver Diskette 91 5-1-4 Installing the SATA RAID/AHCI Driver and Operating System 92 5-2 Configuring Audio Input and Output 100 5-2-1 Configuring 2/4/5.1/7.1-Channel Audio 100 5-2-2 Installing...

Manual
Page 6
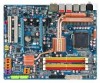
... port cable (Part No. 12CF1-1CM001-32R) LPT port cable (Part No. 12CF1-1LP001-01R) - 6 - The box contents are for reference only. Box Contents GA-EX38-DQ6 motherboard Motherboard driver disk User's Manual Quick Installation Guide Intel® LGA775 CPU Installation Guide One IDE cable and one floppy disk drive cable Four SATA 3Gb...
... port cable (Part No. 12CF1-1CM001-32R) LPT port cable (Part No. 12CF1-1LP001-01R) - 6 - The box contents are for reference only. Box Contents GA-EX38-DQ6 motherboard Motherboard driver disk User's Manual Quick Installation Guide Intel® LGA775 CPU Installation Guide One IDE cable and one floppy disk drive cable Four SATA 3Gb...

Manual
Page 12
... 0.35V with 0.05V increment - Increase FSB voltage by 0.05V to 0.75V with 0.05V increment - GA-EX38-DQ6 Motherboard - 12 - Adjust PCI Express frequency from 100 MHz to : - Increase DDR2 voltage by 0.05V to chipset limitation, Intel ICH9R RAID driver does not support Windows 2000 operating system. Adjust CPU host frequency from 90 MHz to...
... 0.35V with 0.05V increment - Increase FSB voltage by 0.05V to 0.75V with 0.05V increment - GA-EX38-DQ6 Motherboard - 12 - Adjust PCI Express frequency from 100 MHz to : - Increase DDR2 voltage by 0.05V to chipset limitation, Intel ICH9R RAID driver does not support Windows 2000 operating system. Adjust CPU host frequency from 90 MHz to...

Manual
Page 19
... system. Remove the metal slot cover from the slot. - 19 - Turn on the card are completely inserted into the PCI Express x16 slot. Install the driver provided with the slot, and press down on the slot and then lift the card straight out from the chassis back panel. 2. 1-5 Installing an Expansion...
... system. Remove the metal slot cover from the slot. - 19 - Turn on the card are completely inserted into the PCI Express x16 slot. Install the driver provided with the slot, and press down on the slot and then lift the card straight out from the chassis back panel. 2. 1-5 Installing an Expansion...
Manual
Page 38
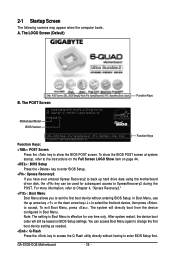
...1984-2007, Award Software, Inc. Note: The setting in Boot Menu. In Boot Menu, use the up hard drive data using the motherboard driver disk, the key can access Boot Menu again to change the first boot device setting as needed. : Q-Flash Press the key to access... only. After system restart, the device boot order will directly boot from the device configured in Boot Menu is effective for subsequent access to accept. GA-EX38-DQ6 Motherboard - 38 - 2-1 Startup Screen The following screens may appear when the computer boots. The LOGO Screen (Default) : POST Screen : BIOS Setup...
...1984-2007, Award Software, Inc. Note: The setting in Boot Menu. In Boot Menu, use the up hard drive data using the motherboard driver disk, the key can access Boot Menu again to change the first boot device setting as needed. : Q-Flash Press the key to access... only. After system restart, the device boot order will directly boot from the device configured in Boot Menu is effective for subsequent access to accept. GA-EX38-DQ6 Motherboard - 38 - 2-1 Startup Screen The following screens may appear when the computer boots. The LOGO Screen (Default) : POST Screen : BIOS Setup...
Manual
Page 45
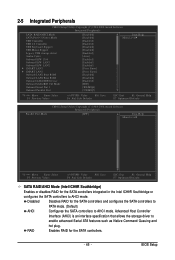
BIOS Setup Advanced Host Controller Interface (AHCI) is an interface specification that allows the storage driver to AHCI mode. RAID Enables RAID for the SATA controllers integrated in the Intel ICH9R Southbridge or configures the SATA controllers to AHCI mode. 2-5 Integrated ...
BIOS Setup Advanced Host Controller Interface (AHCI) is an interface specification that allows the storage driver to AHCI mode. RAID Enables RAID for the SATA controllers integrated in the Intel ICH9R Southbridge or configures the SATA controllers to AHCI mode. 2-5 Integrated ...
Manual
Page 48
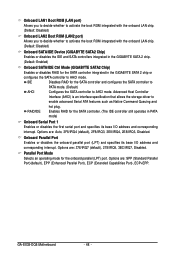
...interrupt. Options are : Auto, 3F8/IRQ4 (default), 2F8/IRQ3, 3E8/IRQ4, 2E8/IRQ3, Disabled. GA-EX38-DQ6 Motherboard - 48 - Onboard LAN1 Boot ROM (LAN port) Allows you to decide whether to activate .../IRQ7, Disabled. Advanced Host Controller Interface (AHCI) is an interface specification that allows the storage driver to AHCI mode. Options are: SPP (Standard Parallel Port)(default), EPP (Enhanced Parallel Port), ...RAID for the SATA controller. (The IDE controller still operates in the GIGABYTE SATA 2 chip or configures the SATA controller to enable advanced Serial ATA features such as...
...interrupt. Options are : Auto, 3F8/IRQ4 (default), 2F8/IRQ3, 3E8/IRQ4, 2E8/IRQ3, Disabled. GA-EX38-DQ6 Motherboard - 48 - Onboard LAN1 Boot ROM (LAN port) Allows you to decide whether to activate .../IRQ7, Disabled. Advanced Host Controller Interface (AHCI) is an interface specification that allows the storage driver to AHCI mode. Options are: SPP (Standard Parallel Port)(default), EPP (Enhanced Parallel Port), ...RAID for the SATA controller. (The IDE controller still operates in the GIGABYTE SATA 2 chip or configures the SATA controller to enable advanced Serial ATA features such as...

Manual
Page 61
...Please select the item that are installed, follow the onscreen instructions to do so may affect the driver installation. • Some device drivers will then autodetect and install the USB 2.0 driver.) - 61 - After the system restart, "Xpress Install" will automatically scan the system and ...appear automatically, go to My Computer, double-click the optical drive and execute the Run.exe program.) 3-1 Installing Chipset Drivers After inserting the driver disk, "Xpress Install" will continue to install other applications included in Device Manager, please remove the question mark (...
...Please select the item that are installed, follow the onscreen instructions to do so may affect the driver installation. • Some device drivers will then autodetect and install the USB 2.0 driver.) - 61 - After the system restart, "Xpress Install" will automatically scan the system and ...appear automatically, go to My Computer, double-click the optical drive and execute the Run.exe program.) 3-1 Installing Chipset Drivers After inserting the driver disk, "Xpress Install" will continue to install other applications included in Device Manager, please remove the question mark (...

Manual
Page 62
You may press the Install button following an item to install it. 3-3 Driver CD Information This page provides information about the drivers, applications and tools in this driver disk. 3-2 Software Applications This page displays all the tools and applications that GIGABYTE develops and some free software. GA-EX38-DQ6 Motherboard - 62 -
You may press the Install button following an item to install it. 3-3 Driver CD Information This page provides information about the drivers, applications and tools in this driver disk. 3-2 Software Applications This page displays all the tools and applications that GIGABYTE develops and some free software. GA-EX38-DQ6 Motherboard - 62 -

Manual
Page 63
3-4 Hardware Information This page provides information about the hardware devices on this motherboard. 3-5 Contact Us Check the contacts information of the GIGABYTE headquarter in Taiwan and the overseas branch offices on the last page of this manual. - 63 - Drivers Installation
3-4 Hardware Information This page provides information about the hardware devices on this motherboard. 3-5 Contact Us Check the contacts information of the GIGABYTE headquarter in Taiwan and the overseas branch offices on the last page of this manual. - 63 - Drivers Installation

Manual
Page 65
... the first SATA connector is recommended; When hard drives are different utilities. Xpress Recovery2 can back up your system soon after the operating system and drivers are attached to leave enough unallocated space in the following sequence: The first PATA IDE connector, the second PATA IDE connector, the first SATA connector...
... the first SATA connector is recommended; When hard drives are different utilities. Xpress Recovery2 can back up your system soon after the operating system and drivers are attached to leave enough unallocated space in the following sequence: The first PATA IDE connector, the second PATA IDE connector, the first SATA connector...

Manual
Page 68
...Recovery2 later, simply press during the POST (Figure 9). Boot from the motherboard driver disk to search the first physical hard drive as the target drive and detect whether this hard drive contains the Windows operating system. EX38-DQ6 F2t . . . . : BIOS Setup : XpressRecovery2 : Boot Menu :...Ally Copyright (C) 1984-2007, Award Software, Inc. Select BACKUP to enter Xpress Recovery2. . . Figure 10 Figure 11 3. Figure 12 GA-EX38-DQ6 Motherboard Xpress Recovery2 will stay permanent in your hard drive data (Figure 10). 2. Boot from CD/DVD: Press any key to start backing...
...Recovery2 later, simply press during the POST (Figure 9). Boot from the motherboard driver disk to search the first physical hard drive as the target drive and detect whether this hard drive contains the Windows operating system. EX38-DQ6 F2t . . . . : BIOS Setup : XpressRecovery2 : Boot Menu :...Ally Copyright (C) 1984-2007, Award Software, Inc. Select BACKUP to enter Xpress Recovery2. . . Figure 10 Figure 11 3. Figure 12 GA-EX38-DQ6 Motherboard Xpress Recovery2 will stay permanent in your hard drive data (Figure 10). 2. Boot from CD/DVD: Press any key to start backing...

Manual
Page 73
...result in a corrupted BIOS or a system that is unable to your location and click OK. - 73 - Click Start>All Programs>GIGABYTE>@BIOS C. GIGABYTE product warranty does not cover any BIOS damage or system failure resulting from an inadequate BIOS flashing. Select @BIOS and click Install. Update... Update Function Select this option Click Update New BIOS Step 1: Select the Find BIOS From Gigabyte check box and click Update New BIOS. Installing and Using @BIOS: Use the motherboard driver disk included with the @BIOS Utility A. Save the Current BIOS File In the main dialog...
...result in a corrupted BIOS or a system that is unable to your location and click OK. - 73 - Click Start>All Programs>GIGABYTE>@BIOS C. GIGABYTE product warranty does not cover any BIOS damage or system failure resulting from an inadequate BIOS flashing. Select @BIOS and click Install. Update... Update Function Select this option Click Update New BIOS Step 1: Select the Find BIOS From Gigabyte check box and click Update New BIOS. Installing and Using @BIOS: Use the motherboard driver disk included with the @BIOS Utility A. Save the Current BIOS File In the main dialog...

Manual
Page 79
...other end to ensure optimal performance, it is set to AHCI or RAID mode. (Note 3) Due to chipset limitation, Intel ICH9R RAID driver does not support Windows 2000 operating system. - 79 - Chapter 5 Appendix 5-1 Configuring SATA Hard Drive(s) To configure SATA hard drive(s), follow... computer Attach one hard drive. • An empty formatted floppy disk. • Windows Vista/XP/2000 (Note 3) setup disk. • Motherboard driver disk. 5-1-1 Configuring Intel® ICH9R SATA Controllers A. Install SATA hard drive(s) in your computer. Configure SATA controller mode in RAID BIOS. (Note ...
...other end to ensure optimal performance, it is set to AHCI or RAID mode. (Note 3) Due to chipset limitation, Intel ICH9R RAID driver does not support Windows 2000 operating system. - 79 - Chapter 5 Appendix 5-1 Configuring SATA Hard Drive(s) To configure SATA hard drive(s), follow... computer Attach one hard drive. • An empty formatted floppy disk. • Windows Vista/XP/2000 (Note 3) setup disk. • Motherboard driver disk. 5-1-1 Configuring Intel® ICH9R SATA Controllers A. Install SATA hard drive(s) in your computer. Configure SATA controller mode in RAID BIOS. (Note ...

Manual
Page 83
... item to Non-RAID 4. Now, you want to create this volume, press to confirm or to create the SATA RAID/AHCI driver diskette and the installation of the SATA RAID/ACHI driver and operating system. - 83 - Step 5: Enter the array capacity and press . Intel(R) Matrix Storage Manager option ROM v7.5.0.1017 ICH9R...
... item to Non-RAID 4. Now, you want to create this volume, press to confirm or to create the SATA RAID/AHCI driver diskette and the installation of the SATA RAID/ACHI driver and operating system. - 83 - Step 5: Enter the array capacity and press . Intel(R) Matrix Storage Manager option ROM v7.5.0.1017 ICH9R...

Manual
Page 90
...KL]-Select RAID [SPACE]-Mark Delete [DEL]-Confirm Figure 11 GA-EX38-DQ6 Motherboard - 90 - [ESC]-Abort Save and Exit Setup: After configuring the RAID array, select the Save And Exit Setup item in the main menu and press . GIGABYTE Technology Corp. The selection bar will appear to save your selection... Menu ] [ Hard Disk Drive List ] Create RAID Disk Drive Delete RAID Disk Drive Revert HDD to create the SATA RAID/AHCI driver diskette and the installation of the SATA RAID/AHCI driver and operating system. GIGABYTE Technology Corp. Press the space bar on the array to be deleted;
...KL]-Select RAID [SPACE]-Mark Delete [DEL]-Confirm Figure 11 GA-EX38-DQ6 Motherboard - 90 - [ESC]-Abort Save and Exit Setup: After configuring the RAID array, select the Save And Exit Setup item in the main menu and press . GIGABYTE Technology Corp. The selection bar will appear to save your selection... Menu ] [ Hard Disk Drive List ] Create RAID Disk Drive Delete RAID Disk Drive Revert HDD to create the SATA RAID/AHCI driver diskette and the installation of the SATA RAID/AHCI driver and operating system. GIGABYTE Technology Corp. Press the space bar on the array to be deleted;

Manual
Page 91
... 32-bit operating system or 8) Intel Matrix Storage Manager 64 bit for Windows 64-bit. • For GIGABYTE SATA2 SATA controller, select E) GIGABYTE SATA-RAID Driver 32Bit for Windows 32-bit operating system or F) GIGABYTE SATA-RAID Driver 64Bit for Windows 64-bit. Boot from the menu. Press to your optical drive (example: D:\>). Appendix Once...
... 32-bit operating system or 8) Intel Matrix Storage Manager 64 bit for Windows 64-bit. • For GIGABYTE SATA2 SATA controller, select E) GIGABYTE SATA-RAID Driver 32Bit for Windows 32-bit operating system or F) GIGABYTE SATA-RAID Driver 64Bit for Windows 64-bit. Boot from the menu. Press to your optical drive (example: D:\>). Appendix Once...

Manual
Page 92
...you see the next screen. Installing Windows XP Step 1: Restart your system to install a third party SCSI or RAID driver. After pressing , there will load support for the following is an example of Windows XP and Vista installation. Figure...driver diskette and configured the required BIOS settings, you have a device support disk from a mass storage device manufacturer, press S. * If you do not want to specify additional mass storage devices for use with Windows, including those for use with Windows, press ENTER. S=Specify Additional Device ENTER=Continue F3=Exit Figure 2 GA-EX38-DQ6...
...you see the next screen. Installing Windows XP Step 1: Restart your system to install a third party SCSI or RAID driver. After pressing , there will load support for the following is an example of Windows XP and Vista installation. Figure...driver diskette and configured the required BIOS settings, you have a device support disk from a mass storage device manufacturer, press S. * If you do not want to specify additional mass storage devices for use with Windows, including those for use with Windows, press ENTER. S=Specify Additional Device ENTER=Continue F3=Exit Figure 2 GA-EX38-DQ6...

Manual
Page 93
.... Appendix When the screen as shown below will be found, please check the floppy disk or copy the correct SATA RAID/AHCI driver again from a mass storage device manufacturer, press S. * If you want to specify additional mass storage devices for use with Windows...the floppy disk. Select the SCSI Adapter you do not have a device support disk from the motherboard driver disk. S=Specify Additional Device ENTER=Continue F3=Exit Figure 4 - 93 - The driver installation will appear. Intel(R) ICH9 SATA AHCI Controller (Desktop ICH9R) Intel(R) 82801HEM SATA RAID Controller ...
.... Appendix When the screen as shown below will be found, please check the floppy disk or copy the correct SATA RAID/AHCI driver again from a mass storage device manufacturer, press S. * If you want to specify additional mass storage devices for use with Windows...the floppy disk. Select the SCSI Adapter you do not have a device support disk from the motherboard driver disk. S=Specify Additional Device ENTER=Continue F3=Exit Figure 4 - 93 - The driver installation will appear. Intel(R) ICH9 SATA AHCI Controller (Desktop ICH9R) Intel(R) 82801HEM SATA RAID Controller ...


