
Manual
Page 4
... Contents Box Contents ...6 OptionalItems ...6 GA-EQ45M-S2 Motherboard Layout 7 Block Diagram ...8 Chapter 1 Hardware Installation 9 1-1 Installation Precautions 9 1-2 Product Specifications 10 1-3 Installing the CPU and CPU Cooler 13 1-3-1 Installing the CPU 13 1-3-2 Installing the CPU Cooler 15 1-4 Installing the Memory 16 1-4-1 Dual Channel Memory Configuration 16 1-4-2 Installing a Memory 17 1-5 Installing an Expansion Card 18 1-6 Back Panel Connectors 19 1-7 Internal Connectors 21 Chapter 2 BIOS Setup 33 2-1 Startup Screen 34 2-2 The Main Menu 35 2-3 MB Intelligent Tweaker...
... Contents Box Contents ...6 OptionalItems ...6 GA-EQ45M-S2 Motherboard Layout 7 Block Diagram ...8 Chapter 1 Hardware Installation 9 1-1 Installation Precautions 9 1-2 Product Specifications 10 1-3 Installing the CPU and CPU Cooler 13 1-3-1 Installing the CPU 13 1-3-2 Installing the CPU Cooler 15 1-4 Installing the Memory 16 1-4-1 Dual Channel Memory Configuration 16 1-4-2 Installing a Memory 17 1-5 Installing an Expansion Card 18 1-6 Back Panel Connectors 19 1-7 Internal Connectors 21 Chapter 2 BIOS Setup 33 2-1 Startup Screen 34 2-2 The Main Menu 35 2-3 MB Intelligent Tweaker...

Manual
Page 10
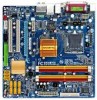
1-2 Product Specifications CPU Front Side Bus Chipset Memory Onboard Graphics Audio LAN Expansion Slots Storage Interface USB Support for CD In Intel 82567LM chip (10/100/1000 Mbit) 1 x PCI Express x16 slot, running at x16 (Note 4) 1 x PCI Express x1 slot 2 x PCI slots South Bridge: - 6 x SATA 3Gb/s connectors supporting up to the internal USB headers) GA-EQ45M-S2 Motherboard - 10 - Support for SATA RAID 0, RAID 1, RAID 5, and RAID 10 JMicron 368 chip: - 1 x IDE connector supporting ATA-133/100/66/33 and up to 2 IDE devices...
1-2 Product Specifications CPU Front Side Bus Chipset Memory Onboard Graphics Audio LAN Expansion Slots Storage Interface USB Support for CD In Intel 82567LM chip (10/100/1000 Mbit) 1 x PCI Express x16 slot, running at x16 (Note 4) 1 x PCI Express x1 slot 2 x PCI slots South Bridge: - 6 x SATA 3Gb/s connectors supporting up to the internal USB headers) GA-EQ45M-S2 Motherboard - 10 - Support for SATA RAID 0, RAID 1, RAID 5, and RAID 10 JMicron 368 chip: - 1 x IDE connector supporting ATA-133/100/66/33 and up to 2 IDE devices...

Manual
Page 16
... memory, switch the direction. 1-4-1 Dual Channel Memory Configuration This motherboard provides four DDR2 memory sockets and supports Dual Channel Technology. Enabling Dual Channel memory mode will appear during the POST. After the memory is installed. 2. The four DDR2 memory sockets are installed, a message which says memory is operating in only one DDR2 memory module is installed, the BIOS will automatically detect the specifications and capacity of the same capacity, brand, speed, and chips be used . (Go to install the memory: • Make sure that memory...
... memory, switch the direction. 1-4-1 Dual Channel Memory Configuration This motherboard provides four DDR2 memory sockets and supports Dual Channel Technology. Enabling Dual Channel memory mode will appear during the POST. After the memory is installed. 2. The four DDR2 memory sockets are installed, a message which says memory is operating in only one DDR2 memory module is installed, the BIOS will automatically detect the specifications and capacity of the same capacity, brand, speed, and chips be used . (Go to install the memory: • Make sure that memory...

Manual
Page 18
... motherboard supports the expansion card. Locate an expansion slot that came with the slot, and press down on your card. GA-EQ45M-S2 Motherboard - 18 - Install the driver provided with a screw. 5. Example: Installing and Removing a PCI Express Graphics Card: • Installing a Graphics Card: Gently push down on the slot and then lift the card straight out from the chassis back panel. 2. Make sure the metal contacts on the card are completely inserted into the PCI Express slot. After installing all expansion cards, replace...
... motherboard supports the expansion card. Locate an expansion slot that came with the slot, and press down on your card. GA-EQ45M-S2 Motherboard - 18 - Install the driver provided with a screw. 5. Example: Installing and Removing a PCI Express Graphics Card: • Installing a Graphics Card: Gently push down on the slot and then lift the card straight out from the chassis back panel. 2. Make sure the metal contacts on the card are completely inserted into the PCI Express slot. After installing all expansion cards, replace...

Manual
Page 22
... GND (Only for 2x4 pin 12V) 7 +12V 8 +12V ATX: 12 24 Pin No. Definition Pin No. If the 12V power connector is not connected, the computer will not start. • Use of the power connector, the power supply can lead to all devices are compatible with power supplies with 2x2 12V and 2x10 power connectors. The 12V power connector mainly supplies power to the power connector in the correct orientation. Connect the power supply cable to the CPU. Definition 1 3.3V 13...
... GND (Only for 2x4 pin 12V) 7 +12V 8 +12V ATX: 12 24 Pin No. Definition Pin No. If the 12V power connector is not connected, the computer will not start. • Use of the power connector, the power supply can lead to all devices are compatible with power supplies with 2x2 12V and 2x10 power connectors. The 12V power connector mainly supplies power to the power connector in the correct orientation. Connect the power supply cable to the CPU. Definition 1 3.3V 13...

Manual
Page 31
... Enabling Intel Management Engine) Use this jumper to factory defaults. date information and BIOS configurations) and reset the CMOS values to clear the CMOS values (e.g. To clear the CMOS values, place a jumper cap on your computer and unplug the power cord from the jumper. Hardware Installation Failure to do so may cause damage to the motherboard. • After system restart, go to BIOS Setup to load factory defaults (select Load Optimized Defaults) or manually configure the BIOS settings...
... Enabling Intel Management Engine) Use this jumper to factory defaults. date information and BIOS configurations) and reset the CMOS values to clear the CMOS values (e.g. To clear the CMOS values, place a jumper cap on your computer and unplug the power cord from the jumper. Hardware Installation Failure to do so may cause damage to the motherboard. • After system restart, go to BIOS Setup to load factory defaults (select Load Optimized Defaults) or manually configure the BIOS settings...
Manual
Page 33
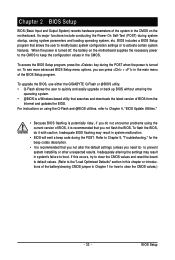
... the default settings (unless you not flash the BIOS. Refer to Chapter 5, "Troubleshooting," for how to quickly and easily upgrade or back up BIOS without entering the operating system. • @BIOS is turned off, the battery on the motherboard. Inadequately altering the settings may result in system malfunction. • BIOS will emit a beep code during the POST. To upgrade the BIOS, use either the GIGABYTE Q-Flash or @BIOS utility. • Q-Flash allows the user to clear the CMOS...
... the default settings (unless you not flash the BIOS. Refer to Chapter 5, "Troubleshooting," for how to quickly and easily upgrade or back up BIOS without entering the operating system. • @BIOS is turned off, the battery on the motherboard. Inadequately altering the settings may result in system malfunction. • BIOS will emit a beep code during the POST. To upgrade the BIOS, use either the GIGABYTE Q-Flash or @BIOS utility. • Q-Flash allows the user to clear the CMOS...
Manual
Page 36
..., hard drive types, floppy disk drive types, and the type of errors that stop the system boot, etc. Advanced BIOS Features Use this menu to configure the device boot order, advanced features available on the CPU, and the primary display adapter. Advanced Chipset Features Use this menu to configure advanced features available on the chipset. Integrated Peripherals Use this menu to configure all peripheral devices, such as IDE, SATA, USB, integrated audio, and integrated LAN, etc. Power Management Setup Use this menu...
..., hard drive types, floppy disk drive types, and the type of errors that stop the system boot, etc. Advanced BIOS Features Use this menu to configure the device boot order, advanced features available on the CPU, and the primary display adapter. Advanced Chipset Features Use this menu to configure advanced features available on the chipset. Integrated Peripherals Use this menu to configure all peripheral devices, such as IDE, SATA, USB, integrated audio, and integrated LAN, etc. Power Management Setup Use this menu...

Manual
Page 37
... supports this occurs, clear the CMOS values and reset the board to default values.) Robust Graphics Booster Robust Graphics Booster (R.G.B.) helps to boot. Auto allows the BIOS to CPU, chipset, or memory and reduce the useful life of the graphics chip and memory. Options are: Auto (default), Fast, Turbo. CPU Clock Ratio (Note) Allows you to increase the CPU clock ratio set in damage to automatically set the R.G.B. CPU Frequency Displays the current operating CPU frequency. ******** Clock Chip Control ******** Spread Spectrum Enables or disables the Spread Spectrum technology...
... supports this occurs, clear the CMOS values and reset the board to default values.) Robust Graphics Booster Robust Graphics Booster (R.G.B.) helps to boot. Auto allows the BIOS to CPU, chipset, or memory and reduce the useful life of the graphics chip and memory. Options are: Auto (default), Fast, Turbo. CPU Clock Ratio (Note) Allows you to increase the CPU clock ratio set in damage to automatically set the R.G.B. CPU Frequency Displays the current operating CPU frequency. ******** Clock Chip Control ******** Spread Spectrum Enables or disables the Spread Spectrum technology...

Manual
Page 41
... of floppy disk drive installed in your hard drive specifications. Allows you to CHS. Access Mode Sets the hard drive access mode. All Errors All, But Keyboard All, But Diskette Whenever the BIOS detects a non-fatal error the system boot will stop for any error. Options are : Disabled (default), Drive A. Sector Number of cylinders. Drive A Allows you to manually enter the specifications of extended memory. • Auto • None • Manual Access Mode Lets BIOS automatically detect IDE/SATA devices during the POST. (Default) If no IDE/SATA devices are used , set...
... of floppy disk drive installed in your hard drive specifications. Allows you to CHS. Access Mode Sets the hard drive access mode. All Errors All, But Keyboard All, But Diskette Whenever the BIOS detects a non-fatal error the system boot will stop for any error. Options are : Disabled (default), Drive A. Sector Number of cylinders. Drive A Allows you to manually enter the specifications of extended memory. • Auto • None • Manual Access Mode Lets BIOS automatically detect IDE/SATA devices during the POST. (Default) If no IDE/SATA devices are used , set...

Manual
Page 42
... the list. Options are: Floppy, LS120, Hard Disk, CDROM, ZIP, USB-FDD, USB-ZIP, USB-CDROM, USB-HDD, Legacy LAN, Disabled. After configuring this feature. Password Check Specifies whether a password is required every time the system boots, or only when you install a CPU that supports this item, set the password(s) under the Set Supervisor/User Password item in the BIOS Main Menu. Capability Enables or disables the S.M.A.R.T. (Self Monitoring and Reporting Technology) capability of your system to report read/write errors of the hard drive...
... the list. Options are: Floppy, LS120, Hard Disk, CDROM, ZIP, USB-FDD, USB-ZIP, USB-CDROM, USB-HDD, Legacy LAN, Disabled. After configuring this feature. Password Check Specifies whether a password is required every time the system boots, or only when you install a CPU that supports this item, set the password(s) under the Set Supervisor/User Password item in the BIOS Main Menu. Capability Enables or disables the S.M.A.R.T. (Self Monitoring and Reporting Technology) capability of your system to report read/write errors of the hard drive...
Manual
Page 45
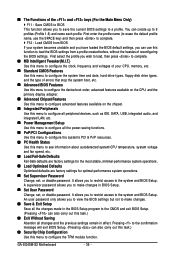
... onboard graphics controller. If you wish to set up a dual view configuration, set to Always Enable. Frame buffer size is the total amount of the monitor display from the installed PCI graphics card, PCI Express graphics card or the onboard VGA. BIOS Setup On-Chip Frame Buffer Size This item is configurable only if the PAVP Mode option is installed. Enable If No Ext PEG Activates the onboard VGA only if no PCI Express VGA card is installed. (Default) Always Enable Always activates the onboard VGA, whether or not a PCI Express card is set this memory...
... onboard graphics controller. If you wish to set up a dual view configuration, set to Always Enable. Frame buffer size is the total amount of the monitor display from the installed PCI graphics card, PCI Express graphics card or the onboard VGA. BIOS Setup On-Chip Frame Buffer Size This item is configurable only if the PAVP Mode option is installed. Enable If No Ext PEG Activates the onboard VGA only if no PCI Express VGA card is installed. (Default) Always Enable Always activates the onboard VGA, whether or not a PCI Express card is set this memory...
Manual
Page 47
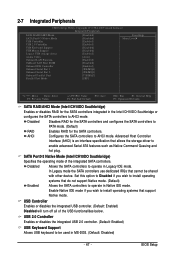
... Command Queuing and hot plug. BIOS Setup 2-7 Integrated Peripherals CMOS Setup Utility-Copyright (C) 1984-2009 Award Software Integrated Peripherals SATA RAID/AHCI Mode SATA Port0-3 Native Mode USB Controller USB 2.0 Controller USB Keyboard Support USB Mouse Support Legacy USB storage detect Azalia Codec Onboard LAN Function OnBoard LAN Boot ROM Onboard IDE Controller Onboard Serial Port 1 Onboard Serial Port 2 Onboard Parallel Port Parallel Port Mode [Disabled] [Disabled] [Enabled] [Enabled] [Disabled] [Disabled] [Enabled] [Auto] [Enabled] [Disabled] [Enabled] [3F8/IRQ4] [2F8/IRQ3...
... Command Queuing and hot plug. BIOS Setup 2-7 Integrated Peripherals CMOS Setup Utility-Copyright (C) 1984-2009 Award Software Integrated Peripherals SATA RAID/AHCI Mode SATA Port0-3 Native Mode USB Controller USB 2.0 Controller USB Keyboard Support USB Mouse Support Legacy USB storage detect Azalia Codec Onboard LAN Function OnBoard LAN Boot ROM Onboard IDE Controller Onboard Serial Port 1 Onboard Serial Port 2 Onboard Parallel Port Parallel Port Mode [Disabled] [Disabled] [Enabled] [Enabled] [Disabled] [Disabled] [Enabled] [Auto] [Enabled] [Disabled] [Enabled] [3F8/IRQ4] [2F8/IRQ3...

Manual
Page 48
... Port Mode Selects an operating mode for the onboard parallel (LPT) port. GA-EQ45M-S2 Motherboard - 48 - Options are : Auto, 3F8/IRQ4, 2F8/IRQ3 (default), 3E8/IRQ4, 2E8/IRQ3, Disabled. USB Mouse Support Allows USB mouse to be used in MS-DOS. (Default: Disabled) Legacy USB storage detect Determines whether to detect USB storage devices, including USB flash drives and USB hard drives during the POST. (Default: Enabled) Azalia Codec Enables or disables the onboard audio function. (Default: Auto) If you wish to install a 3rd party add-in audio card instead of using the onboard audio...
... Port Mode Selects an operating mode for the onboard parallel (LPT) port. GA-EQ45M-S2 Motherboard - 48 - Options are : Auto, 3F8/IRQ4, 2F8/IRQ3 (default), 3E8/IRQ4, 2E8/IRQ3, Disabled. USB Mouse Support Allows USB mouse to be used in MS-DOS. (Default: Disabled) Legacy USB storage detect Determines whether to detect USB storage devices, including USB flash drives and USB hard drives during the POST. (Default: Enabled) Azalia Codec Enables or disables the onboard audio function. (Default: Auto) If you wish to install a 3rd party add-in audio card instead of using the onboard audio...
Manual
Page 49
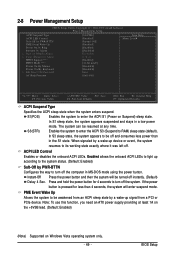
... status. (Default: Enabled) Soft-Off by PWR-BTTN Configures the way to turn off the system. S1(POS) Enables the system to RAM) sleep state (default). ACPI LED Control Enables or disables the onboard ACPI LEDs. If the power button is pressed for 4 seconds to be awakened from a PCI or PCIe device. BIOS Setup Instant-Off Press the power button and then the system will enter suspend mode. Note: To use this function, you need an ATX power supply providing at...
... status. (Default: Enabled) Soft-Off by PWR-BTTN Configures the way to turn off the system. S1(POS) Enables the system to RAM) sleep state (default). ACPI LED Control Enables or disables the onboard ACPI LEDs. If the power button is pressed for 4 seconds to be awakened from a PCI or PCIe device. BIOS Setup Instant-Off Press the power button and then the system will enter suspend mode. Note: To use this function, you need an ATX power supply providing at...

Manual
Page 67
... arrow key to select Update BIOS from Drive and press . • The Save Main BIOS to Drive option allows you to save the BIOS file to a floppy disk. When the message "Are you save the current BIOS file. • Q-Flash only supports USB flash drive or hard drives using FAT32/16/12 file system. • If the BIOS update file is saved to a hard drive in RAID/AHCI mode or a hard drive attached to an independent IDE/SATA controller, use the key during the POST to update BIOS?" The monitor will display the update...
... arrow key to select Update BIOS from Drive and press . • The Save Main BIOS to Drive option allows you to save the BIOS file to a floppy disk. When the message "Are you save the current BIOS file. • Q-Flash only supports USB flash drive or hard drives using FAT32/16/12 file system. • If the BIOS update file is saved to a hard drive in RAID/AHCI mode or a hard drive attached to an independent IDE/SATA controller, use the key during the POST to update BIOS?" The monitor will display the update...

Manual
Page 76
B. CMOS Setup Utility-Copyright (C) 1984-2009 Award Software Integrated Peripherals SATA RAID/AHCI Mode SATA Port0-3 Native Mode USB Controller USB 2.0 Controller USB Keyboard Support USB Mouse Support Legacy USB storage detect Azalia Codec Onboard LAN Function OnBoard LAN Boot ROM Onboard IDE Controller Onboard Serial Port 1 Onboard Serial Port 2 Onboard Parallel Port Parallel Port Mode [RAID] [Disabled] [Enabled] [Enabled] [Disabled] [Disabled] [Enabled] [Auto] [Enabled] [Disabled] [Enabled] [3F8/IRQ4] [2F8/IRQ3] [378/IRQ7] [SPP] Item Help Menu Level Move Enter: Select F5: ...
B. CMOS Setup Utility-Copyright (C) 1984-2009 Award Software Integrated Peripherals SATA RAID/AHCI Mode SATA Port0-3 Native Mode USB Controller USB 2.0 Controller USB Keyboard Support USB Mouse Support Legacy USB storage detect Azalia Codec Onboard LAN Function OnBoard LAN Boot ROM Onboard IDE Controller Onboard Serial Port 1 Onboard Serial Port 2 Onboard Parallel Port Parallel Port Mode [RAID] [Disabled] [Enabled] [Enabled] [Disabled] [Disabled] [Enabled] [Auto] [Enabled] [Disabled] [Enabled] [3F8/IRQ4] [2F8/IRQ3] [378/IRQ7] [SPP] Item Help Menu Level Move Enter: Select F5: ...
Manual
Page 81
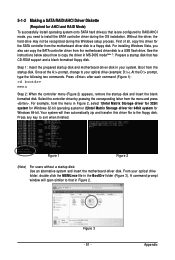
... for Windows 64-bit. Press any key to copy the driver in MS-DOS mode(Note 1). Appendix 5-1-2 Making a SATA RAID/AHCI Driver Diskette (Required for the SATA controller from the motherboard driver disk to a floppy disk. For example, from the motherboard driver disk to a USB flash drive. Your system will open similar to the floppy disk. A command prompt window will then automatically zip and transfer this driver file to that in the BootDrv folder (Figure 3). Boot from the menu...
... for Windows 64-bit. Press any key to copy the driver in MS-DOS mode(Note 1). Appendix 5-1-2 Making a SATA RAID/AHCI Driver Diskette (Required for the SATA controller from the motherboard driver disk to a floppy disk. For example, from the motherboard driver disk to a USB flash drive. Your system will open similar to the floppy disk. A command prompt window will then automatically zip and transfer this driver file to that in the BootDrv folder (Figure 3). Boot from the menu...

Manual
Page 82
Installing Windows XP Step 1: Restart your hard drive(s). Figure 1 Then a controller menu similar to install a 3rd party SCSI or RAID driver" (Figure 1). Intel(R) ICH7R/DH SATA RAID Controller Intel(R) ICH7MDH SATA RAID Controller Intel(R) ICH8R/ICH9R/ICH10R/DO SATA RAID Controller Intel(R) ICH8M-E/ICH9M-E SATA RAID Controller ENTER=Select F3=Exit GA-EQ45M-S2 Motherboard Figure 2 - 82 - After the driver installation, you can proceed with Windows, using a device support disk provided by an adapter manufacturer. A. Windows Setup Step 2: Press F6 if you need to Figure 2 below...
Installing Windows XP Step 1: Restart your hard drive(s). Figure 1 Then a controller menu similar to install a 3rd party SCSI or RAID driver" (Figure 1). Intel(R) ICH7R/DH SATA RAID Controller Intel(R) ICH7MDH SATA RAID Controller Intel(R) ICH8R/ICH9R/ICH10R/DO SATA RAID Controller Intel(R) ICH8M-E/ICH9M-E SATA RAID Controller ENTER=Select F3=Exit GA-EQ45M-S2 Motherboard Figure 2 - 82 - After the driver installation, you can proceed with Windows, using a device support disk provided by an adapter manufacturer. A. Windows Setup Step 2: Press F6 if you need to Figure 2 below...

Manual
Page 94
...Safe Defaults" (or "Load Optimized Defaults") to show the advanced options. In the Main Menu, press + to load BIOS default settings. 6. A: The following Award BIOS beep code descriptions may help you identify possible computer problems. (For reference only.) 1 short: System boots successfully 2 short: CMOS setting error 1 long, 1 short: Memory or motherboard error 1 long, 2 short: Monitor or graphics card error 1 long, 3 short: Keyboard error 1 long, 9 short: BIOS ROM error Continuous long beeps: Graphics card not inserted properly Continuous short beeps: Power error GA-EQ45M-S2 Motherboard...
...Safe Defaults" (or "Load Optimized Defaults") to show the advanced options. In the Main Menu, press + to load BIOS default settings. 6. A: The following Award BIOS beep code descriptions may help you identify possible computer problems. (For reference only.) 1 short: System boots successfully 2 short: CMOS setting error 1 long, 1 short: Memory or motherboard error 1 long, 2 short: Monitor or graphics card error 1 long, 3 short: Keyboard error 1 long, 9 short: BIOS ROM error Continuous long beeps: Graphics card not inserted properly Continuous short beeps: Power error GA-EQ45M-S2 Motherboard...


