Gigabyte GA-Z77-DS3H Support and Manuals
Get Help and Manuals for this Gigabyte item
View All Support Options Below
Free Gigabyte GA-Z77-DS3H manuals!
Problems with Gigabyte GA-Z77-DS3H?
Ask a Question
Free Gigabyte GA-Z77-DS3H manuals!
Problems with Gigabyte GA-Z77-DS3H?
Ask a Question
Most Recent Gigabyte GA-Z77-DS3H Questions

Ga-h77-ds3h I/o Shield
I bought a gigabyte mobo. (ga-h77-ds3h). unfortunately, the i/o shield back plate was not in the box...
I bought a gigabyte mobo. (ga-h77-ds3h). unfortunately, the i/o shield back plate was not in the box...
(Posted by flutesuri 10 years ago)

Problems Of Usb 2.0 Ports On Back Panel
Windows 7 at the login screen: The mouse and keyboard are not working at theUSB 2.0 ports on the bac...
Windows 7 at the login screen: The mouse and keyboard are not working at theUSB 2.0 ports on the bac...
(Posted by grabul 11 years ago)
Gigabyte GA-Z77-DS3H Videos

Hackintosh GIGABYTE GA-Z77-DS3H i5 3570K
Duration: 19:25
Total Views: 8,734
Duration: 19:25
Total Views: 8,734
??????????? ????? Gigabyte GA-Z77-DS3H | unboxing
Duration: :59
Total Views: 372
Duration: :59
Total Views: 372
UNBOXING || PLACA MÃE GIGABYTE GA-Z77-DS3H || BY TERABYTESHOP.COM.BR || HACKINTOSH
Duration: 7:50
Total Views: 1,227
Duration: 7:50
Total Views: 1,227
Popular Gigabyte GA-Z77-DS3H Manual Pages
User Guide - Page 5
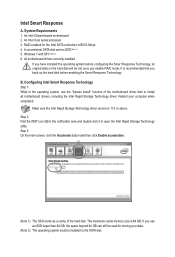
.... Step 3: On the main screen, click the Accelerate button and then click Enable acceleration. The maximum cache memory size is 11.0 or above. Windows 7 with SP1 (Note 2) 6. B. Configuring Intel Smart Response Technology Step 1: While in BIOS Setup 4.
All motherboard drivers correctly installed
If you have installed the operating system before enabling the Smart Response Technology. An...
User Manual - Page 1
GA-Z77-DS3H GA-H77-DS3H
User's Manual
Rev. 1001 12ME-Z77DS3H-1001R
User Manual - Page 4
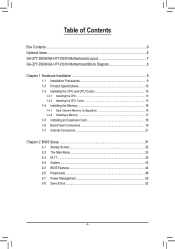
...7 GA-Z77-DS3H/GA-H77-DS3H Motherboard Block Diagram 8
Chapter 1 Hardware Installation 9 1-1 Installation Precautions 9 1-2 Product Specifications 10 1-3 Installing the CPU and CPU Cooler 13
1-3-1 Installing the CPU 13 1-3-2 Installing the CPU Cooler 15 1-4 Installing the Memory 16 1-4-1 Dual Channel Memory Configuration 16 1-4-2 Installing a Memory 17 1-5 Installing an Expansion Card 18...
User Manual - Page 6
... notice. Optional Items
2-port USB 2.0 bracket (Part No. 12CR1-1UB030-5*R) 2-port SATA power cable (Part No. 12CF1-2SERPW-0*R) COM port cable (Part No. 12CF1-1CM001-3*R) 3.5" Front Panel with 2 USB 3.0/2.0 ports (Part No. 12CR1-FPX582-0*R)
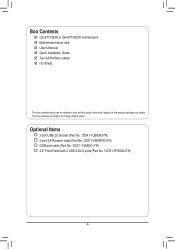
- 6 - Two SATA 6Gb/s cables ;;
GA-Z77-DS3H or GA-H77-DS3H motherboard ;; Quick Installation Guide ;; The box contents are for reference only and...
User Manual - Page 7
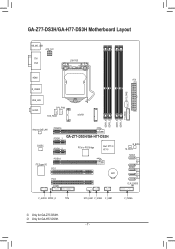
k Only for GA-Z77-DS3H. GA-Z77-DS3H/GA-H77-DS3H Motherboard Layout
KB_MS_USB ATX_12V
DVI VGA
LGA1155
HDMI ATX
R_USB30
SYS_FAN2
USB_LAN AUDIO
CPU_FAN SYS_FAN3
mSATA
DDR3_4 DDR3_2 DDR3_3 DDR3_1
F_USB30
Atheros GbE LAN CODEC
PCIEX16
PCIEX1_1 GA-Z77-DS3H/GA-H77-DS3H
PCIEX1_2
PCIe to PCI Bridge
Intel® Z77j/ H77k
PCIEX4 iTE Super I/O
PCI1 BAT
PCI2
COMA
B_BIOS M_BIOS
SATA3 0 1
...
User Manual - Page 8
... CLK (33 MHz)
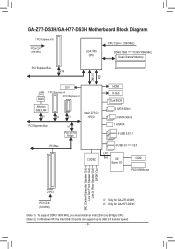
j Only for GA-Z77-DS3H. GA-Z77-DS3H/GA-H77-DS3H Motherboard Block Diagram
1 PCI Express x16
PCIe CLK (100 MHz)
LGA1155 CPU
CPU CLK+/- (100 MHz)
DDR3 1600 (Note 1)/1333/1066 MHz Dual Channel Memory
PCI Express Bus x16
DMI 2.0 FDI
LAN RJ45
DVI
1 PCI Express x4 2 PCI Express x1
Atheros GbE LAN
x1
x4
x1
Intel® Z77j/ H77k
PCI Express...
User Manual - Page 10
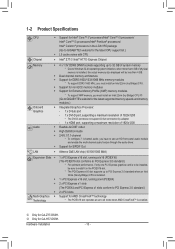
...not support D-Sub connection by adapter. - 1 x HDMI port, supporting a maximum resolution of physical memory is installed.
1 x PCI Express x16 slot, running at up to 32 GB of system memory * Due to use an HD front panel audio module and enable the multi-channel audio feature through the audio driver.
Hardware Installation
- 10 - k Only for GA-Z77-DS3H.
j Only for GA-H77-DS3H.
User Manual - Page 13
...computer and unplug the power cord from the power outlet before installing the
CPU to your hardware specifications including the CPU, graphics card, memory, hard drive, etc.
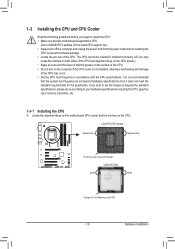
1-3-1 Installing the CPU
A. LGA1155 CPU Socket
Alignment Key
Alignment Key
Pin One Corner of the CPU. If you may occur. •• Set the CPU host frequency in accordance with the CPU specifications.
Locate the...
User Manual - Page 18
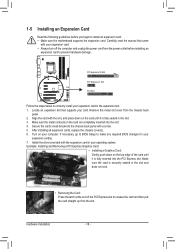
... off the computer and unplug the power cord from the chassis back
panel. 2. Make sure the card is fully seated in the expansion slot. 1. Secure the card's metal bracket to install an expansion card: •• Make sure the motherboard supports the expansion card. Locate an expansion slot that came
with a screw. 5. Install the driver provided with the slot, and press...
User Manual - Page 29
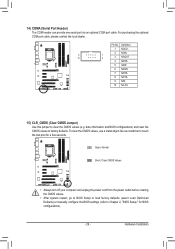
... turn off your computer and unplug the power cord from the power outlet before clearing the CMOS values.
•• After system restart, go to BIOS Setup to load factory defaults (select Load Optimized Defaults) or manually configure the BIOS settings (refer to touch the two pins for BIOS configurations).
- 29 - Hardware Installation 14) COMA (Serial Port Header) The COM...
User Manual - Page 31
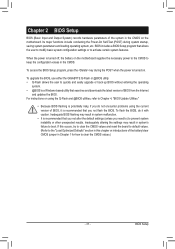
... it is recommended that you not alter the default settings (unless you do not encounter problems using the Q-Flash and @BIOS utilities, refer to Chapter 4, "BIOS Update Utilities."
•• Because BIOS flashing is turned off, the battery on the motherboard.
Inadequate BIOS flashing may result in the CMOS.
To access the BIOS Setup program, press the key during system startup...
User Manual - Page 37
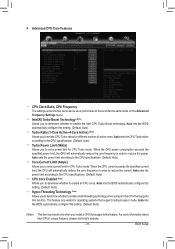
... feature only works for CPU Turbo mode.
Auto sets the CPU Turbo ratios according to the CPU specifications. (Default: Auto)
&& Turbo Power Limit (Watts) Allows you to determine whether to enable multi-threading technology when using an Intel CPU that supports this function. Auto lets the BIOS automatically configure this setting. (Default: Auto)
&& Hyper-Threading Technology (Note) Allows you...
User Manual - Page 48
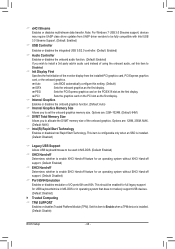
... item is configurable only when an SSD is installed. (Default: Disable)
BIOS Setup
- 48 - This should be used in audio card instead of using the onboard audio, set this item to Disabled.
&& Init Display First Specifes the frst initiation of the monitor display from UASP driver vendors to be fully compatible with Intel USB 3.0 Streams Support. (Default: Enabled)
&& USB Controller
Enables or...
User Manual - Page 71
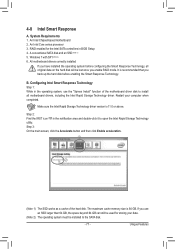
... Smart Response Technology.
Windows 7 with SP1 (Note 2) 6. Unique Features An Intel Core series processor 3. Configuring Intel Smart Response Technology Step 1: While in BIOS Setup 4.
j
k
(Note 1) The SSD works as a cache of the motherboard driver disk to open the Intel Rapid Storage Technology utility. The maximum cache memory size is 11.0 or above. 4-8 Intel Smart Response
A.
User Manual - Page 94
...
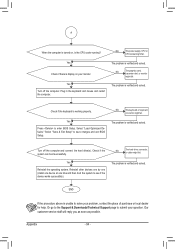
The hard drive, connector, or cable might fail. Reinstall other devices one by one (install one device at one time and then boot the system to save changes and exit BIOS Setup.
No
The power supply, CPU or
CPU socket might fail.
The problem is working properly. Check if the keyboard is verified and solved. Select "Save & Exit...
Gigabyte GA-Z77-DS3H Reviews
We have not received any reviews for Gigabyte yet.