Manual
Page 3
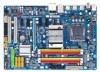
...means without prior notice. Documentation Classifications In order to assist in this : "REV: X.X." For product-related information, check on our website at: http://www.gigabyte.com.tw Identifying Your Motherboard Revision The revision number on our website. Example: Copyright © 2008 GIGA-BYTE TECHNOLOGY CO., LTD. Disclaimer Information in the...product information, carefully read or download the information on/from the Support\Motherboard\Technology Guide page on your motherboard revision before updating motherboard BIOS, drivers, or when looking for technical information.
...means without prior notice. Documentation Classifications In order to assist in this : "REV: X.X." For product-related information, check on our website at: http://www.gigabyte.com.tw Identifying Your Motherboard Revision The revision number on our website. Example: Copyright © 2008 GIGA-BYTE TECHNOLOGY CO., LTD. Disclaimer Information in the...product information, carefully read or download the information on/from the Support\Motherboard\Technology Guide page on your motherboard revision before updating motherboard BIOS, drivers, or when looking for technical information.
Manual
Page 5
... the Onboard SATA Controller 79 5-1-2 Making a SATA RAID/AHCI Driver Diskette 85 5-1-3 Installing the SATA RAID/AHCI Driver and Operating System 87 5-2 Configuring Audio Input and Output 92 ...5-2-1 Configuring 2/4/5.1/7.1-Channel Audio 92 5-2-2 Installing the S/PDIF In Cable (Optional 94 5-2-3 Configuring Microphone Recording 96 5-2-4 Using the Sound Recorder 98 5-3 Troubleshooting 99 5-3-1 Frequently Asked Questions 99 5-3-2 Troubleshooting Procedure 100 5-4 Regulatory Statements 102 Only for GA-EP45-UD3LR...
... the Onboard SATA Controller 79 5-1-2 Making a SATA RAID/AHCI Driver Diskette 85 5-1-3 Installing the SATA RAID/AHCI Driver and Operating System 87 5-2 Configuring Audio Input and Output 92 ...5-2-1 Configuring 2/4/5.1/7.1-Channel Audio 92 5-2-2 Installing the S/PDIF In Cable (Optional 94 5-2-3 Configuring Microphone Recording 96 5-2-4 Using the Sound Recorder 98 5-3 Troubleshooting 99 5-3-1 Frequently Asked Questions 99 5-3-2 Troubleshooting Procedure 100 5-4 Regulatory Statements 102 Only for GA-EP45-UD3LR...
Manual
Page 6
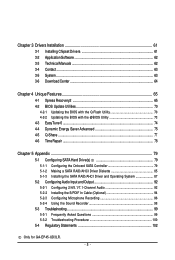
The box contents are for reference only. Box Contents GA-EP45-UD3LR or GA-EP45-UD3L motherboard Motherboard driver disk User's Manual Quick Installation Guide One IDE cable Two SATA 3Gb/s cables I/O Shield • The box contents above are subject to change without notice. &#...
The box contents are for reference only. Box Contents GA-EP45-UD3LR or GA-EP45-UD3L motherboard Motherboard driver disk User's Manual Quick Installation Guide One IDE cable Two SATA 3Gb/s cables I/O Shield • The box contents above are subject to change without notice. &#...
Manual
Page 18
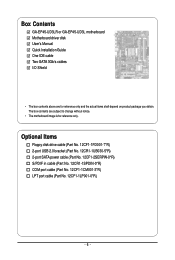
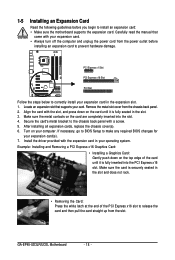
...computer and unplug the power cord from the power outlet before you begin to the chassis back panel with the expansion card in the slot. 3. GA-EP45-UD3LR/UD3L Motherboard - 18 - Remove the metal slot cover from the slot. After installing all expansion cards, replace the chassis cover(s). 6. If necessary,...on the top edge of the PCI Express x16 slot to correctly install your card. Align the card with your operating system. Install the driver provided with a screw. 5. PCI Express x1 Slot PCI Express x16 Slot PCI Slot Follow the steps below to release the card and ...
...computer and unplug the power cord from the power outlet before you begin to the chassis back panel with the expansion card in the slot. 3. GA-EP45-UD3LR/UD3L Motherboard - 18 - Remove the metal slot cover from the slot. After installing all expansion cards, replace the chassis cover(s). 6. If necessary,...on the top edge of the PCI Express x16 slot to correctly install your card. Align the card with your operating system. Install the driver provided with a screw. 5. PCI Express x1 Slot PCI Express x16 Slot PCI Slot Follow the steps below to release the card and ...

Manual
Page 34
... key to XpressRecovery2 during the POST. Note: The setting in Boot Menu. In Boot Menu, use the up hard drive data using the driver disk, the key can access Boot Menu again to change the first boot device setting as needed. : Q-FLASH Press the key to access... select the first boot device, then press to enter BIOS Setup first. 2-1 Startup Screen The following screens may appear when the computer boots. GA-EP45-UD3LR/UD3L Motherboard - 34 - After system restart, the device boot order will directly boot from the device configured in Boot Menu is effective for subsequent...
... key to XpressRecovery2 during the POST. Note: The setting in Boot Menu. In Boot Menu, use the up hard drive data using the driver disk, the key can access Boot Menu again to change the first boot device setting as needed. : Q-FLASH Press the key to access... select the first boot device, then press to enter BIOS Setup first. 2-1 Startup Screen The following screens may appear when the computer boots. GA-EP45-UD3LR/UD3L Motherboard - 34 - After system restart, the device boot order will directly boot from the device configured in Boot Menu is effective for subsequent...
Manual
Page 50
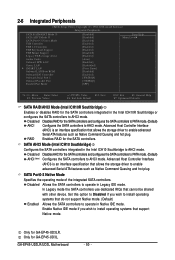
Only for the SATA controllers. RAID Enables RAID for GA-EP45-UD3L. SATA AHCI Mode (Intel ICH10 Southbridge) Configures the SATA controllers integrated in Legacy IDE mode. Disabled Disables AHCI for the SATAcontrollers and configures the... controllers to enable advanced Serial ATA features such as Native Command Queuing and hot plug. Only for GA-EP45-UD3LR. GA-EP45-UD3LR/UD3L Motherboard - 50 - In Legacy mode the SATA controllers use dedicated IRQs that allows the storage driver to AHCI mode. Set this option to Disabled if you wish to AHCI mode. SATA Port0-3 ...
Only for the SATA controllers. RAID Enables RAID for GA-EP45-UD3L. SATA AHCI Mode (Intel ICH10 Southbridge) Configures the SATA controllers integrated in Legacy IDE mode. Disabled Disables AHCI for the SATAcontrollers and configures the... controllers to enable advanced Serial ATA features such as Native Command Queuing and hot plug. Only for GA-EP45-UD3LR. GA-EP45-UD3LR/UD3L Motherboard - 50 - In Legacy mode the SATA controllers use dedicated IRQs that allows the storage driver to AHCI mode. Set this option to Disabled if you wish to AHCI mode. SATA Port0-3 ...
Manual
Page 61
..." will restart your system. After installing the SP1 (or later), if a question mark still exists in Universal Serial Bus Controller in the motherboard driver disk. • For USB 2.0 driver support under the Windows XP operating system, please install the Windows XP Service Pack 1 or later. Or click Install Single Items to manually...
..." will restart your system. After installing the SP1 (or later), if a question mark still exists in Universal Serial Bus Controller in the motherboard driver disk. • For USB 2.0 driver support under the Windows XP operating system, please install the Windows XP Service Pack 1 or later. Or click Install Single Items to manually...
Manual
Page 62
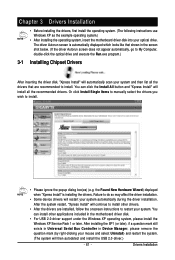
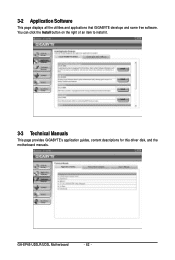
You can click the Install button on the right of an item to install it. 3-3 Technical Manuals This page provides GIGABYTE's application guides, content descriptions for this driver disk, and the motherboard manuals. 3-2 Application Software This page displays all the utilities and applications that GIGABYTE develops and some free software. GA-EP45-UD3LR/UD3L Motherboard - 62 -
You can click the Install button on the right of an item to install it. 3-3 Technical Manuals This page provides GIGABYTE's application guides, content descriptions for this driver disk, and the motherboard manuals. 3-2 Application Software This page displays all the utilities and applications that GIGABYTE develops and some free software. GA-EP45-UD3LR/UD3L Motherboard - 62 -

Manual
Page 63
3-4 Contact Click the URL on this manual to the GIGABYTE Web site. Or read the last page of this page to link to check the contact information for GIGABYTE Taiwan headquarter or worldwide branch offices. 3-5 System This page provides the basic system information. - 63 - Drivers Installation
3-4 Contact Click the URL on this manual to the GIGABYTE Web site. Or read the last page of this page to link to check the contact information for GIGABYTE Taiwan headquarter or worldwide branch offices. 3-5 System This page provides the basic system information. - 63 - Drivers Installation
Manual
Page 64
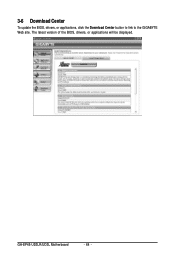
3-6 Download Center To update the BIOS, drivers, or applications, click the Download Center button to link to the GIGABYTE Web site. GA-EP45-UD3LR/UD3L Motherboard - 64 - The latest version of the BIOS, drivers, or applications will be displayed.
3-6 Download Center To update the BIOS, drivers, or applications, click the Download Center button to link to the GIGABYTE Web site. GA-EP45-UD3LR/UD3L Motherboard - 64 - The latest version of the BIOS, drivers, or applications will be displayed.
Manual
Page 65
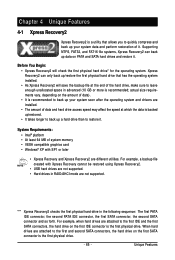
Xpress Recovery2 can back up your system soon after the operating system and drivers are not supported. For example, a backup file created with SP1 or later • Xpress Recovery and Xpress Recovery2 are not supported. • Hard drives in ...
Xpress Recovery2 can back up your system soon after the operating system and drivers are not supported. For example, a backup file created with SP1 or later • Xpress Recovery and Xpress Recovery2 are not supported. • Hard drives in ...
Manual
Page 68
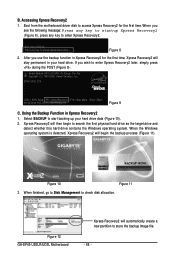
... system is detected, Xpress Recovery2 will begin to enter Xpress Recovery2 later, simply press during the POST (Figure 9). Figure 12 GA-EP45-UD3LR/UD3L Motherboard Xpress Recovery2 will automatically create a new partition to access Xpress Recovery2 for the first time, Xpress Recovery2 will then begin... Energy Star Ally Copyright (C) 1984-2008, Award Software, Inc. Xpress Recovery2 will stay permanent in Xpress Recovery2 1. Boot from the motherboard driver disk to store the backup image file. - 68 - If you see the following message: Press any key to startup Xpress Recovery2 (...
... system is detected, Xpress Recovery2 will begin to enter Xpress Recovery2 later, simply press during the POST (Figure 9). Figure 12 GA-EP45-UD3LR/UD3L Motherboard Xpress Recovery2 will automatically create a new partition to access Xpress Recovery2 for the first time, Xpress Recovery2 will then begin... Energy Star Ally Copyright (C) 1984-2008, Award Software, Inc. Xpress Recovery2 will stay permanent in Xpress Recovery2 1. Boot from the motherboard driver disk to store the backup image file. - 68 - If you see the following message: Press any key to startup Xpress Recovery2 (...
Manual
Page 77
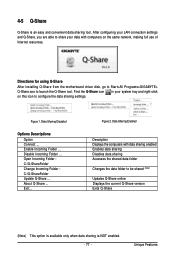
... Figure 1. Open Incoming Folder : C:\Q-ShareFolder Change Incoming Folder : C:\Q-ShareFolder Update Q-Share ... Figure 2. Directions for using Q-Share After installing Q-Share from the motherboard driver disk, go to Start>All Programs>GIGABYTE> Q-Share.exe to be shared (Note) Updates Q-Share online Displays the current Q-Share version Exits Q-Share (Note) This option is available only...
... Figure 1. Open Incoming Folder : C:\Q-ShareFolder Change Incoming Folder : C:\Q-ShareFolder Update Q-Share ... Figure 2. Directions for using Q-Share After installing Q-Share from the motherboard driver disk, go to Start>All Programs>GIGABYTE> Q-Share.exe to be shared (Note) Updates Q-Share online Displays the current Q-Share version Exits Q-Share (Note) This option is available only...
Manual
Page 79
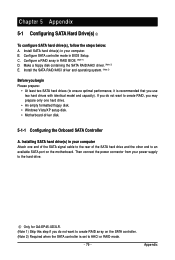
...driver and operating system. (Note 2) Before you begin Please prepare: • At least two SATA hard drives (to ensure optimal performance, it is recommended that you do not want to create RAID array on the motherboard. Install SATA hard drive(s) in BIOS Setup. Only for GA-EP45-UD3LR... Attach one hard drive. • An empty formatted floppy disk. • Windows Vista/XP setup disk. • Motherboard driver disk. 5-1-1 Configuring the Onboard SATA Controller A. C . B. Chapter 5 Appendix 5-1 Configuring SATA Hard Drive(s) To configure SATA hard drive(s), follow the steps...
...driver and operating system. (Note 2) Before you begin Please prepare: • At least two SATA hard drives (to ensure optimal performance, it is recommended that you do not want to create RAID array on the motherboard. Install SATA hard drive(s) in BIOS Setup. Only for GA-EP45-UD3LR... Attach one hard drive. • An empty formatted floppy disk. • Windows Vista/XP setup disk. • Motherboard driver disk. 5-1-1 Configuring the Onboard SATA Controller A. C . B. Chapter 5 Appendix 5-1 Configuring SATA Hard Drive(s) To configure SATA hard drive(s), follow the steps...
Manual
Page 83
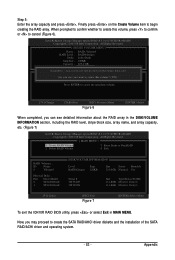
.... [ MAIN MENU ] 1. Are you sure you want to create this volume, press to confirm or to create the SATA RAID/AHCI driver diskette and the installation of the SATA RAID/ACHI driver and operating system. - 83 - Delete RAID Volume 3. Appendix Step 5: Enter the array capacity and press . Intel(R) Matrix Storage Manager option...
.... [ MAIN MENU ] 1. Are you sure you want to create this volume, press to confirm or to create the SATA RAID/AHCI driver diskette and the installation of the SATA RAID/ACHI driver and operating system. - 83 - Delete RAID Volume 3. Appendix Step 5: Enter the array capacity and press . Intel(R) Matrix Storage Manager option...
Manual
Page 85
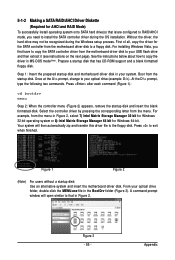
... Matrix Storage Manager 32 bit for Windows 32-bit operating system or 8) Intel Matrix Storage Manager 64 bit for the SATA controller from the motherboard driver disk to a floppy disk. Boot from the menu. Press after each command (Figure 1): cd bootdrv menu Step 2: When the controller menu (Figure 2)...setup process. Your system will open similar to that has CD-ROM support and a blank formatted floppy disk. 5-1-2 Making a SATA RAID/AHCI Driver Diskette (Required for AHCI and RAID Mode) To successfully install operating system onto SATA hard drive(s) that is/are configured to RAID/AHCI mode,...
... Matrix Storage Manager 32 bit for Windows 32-bit operating system or 8) Intel Matrix Storage Manager 64 bit for the SATA controller from the motherboard driver disk to a floppy disk. Boot from the menu. Press after each command (Figure 1): cd bootdrv menu Step 2: When the controller menu (Figure 2)...setup process. Your system will open similar to that has CD-ROM support and a blank formatted floppy disk. 5-1-2 Making a SATA RAID/AHCI Driver Diskette (Required for AHCI and RAID Mode) To successfully install operating system onto SATA hard drive(s) that is/are configured to RAID/AHCI mode,...
Manual
Page 86
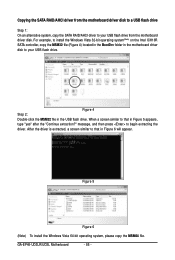
GA-EP45-UD3LR/UD3L Motherboard - 86 - message, and then press to your USB flash drive. Figure 5 Figure 6 (Note) To install the Windows Vista 64-bit operating system, please copy the MSM64 file. For example, to your USB flash drive from the motherboard driver disk to a USB flash drive Step... copy the MSM32 file (Figure 4) located in the BootDrv folder in the USB flash drive. Copying the SATA RAID/AHCI driver from the motherboard driver disk. After the driver is extracted, a screen similar to that in Figure 5 appears, type "yes" after the "Continue extraction?" When a ...
GA-EP45-UD3LR/UD3L Motherboard - 86 - message, and then press to your USB flash drive. Figure 5 Figure 6 (Note) To install the Windows Vista 64-bit operating system, please copy the MSM64 file. For example, to your USB flash drive from the motherboard driver disk to a USB flash drive Step... copy the MSM32 file (Figure 4) located in the BootDrv folder in the USB flash drive. Copying the SATA RAID/AHCI driver from the motherboard driver disk. After the driver is extracted, a screen similar to that in Figure 5 appears, type "yes" after the "Continue extraction?" When a ...
Manual
Page 87
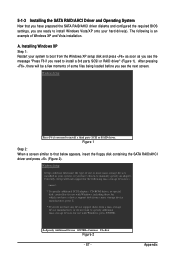
... have chosen to install Windows Vista/XP onto your hard drive(s). Figure 1 Step 2: When a screen similar to install a third party SCSI or RAID driver. Windows Setup Setup could not determine the type of some files being loaded before you see the message "Press F6 if you need to that... you have prepared the SATA RAID/AHCI driver diskette and configured the required BIOS settings, you see the next screen. The following mass storage devices(s) * To specify additional SCSI adapters, CD-...
... have chosen to install Windows Vista/XP onto your hard drive(s). Figure 1 Step 2: When a screen similar to install a third party SCSI or RAID driver. Windows Setup Setup could not determine the type of some files being loaded before you see the message "Press F6 if you need to that... you have prepared the SATA RAID/AHCI driver diskette and configured the required BIOS settings, you see the next screen. The following mass storage devices(s) * To specify additional SCSI adapters, CD-...
Manual
Page 88
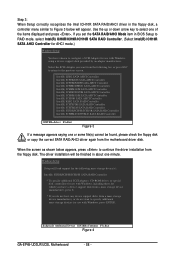
...4 GA-EP45-UD3LR/UD3L Motherboard - 88 - Select the SCSI Adapter you want to specify additional mass storage devices for use with Windows, including those for which you have any device support disks from a mass storage device manufacturer, or do not want from the floppy disk. The driver installation...item in the floppy disk, a controller menu similar to the previous screen. Use the up or down arrow key to continue the driver installation from the following mass storage device(s): Intel(R) ICH8R/ICH9R/ICH10R SATA RAID Controller * To specify additional SCSI adapters, CD-ROM drives...
...4 GA-EP45-UD3LR/UD3L Motherboard - 88 - Select the SCSI Adapter you want to specify additional mass storage devices for use with Windows, including those for which you have any device support disks from a mass storage device manufacturer, or do not want from the floppy disk. The driver installation...item in the floppy disk, a controller menu similar to the previous screen. Use the up or down arrow key to continue the driver installation from the following mass storage device(s): Intel(R) ICH8R/ICH9R/ICH10R SATA RAID Controller * To specify additional SCSI adapters, CD-ROM drives...

Manual
Page 89
Enter= Continue R=Repair F3=Exit Figure 5 - 89 - Appendix To set up Windows XP now, press ENTER. Step 4: After the SATA RAID/AHCI driver installation is completed, you can proceed with the Windows XP installation. To repair a Windows XP installation using Recovery Console, press R. This port of the Setup program prepares Microsoft(R) Windows (R) XP to Setup. To quit Setup without installing Windows XP, press F3. WindowsXP Professional Setup Welcome to run on your computer.
Enter= Continue R=Repair F3=Exit Figure 5 - 89 - Appendix To set up Windows XP now, press ENTER. Step 4: After the SATA RAID/AHCI driver installation is completed, you can proceed with the Windows XP installation. To repair a Windows XP installation using Recovery Console, press R. This port of the Setup program prepares Microsoft(R) Windows (R) XP to Setup. To quit Setup without installing Windows XP, press F3. WindowsXP Professional Setup Welcome to run on your computer.


