
Manual
Page 5
... 5-1-2 Making a SATA RAID/AHCI Driver Diskette 91 5-1-3 Installing the SATA RAID/AHCI Driver and Operating System 93 5-2 ConfiguringAudio ...Input and Output 98 5-2-1 Configuring 2/4/5.1/7.1-Channel Audio 98 5-2-2 Installing the S/PDIF In Cable (Optional 100 5-2-3 Enabling the Dolby Home Theater Function 102 5-2-4 Configuring Microphone Recording 103 5-2-5 Using the Sound Recorder 105 5-3 Troubleshooting 106 5-3-1 Frequently Asked Questions 106 5-3-2 Troubleshooting Procedure 107 Regulatory Statements 109 "*" Only for GA-EP45-DS4P...
... 5-1-2 Making a SATA RAID/AHCI Driver Diskette 91 5-1-3 Installing the SATA RAID/AHCI Driver and Operating System 93 5-2 ConfiguringAudio ...Input and Output 98 5-2-1 Configuring 2/4/5.1/7.1-Channel Audio 98 5-2-2 Installing the S/PDIF In Cable (Optional 100 5-2-3 Enabling the Dolby Home Theater Function 102 5-2-4 Configuring Microphone Recording 103 5-2-5 Using the Sound Recorder 105 5-3 Troubleshooting 106 5-3-1 Frequently Asked Questions 106 5-3-2 Troubleshooting Procedure 107 Regulatory Statements 109 "*" Only for GA-EP45-DS4P...

Manual
Page 6
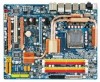
... cable (Part No. 12CF1-2SERPW-01R) S/PDIF in cable (Part No. 12CR1-1SPDIN-01R) COM port cable (Part No. 12CF1-1CM001-32R) - 6 - Box Contents GA-EP45-DS4P/GA-EP45-DS4 motherboard Motherboard driver disk User's Manual Quick Installation Guide Intel® LGA775 CPU Installation Guide One IDE cable and one floppy disk drive cable Four SATA 3Gb...
... cable (Part No. 12CF1-2SERPW-01R) S/PDIF in cable (Part No. 12CR1-1SPDIN-01R) COM port cable (Part No. 12CF1-1CM001-32R) - 6 - Box Contents GA-EP45-DS4P/GA-EP45-DS4 motherboard Motherboard driver disk User's Manual Quick Installation Guide Intel® LGA775 CPU Installation Guide One IDE cable and one floppy disk drive cable Four SATA 3Gb...

Manual
Page 18
...with your card. Secure the card's metal bracket to release the card and then pull the card straight up from the slot. Install the driver provided with a screw. 5. Make sure the metal contacts on the slot and then lift the card straight out from the slot. If necessary... the power cord from the PCIEX16_1 Slot: Gently push back on the lever on the card are completely inserted into the PCI Express x16 slot. GA-EP45-DS4P/DS4 Motherboard - 18 - • Removing the Card from the chassis back panel. 2. 1-5 Installing an Expansion Card Read the following guidelines before installing ...
...with your card. Secure the card's metal bracket to release the card and then pull the card straight up from the slot. Install the driver provided with a screw. 5. Make sure the metal contacts on the slot and then lift the card straight out from the slot. If necessary... the power cord from the PCIEX16_1 Slot: Gently push back on the lever on the card are completely inserted into the PCI Express x16 slot. GA-EP45-DS4P/DS4 Motherboard - 18 - • Removing the Card from the chassis back panel. 2. 1-5 Installing an Expansion Card Read the following guidelines before installing ...

Manual
Page 36
...Boot Menu. 2-1 Startup Screen The following screens may appear when the computer boots. In Boot Menu, use the up hard drive data using the driver disk, the key can access Boot Menu again to change the first boot device setting as needed. : Q-Flash Press the key to the ... To exit Boot Menu, press . The POST Screen Award Modular BIOS v6.00PG, An Energy Star Ally Copyright (C) 1984-2008, Award Software, Inc. GA-EP45-DS4P/DS4 Motherboard - 36 - The system will still be used for subsequent access to access the Q-Flash utility in Boot Menu is effective for one time only...
...Boot Menu. 2-1 Startup Screen The following screens may appear when the computer boots. In Boot Menu, use the up hard drive data using the driver disk, the key can access Boot Menu again to change the first boot device setting as needed. : Q-Flash Press the key to the ... To exit Boot Menu, press . The POST Screen Award Modular BIOS v6.00PG, An Energy Star Ally Copyright (C) 1984-2008, Award Software, Inc. GA-EP45-DS4P/DS4 Motherboard - 36 - The system will still be used for subsequent access to access the Q-Flash utility in Boot Menu is effective for one time only...

Manual
Page 64
You can click the Install button on the right of an item to install it. 3-3 Technical Manuals This page provides GIGABYTE's application guides, content descriptions for this driver disk, and the motherboard manuals. GA-EP45-DS4P/DS4 Motherboard - 64 - 3-2 Application Software This page displays all the utilities and applications that GIGABYTE develops and some free software.
You can click the Install button on the right of an item to install it. 3-3 Technical Manuals This page provides GIGABYTE's application guides, content descriptions for this driver disk, and the motherboard manuals. GA-EP45-DS4P/DS4 Motherboard - 64 - 3-2 Application Software This page displays all the utilities and applications that GIGABYTE develops and some free software.

Manual
Page 66
The latest version of the BIOS, drivers, or applications will be displayed. 3-6 Download Center To update the BIOS, drivers, or applications, click the Download Center button to link to the GIGABYTE Web site. GA-EP45-DS4P/DS4 Motherboard - 66 -
The latest version of the BIOS, drivers, or applications will be displayed. 3-6 Download Center To update the BIOS, drivers, or applications, click the Download Center button to link to the GIGABYTE Web site. GA-EP45-DS4P/DS4 Motherboard - 66 -

Manual
Page 70
... following message: Press any key to startup Xpress Recovery2 (Figure 8), press any key to store the backup image file. - 70 - Boot from the motherboard driver disk to access Xpress Recovery2 for the first time, Xpress Recovery2 will automatically create a new partition to startup XpressRecovery2..... Award Modular BIOS v6.00PG, An... allocation. Figure 10 Figure 11 3. When finished, go to Disk Management to enter Xpress Recovery2 later, simply press during the POST (Figure 9). Figure 12 GA-EP45-DS4P/DS4 Motherboard Xpress Recovery2 will stay permanent in Xpress Recovery2 1.
... following message: Press any key to startup Xpress Recovery2 (Figure 8), press any key to store the backup image file. - 70 - Boot from the motherboard driver disk to access Xpress Recovery2 for the first time, Xpress Recovery2 will automatically create a new partition to startup XpressRecovery2..... Award Modular BIOS v6.00PG, An... allocation. Figure 10 Figure 11 3. When finished, go to Disk Management to enter Xpress Recovery2 later, simply press during the POST (Figure 9). Figure 12 GA-EP45-DS4P/DS4 Motherboard Xpress Recovery2 will stay permanent in Xpress Recovery2 1.

Manual
Page 79
...files first. Step 3: Install the Ultra TPM utility from the motherboard driver disk (select Infineon TPM Driver). B. The Ultra TPM utility appears in the BIOS. To create a TPM key and save it to Chapter 2, "BIOS Setup," for GA-EP45-DS4P. (Note 1) (Note 2) (Note 3) (Note 4) This feature ...against unauthorized access to BIOS(Note 2) check box, or select at least set up the PSD.) 2. 4-5 Ultra TPM* (Note 1) GIGABYTE's unique Ultra TPM (Trusted Platform Module) features the industry's most advanced hardwarebased data encryption design. By simply plugging or unplugging the USB flash...
...files first. Step 3: Install the Ultra TPM utility from the motherboard driver disk (select Infineon TPM Driver). B. The Ultra TPM utility appears in the BIOS. To create a TPM key and save it to Chapter 2, "BIOS Setup," for GA-EP45-DS4P. (Note 1) (Note 2) (Note 3) (Note 4) This feature ...against unauthorized access to BIOS(Note 2) check box, or select at least set up the PSD.) 2. 4-5 Ultra TPM* (Note 1) GIGABYTE's unique Ultra TPM (Trusted Platform Module) features the industry's most advanced hardwarebased data encryption design. By simply plugging or unplugging the USB flash...

Manual
Page 80
Find the Q-Share icon in your computer to another computer simply using Q-Share After installing Q-Share from the motherboard driver disk, go to Start>All Programs>GIGABYTE> Q-Share.exe to launch the Q-Share tool. Exit... Enable Incoming Folder ... Disable Incoming Folder ... About Q-Share ... Directions for using Q-Share without making complicated settings. Figure ... data sharing enabled Enables data sharing Disables data sharing Accesses the shared data folder Changes the data folder to configure the data sharing settings. GA-EP45-DS4P/DS4 Motherboard - 80 -
Find the Q-Share icon in your computer to another computer simply using Q-Share After installing Q-Share from the motherboard driver disk, go to Start>All Programs>GIGABYTE> Q-Share.exe to launch the Q-Share tool. Exit... Enable Incoming Folder ... Disable Incoming Folder ... About Q-Share ... Directions for using Q-Share without making complicated settings. Figure ... data sharing enabled Enables data sharing Disables data sharing Accesses the shared data folder Changes the data folder to configure the data sharing settings. GA-EP45-DS4P/DS4 Motherboard - 80 -

Manual
Page 82
... Diagnostic Utility icon appears in Windows XP: Select Realtek Ethernet Teaming Utility and click Install. Step 1: Insert the motherboard driver disk and select Application Software, Install Application Software. Select the check boxes for the Team, e.g. Removing the Existing Teaming...failed port to act as one single connection for installation. Enabling Teaming Functionality in the system tray after the system restarts. GA-EP45-DS4P/DS4 Motherboard - 82 - Fault tolerance on your system when completed. A. Click Install under Realtek Ethernet Teaming Utility for twice...
... Diagnostic Utility icon appears in Windows XP: Select Realtek Ethernet Teaming Utility and click Install. Step 1: Insert the motherboard driver disk and select Application Software, Install Application Software. Select the check boxes for the Team, e.g. Removing the Existing Teaming...failed port to act as one single connection for installation. Enabling Teaming Functionality in the system tray after the system restarts. GA-EP45-DS4P/DS4 Motherboard - 82 - Fault tolerance on your system when completed. A. Click Install under Realtek Ethernet Teaming Utility for twice...
Manual
Page 92
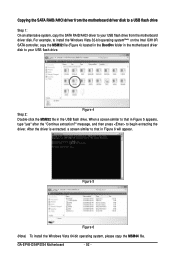
... that in the USB flash drive. GA-EP45-DS4P/DS4 Motherboard - 92 - Copying the SATA RAID/AHCI driver from the motherboard driver disk to a USB flash drive Step 1: On an alternative system, copy the SATA RAID/AHCI driver to begin extracting the driver. For example, to your USB flash drive from the motherboard driver disk. Figure 5 Figure 6 (Note) To...
... that in the USB flash drive. GA-EP45-DS4P/DS4 Motherboard - 92 - Copying the SATA RAID/AHCI driver from the motherboard driver disk to a USB flash drive Step 1: On an alternative system, copy the SATA RAID/AHCI driver to begin extracting the driver. For example, to your USB flash drive from the motherboard driver disk. Figure 5 Figure 6 (Note) To...

Manual
Page 94
...If you want to specify additional mass storage devices for use with Windows, press ENTER. S=Specify Additional Device ENTER=Continue F3=Exit Figure 4 GA-EP45-DS4P/DS4 Motherboard - 94 - If you set the SATA RAID/AHCI Mode item in BIOS Setup to RAID mode, select Intel(R) ICH8R/ICH9R/ICH10R SATA... following list, or press ESC to return to the previous screen. The driver installation will be found, please check the floppy disk or copy the correct SATA RAID/AHCI driver again from the motherboard driver disk. Step 3: When Setup correctly recognizes the Intel ICH10R SATA RAID/AHCI...
...If you want to specify additional mass storage devices for use with Windows, press ENTER. S=Specify Additional Device ENTER=Continue F3=Exit Figure 4 GA-EP45-DS4P/DS4 Motherboard - 94 - If you set the SATA RAID/AHCI Mode item in BIOS Setup to RAID mode, select Intel(R) ICH8R/ICH9R/ICH10R SATA... following list, or press ESC to return to the previous screen. The driver installation will be found, please check the floppy disk or copy the correct SATA RAID/AHCI driver again from the motherboard driver disk. Step 3: When Setup correctly recognizes the Intel ICH10R SATA RAID/AHCI...

Manual
Page 96
When a screen similar to boot from the Windows Vista setup disk and perform standard OS installation steps. Figure 7 GA-EP45-DS4P/DS4 Motherboard - 96 - B. Installing Windows Vista (The procedure below appears, select Load Driver. (Figure 6). Figure 6 Step 2: Specify the location where the driver is saved, such as your system to that below assumes that only one RAID array exists in your system.) Step 1: Restart your floppy disk or USB flash drive (Figure 7).
When a screen similar to boot from the Windows Vista setup disk and perform standard OS installation steps. Figure 7 GA-EP45-DS4P/DS4 Motherboard - 96 - B. Installing Windows Vista (The procedure below appears, select Load Driver. (Figure 6). Figure 6 Step 2: Specify the location where the driver is saved, such as your system to that below assumes that only one RAID array exists in your system.) Step 1: Restart your floppy disk or USB flash drive (Figure 7).

Manual
Page 98
... Audio Manager icon will appear in and out) to access the Audio Control Panel. Before installing the audio driver, make a telephone call over the Internet, and etc. GA-EP45-DS4P/DS4 Motherboard - 98 - Side Speaker Out Mic In For example, in jack and manually configure the jack for microphone ... Speakers: (The following for each jack through the audio driver. For example, users can have an Internet chat, make sure the "Microsoft UAA Bus driver for High Definition Audio" has been installed from the motherboard driver disk and your front panel audio supports Intel HD Audio ...
... Audio Manager icon will appear in and out) to access the Audio Control Panel. Before installing the audio driver, make a telephone call over the Internet, and etc. GA-EP45-DS4P/DS4 Motherboard - 98 - Side Speaker Out Mic In For example, in jack and manually configure the jack for microphone ... Speakers: (The following for each jack through the audio driver. For example, users can have an Internet chat, make sure the "Microsoft UAA Bus driver for High Definition Audio" has been installed from the motherboard driver disk and your front panel audio supports Intel HD Audio ...

Manual
Page 102
...be heard as surround sound from two- And click the DOLBY PRO LOGIC II button. Point 1. : Click Dolby Pro Logic IIx. GA-EP45-DS4P/DS4 Motherboard - 102 - Either click Dolby Digital 5.1 in the Audio Control Panel. Enabling Dolby Headphone allows 2-channel stereo content to enable ...DIGITAL LIVE: If your speaker configurations. 4. channel content. Windows Vista Install the Dolby GUI Software driver from analog speakers or headphone. Windows XP After installing the audio driver, at the center bottom of headphones. 3. DOLBY PRO LOGIC II: Click this button to be...
...be heard as surround sound from two- And click the DOLBY PRO LOGIC II button. Point 1. : Click Dolby Pro Logic IIx. GA-EP45-DS4P/DS4 Motherboard - 102 - Either click Dolby Digital 5.1 in the Audio Control Panel. Enabling Dolby Headphone allows 2-channel stereo content to enable ...DIGITAL LIVE: If your speaker configurations. 4. channel content. Windows Vista Install the Dolby GUI Software driver from analog speakers or headphone. Windows XP After installing the audio driver, at the center bottom of headphones. 3. DOLBY PRO LOGIC II: Click this button to be...


