
Manual
Page 51
... SATA controllers. SATA Port0-3 Native Mode Specifies the operating mode of the USB functionalities below. Windows 9X/ME. (Default) Enabled Allows the SATA controllers to AHCI mode. Windows XP. Advanced Host Controller Interface (AHCI) is an interface specification that do not support Native mode... disables RAID for the SATA controllers. Enable Native IDE mode if you wish to install operating systems that allows the storage driver to AHCI mode. Disabled Disables RAID for the SATA controllers and configures the SATA controllers to PATA mode. (Default) AHCI...
... SATA controllers. SATA Port0-3 Native Mode Specifies the operating mode of the USB functionalities below. Windows 9X/ME. (Default) Enabled Allows the SATA controllers to AHCI mode. Windows XP. Advanced Host Controller Interface (AHCI) is an interface specification that do not support Native mode... disables RAID for the SATA controllers. Enable Native IDE mode if you wish to install operating systems that allows the storage driver to AHCI mode. Disabled Disables RAID for the SATA controllers and configures the SATA controllers to PATA mode. (Default) AHCI...

Manual
Page 63
... Single Items to manually select the drivers you wish to install. The driver Autorun screen is installing the drivers. Failure to do so may affect the driver installation. • Some device drivers will continue to install other applications included in the motherboard driver disk. • For USB 2.0 driver support under the Windows XP operating system, please install the...
... Single Items to manually select the drivers you wish to install. The driver Autorun screen is installing the drivers. Failure to do so may affect the driver installation. • Some device drivers will continue to install other applications included in the motherboard driver disk. • For USB 2.0 driver support under the Windows XP operating system, please install the...

Manual
Page 67
...FAT32, and FAT16 file systems, Xpress Recovery2 can only back up a hard drive than to back up your system soon after the operating system and drivers are installed. • The amount of data and hard drive access speed may affect the speed at the end of system memory • VESA ...compatible graphics card • Windows® XP with Xpress Recovery cannot be restored using Xpress Recovery2. • USB hard drives are not supported. • Hard drives in the following...
...FAT32, and FAT16 file systems, Xpress Recovery2 can only back up a hard drive than to back up your system soon after the operating system and drivers are installed. • The amount of data and hard drive access speed may affect the speed at the end of system memory • VESA ...compatible graphics card • Windows® XP with Xpress Recovery cannot be restored using Xpress Recovery2. • USB hard drives are not supported. • Hard drives in the following...

Manual
Page 70
...the backup function in Xpress Recovery2 for the first time. When the Windows operating system is detected, Xpress Recovery2 will stay permanent in Xpress Recovery2 1. Boot from the motherboard driver disk to access Xpress Recovery2 for the first time, Xpress Recovery2 will... to store the backup image file. - 70 - Xpress Recovery2 will automatically create a new partition to startup XpressRecovery2..... Figure 12 GA-EP45-DS4P/DS4 Motherboard Xpress Recovery2 will then begin the backup process (Figure 11). Using the Backup Function in your hard drive data (Figure 10...
...the backup function in Xpress Recovery2 for the first time. When the Windows operating system is detected, Xpress Recovery2 will stay permanent in Xpress Recovery2 1. Boot from the motherboard driver disk to access Xpress Recovery2 for the first time, Xpress Recovery2 will... to store the backup image file. - 70 - Xpress Recovery2 will automatically create a new partition to startup XpressRecovery2..... Figure 12 GA-EP45-DS4P/DS4 Motherboard Xpress Recovery2 will then begin the backup process (Figure 11). Using the Backup Function in your hard drive data (Figure 10...

Manual
Page 82
... port to remove the existing Teaming, click the item you will see the connection speed is subject to access the utility. GA-EP45-DS4P/DS4 Motherboard - 82 - Fault tolerance on your system when completed. Click Install under Realtek Ethernet Teaming Utility for the two available... in the system tray after the system restarts. Step 1: Insert the motherboard driver disk and select Application Software, Install Application Software. Step 2: The Realtek Ethernet Diagnostic Utility icon appears in Windows XP: Select Realtek Ethernet Teaming Utility and click Install. Go to act as...
... port to remove the existing Teaming, click the item you will see the connection speed is subject to access the utility. GA-EP45-DS4P/DS4 Motherboard - 82 - Fault tolerance on your system when completed. Click Install under Realtek Ethernet Teaming Utility for the two available... in the system tray after the system restarts. Step 1: Insert the motherboard driver disk and select Application Software, Install Application Software. Step 2: The Realtek Ethernet Diagnostic Utility icon appears in Windows XP: Select Realtek Ethernet Teaming Utility and click Install. Go to act as...

Manual
Page 83
...to access the utility. Step 4: After the Teaming is 2.0 Gbps. Removing the Existing Teaming: Step 5: Click View status in Windows Vista: Select Realtek Ethernet Teaming Utility and click Install. Unique Features Restart your hub's specifications. When the Create Virtual Adapter For... the Remove button. - 83 - If you will see only one connection in Network and Sharing Center. Step 1: Insert the motherboard driver disk and select Application Software, Install Application Software. Step 2: Click the Start icon . B. Enabling Teaming Functionality in Network and Sharing...
...to access the utility. Step 4: After the Teaming is 2.0 Gbps. Removing the Existing Teaming: Step 5: Click View status in Windows Vista: Select Realtek Ethernet Teaming Utility and click Install. Unique Features Restart your hub's specifications. When the Create Virtual Adapter For... the Remove button. - 83 - If you will see only one connection in Network and Sharing Center. Step 1: Insert the motherboard driver disk and select Application Software, Install Application Software. Step 2: Click the Start icon . B. Enabling Teaming Functionality in Network and Sharing...

Manual
Page 85
... RAID BIOS. (Note 1) D. If you do not want to AHCI or RAID mode. - 85 - Appendix B. Make a floppy disk containing the SATA RAID/AHCI driver. (Note 2) E. Chapter 5 Appendix 5-1 Configuring SATA Hard Drive(s) To configure SATA hard drive(s), follow the steps below: A. Configure SATA controller mode in your power supply...(s) in BIOS Setup. Then connect the power connector from your computer Attach one hard drive. • An empty formatted floppy disk. • Windows Vista/XP setup disk. • Motherboard driver disk. 5-1-1 Configuring the Onboard SATA Controller A.
... RAID BIOS. (Note 1) D. If you do not want to AHCI or RAID mode. - 85 - Appendix B. Make a floppy disk containing the SATA RAID/AHCI driver. (Note 2) E. Chapter 5 Appendix 5-1 Configuring SATA Hard Drive(s) To configure SATA hard drive(s), follow the steps below: A. Configure SATA controller mode in your power supply...(s) in BIOS Setup. Then connect the power connector from your computer Attach one hard drive. • An empty formatted floppy disk. • Windows Vista/XP setup disk. • Motherboard driver disk. 5-1-1 Configuring the Onboard SATA Controller A.

Manual
Page 91
... Matrix Storage Manager 64 bit for Windows 64-bit. Appendix For installing Windows Vista, you need to install the SATA controller driver during the Windows setup process. Prepare a startup disk that in the BootDrv folder (Figure 3). Select the controller driver by pressing the corresponding letter from ... remove the startup disk and insert the blank formatted disk. A command prompt window will then automatically zip and transfer this driver file to the floppy disk. For example, from the motherboard driver disk to a floppy disk. See the instructions below about how to exit when...
... Matrix Storage Manager 64 bit for Windows 64-bit. Appendix For installing Windows Vista, you need to install the SATA controller driver during the Windows setup process. Prepare a startup disk that in the BootDrv folder (Figure 3). Select the controller driver by pressing the corresponding letter from ... remove the startup disk and insert the blank formatted disk. A command prompt window will then automatically zip and transfer this driver file to the floppy disk. For example, from the motherboard driver disk to a floppy disk. See the instructions below about how to exit when...
Manual
Page 92
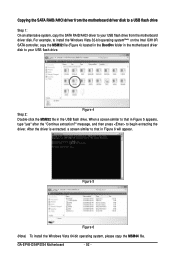
...When a screen similar to your USB flash drive from the motherboard driver disk. Figure 5 Figure 6 (Note) To install the Windows Vista 64-bit operating system, please copy the MSM64 file. For example, to install the Windows Vista 32-bit operating system(Note) on the Intel ICH10R SATA... 2: Double-click the MSM32 file in Figure 5 appears, type "yes" after the "Continue extraction?" After the driver is extracted, a screen similar to begin extracting the driver. GA-EP45-DS4P/DS4 Motherboard - 92 - message, and then press to that in the USB flash drive. Copying the SATA RAID/AHCI...
...When a screen similar to your USB flash drive from the motherboard driver disk. Figure 5 Figure 6 (Note) To install the Windows Vista 64-bit operating system, please copy the MSM64 file. For example, to install the Windows Vista 32-bit operating system(Note) on the Intel ICH10R SATA... 2: Double-click the MSM32 file in Figure 5 appears, type "yes" after the "Continue extraction?" After the driver is extracted, a screen similar to begin extracting the driver. GA-EP45-DS4P/DS4 Motherboard - 92 - message, and then press to that in the USB flash drive. Copying the SATA RAID/AHCI...
Manual
Page 93
...you need to install a third party SCSI or RAID driver. Figure 1 Step 2: When a screen similar to that you have prepared the SATA RAID/AHCI driver diskette and configured the required BIOS settings, you are ready to install Windows Vista/XP onto your system, or you have chosen ... Operating System Now that below appears, insert the floppy disk containing the SATA RAID/AHCI driver and press (Figure 2). Windows Setup Setup could not determine the type of Windows XP and Vista installation. A. Appendix Currently, Setup will be a few moments of some files being loaded before you ...
...you need to install a third party SCSI or RAID driver. Figure 1 Step 2: When a screen similar to that you have prepared the SATA RAID/AHCI driver diskette and configured the required BIOS settings, you are ready to install Windows Vista/XP onto your system, or you have chosen ... Operating System Now that below appears, insert the floppy disk containing the SATA RAID/AHCI driver and press (Figure 2). Windows Setup Setup could not determine the type of Windows XP and Vista installation. A. Appendix Currently, Setup will be a few moments of some files being loaded before you ...

Manual
Page 94
S=Specify Additional Device ENTER=Continue F3=Exit Figure 4 GA-EP45-DS4P/DS4 Motherboard - 94 - Use the up or down arrow key to select one or some file(s) cannot be finished in about one minute. Windows Setup Setup will load support for the following list, or press ESC to return to the ... To specify additional SCSI adapters, CD-ROM drives, or special disk controllers for use with Windows, including those for AHCI mode.) Windows Setup You have any device support disks from the motherboard driver disk. Select the SCSI Adapter you set the SATA RAID/AHCI Mode item in BIOS Setup...
S=Specify Additional Device ENTER=Continue F3=Exit Figure 4 GA-EP45-DS4P/DS4 Motherboard - 94 - Use the up or down arrow key to select one or some file(s) cannot be finished in about one minute. Windows Setup Setup will load support for the following list, or press ESC to return to the ... To specify additional SCSI adapters, CD-ROM drives, or special disk controllers for use with Windows, including those for AHCI mode.) Windows Setup You have any device support disks from the motherboard driver disk. Select the SCSI Adapter you set the SATA RAID/AHCI Mode item in BIOS Setup...

Manual
Page 95
To repair a Windows XP installation using Recovery Console, press R. To set up Windows XP now, press ENTER. Enter= Continue R=Repair F3=Exit Figure 5 - 95 - Step 4: After the SATA RAID/AHCI driver installation is completed, you can proceed with the Windows XP installation. This port of the Setup program prepares Microsoft(R) Windows (R) XP to Setup. To quit Setup without installing Windows XP, press F3. Appendix WindowsXP Professional Setup Welcome to run on your computer.
To repair a Windows XP installation using Recovery Console, press R. To set up Windows XP now, press ENTER. Enter= Continue R=Repair F3=Exit Figure 5 - 95 - Step 4: After the SATA RAID/AHCI driver installation is completed, you can proceed with the Windows XP installation. This port of the Setup program prepares Microsoft(R) Windows (R) XP to Setup. To quit Setup without installing Windows XP, press F3. Appendix WindowsXP Professional Setup Welcome to run on your computer.

Manual
Page 96
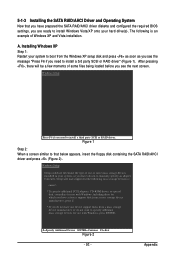
B. Installing Windows Vista (The procedure below assumes that below appears, select Load Driver. (Figure 6). Figure 7 GA-EP45-DS4P/DS4 Motherboard - 96 - When a screen similar to boot from the Windows Vista setup disk and perform standard OS installation steps. Figure 6 Step 2: Specify the location where the driver is saved, such as your system to that only one RAID array exists in your system.) Step 1: Restart your floppy disk or USB flash drive (Figure 7).
B. Installing Windows Vista (The procedure below assumes that below appears, select Load Driver. (Figure 6). Figure 7 GA-EP45-DS4P/DS4 Motherboard - 96 - When a screen similar to boot from the Windows Vista setup disk and perform standard OS installation steps. Figure 6 Step 2: Specify the location where the driver is saved, such as your system to that only one RAID array exists in your system.) Step 1: Restart your floppy disk or USB flash drive (Figure 7).

Manual
Page 98
...default audio jack assignments. For example, users can listen to the following instructions use Windows XP as the example operating system.) Step 1: After installing the audio driver, the Audio Manager icon will appear in jack and manually configure the jack for ... installed from the motherboard driver disk and your system tray. Doubleclick the icon to change the function for Windows. (Note) 2/4/5.1/7.1-Channel Audio Configurations: Refer to MP3 music, have both the front and back panel audio connectors active simultaneously. GA-EP45-DS4P/DS4 Motherboard - 98 - The...
...default audio jack assignments. For example, users can listen to the following instructions use Windows XP as the example operating system.) Step 1: After installing the audio driver, the Audio Manager icon will appear in jack and manually configure the jack for ... installed from the motherboard driver disk and your system tray. Doubleclick the icon to change the function for Windows. (Note) 2/4/5.1/7.1-Channel Audio Configurations: Refer to MP3 music, have both the front and back panel audio connectors active simultaneously. GA-EP45-DS4P/DS4 Motherboard - 98 - The...

Manual
Page 102
... icon to All Programs, Dolby Control Center to enable or disable the Dolby Headphone function. GA-EP45-DS4P/DS4 Motherboard - 102 - Windows XP After installing the audio driver, at the center bottom of headphones. 3. Windows Vista Install the Dolby GUI Software driver from any sound from two- 5-2-3 Enabling the Dolby Home Theater Function Before Dolby Home Theater...
... icon to All Programs, Dolby Control Center to enable or disable the Dolby Headphone function. GA-EP45-DS4P/DS4 Motherboard - 102 - Windows XP After installing the audio driver, at the center bottom of headphones. 3. Windows Vista Install the Dolby GUI Software driver from any sound from two- 5-2-3 Enabling the Dolby Home Theater Function Before Dolby Home Theater...


