
Manual
Page 9
... an ESD wrist strap, keep your hands dry and first touch a metal object to eliminate static electricity. • Prior to installing the motherboard, please have a problem related to installation, do not remove or break motherboard S/N (Serial Number) sticker or warranty sticker provided by unplugging the power cord from the motherboard, make...
... an ESD wrist strap, keep your hands dry and first touch a metal object to eliminate static electricity. • Prior to installing the motherboard, please have a problem related to installation, do not remove or break motherboard S/N (Serial Number) sticker or warranty sticker provided by unplugging the power cord from the motherboard, make...
Manual
Page 27
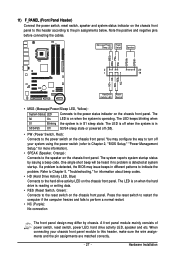
... speaker on the chassis front panel. Refer to Chapter 5, "Troubleshooting," for more information). • SPEAK (Speaker, Orange): Connects to indicate the problem. A front panel module mainly consists of power switch, reset switch, power LED, hard drive activity LED, speaker and etc. Note the positive and...make sure the wire assignments and the pin assignments are matched correctly. - 27 - You may issue beeps in S1 sleep state. If a problem is reading or writing data. • RES (Reset Switch, Green): Connects to the hard drive activity LED on the chassis front panel. ...
... speaker on the chassis front panel. Refer to Chapter 5, "Troubleshooting," for more information). • SPEAK (Speaker, Orange): Connects to indicate the problem. A front panel module mainly consists of power switch, reset switch, power LED, hard drive activity LED, speaker and etc. Note the positive and...make sure the wire assignments and the pin assignments are matched correctly. - 27 - You may issue beeps in S1 sleep state. If a problem is reading or writing data. • RES (Reset Switch, Green): Connects to the hard drive activity LED on the chassis front panel. ...
Manual
Page 33
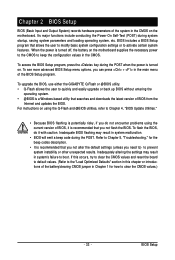
... the latest version of the battery/clearing CMOS jumper in the CMOS. Refer to activate certain system features. To upgrade the BIOS, use either the GIGABYTE Q-Flash or @BIOS utility. • Q-Flash allows the user to quickly and easily upgrade or back up BIOS without entering the operating system. ... beep codes description. • It is a Windows-based utility that you do it is turned on. To flash the BIOS, do not encounter problems using the current version of BIOS, it with caution. BIOS includes a BIOS Setup program that you not alter the default settings (unless you can ...
... the latest version of the battery/clearing CMOS jumper in the CMOS. Refer to activate certain system features. To upgrade the BIOS, use either the GIGABYTE Q-Flash or @BIOS utility. • Q-Flash allows the user to quickly and easily upgrade or back up BIOS without entering the operating system. ... beep codes description. • It is a Windows-based utility that you do it is turned on. To flash the BIOS, do not encounter problems using the current version of BIOS, it with caution. BIOS includes a BIOS Setup program that you not alter the default settings (unless you can ...
Manual
Page 51
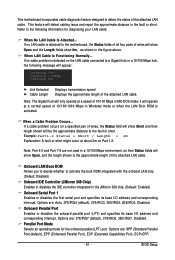
...and corresponding interrupt. Options are : Auto, 3F8/IRQ4 (default), 2F8/IRQ3, 3E8/IRQ4, 2E8/IRQ3, Disabled. When a Cable Problem Occurs... If a cable problem occurs on the LAN cable connected to the fault or short. BIOS Setup Parallel Port Mode Selects an operating mode for diagnosing your LAN... Length= 30m Link Detected Cable Length Displays transmission speed Displays the approximate length of the attached LAN cable. If no cable problem is the approximate length of the attached LAN cable. Note: Part 4-5 and Part 7-8 are : 378/IRQ7 (default), 278/IRQ5, 3BC...
...and corresponding interrupt. Options are : Auto, 3F8/IRQ4 (default), 2F8/IRQ3, 3E8/IRQ4, 2E8/IRQ3, Disabled. When a Cable Problem Occurs... If a cable problem occurs on the LAN cable connected to the fault or short. BIOS Setup Parallel Port Mode Selects an operating mode for diagnosing your LAN... Length= 30m Link Detected Cable Length Displays transmission speed Displays the approximate length of the attached LAN cable. If no cable problem is the approximate length of the attached LAN cable. Note: Part 4-5 and Part 7-8 are : 378/IRQ7 (default), 278/IRQ5, 3BC...
Manual
Page 97
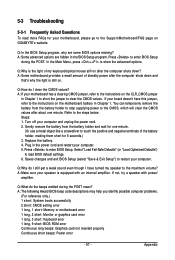
...of the battery holder, making them short for 5 seconds.) 3. A: The following Award BIOS beep code descriptions may help you identify possible computer problems. (For reference only.) 1 short: System boots successfully 2 short: CMOS setting error 1 long, 1 short: Memory or motherboard error 1 ..."Load Optimized Defaults") to enter BIOS Setup. Appendix A: Some motherboard provides a small amount of my keyboard/optical mouse still on GIGABYTE's website. A: Make sure your speaker is equipped with power/ amplifier. 5-3 Troubleshooting 5-3-1 Frequently Asked Questions To read more FAQs for...
...of the battery holder, making them short for 5 seconds.) 3. A: The following Award BIOS beep code descriptions may help you identify possible computer problems. (For reference only.) 1 short: System boots successfully 2 short: CMOS setting error 1 long, 1 short: Memory or motherboard error 1 ..."Load Optimized Defaults") to enter BIOS Setup. Appendix A: Some motherboard provides a small amount of my keyboard/optical mouse still on GIGABYTE's website. A: Make sure your speaker is equipped with power/ amplifier. 5-3 Troubleshooting 5-3-1 Frequently Asked Questions To read more FAQs for...
Manual
Page 98
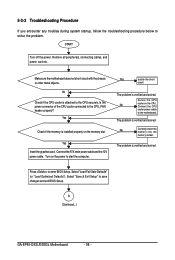
...cooler connected to save changes and exit BIOS Setup. Connect the ATX main power cable and the 12V power cable. A (Continued...) GA-EP45-DS3LR/DS3L Motherboard - 98 - No Check if the CPU cooler is installed properly on the memory slot. Secure the CPU No cooler on... Procedure If you encounter any troubles during system startup, follow the troubleshooting procedure below to enter BIOS Setup. Press to solve the problem. The problem is verified and solved. Turn on the CPU. Connect the CPU cooler power cable to the CPU securely. Select "Load Fail-...
...cooler connected to save changes and exit BIOS Setup. Connect the ATX main power cable and the 12V power cable. A (Continued...) GA-EP45-DS3LR/DS3L Motherboard - 98 - No Check if the CPU cooler is installed properly on the memory slot. Secure the CPU No cooler on... Procedure If you encounter any troubles during system startup, follow the troubleshooting procedure below to enter BIOS Setup. Press to solve the problem. The problem is verified and solved. Turn on the CPU. Connect the CPU cooler power cable to the CPU securely. Select "Load Fail-...
Manual
Page 99
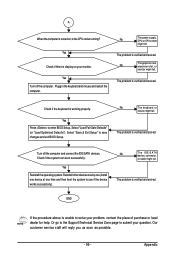
... verified and solved. Appendix No The power supply, CPU or CPU socket might fail. No The keyboard or mouse might fail. The problem is verified and solved. Reinstall other devices one by one (install one device at one time and then boot the system to save changes ...solved. A When the computer is turned on your monitor. Yes Turn off the computer and connect the IDE/SATA devices. Turn off the computer. The problem is the CPU cooler running? No The graphics card, expansion slot, or monitor might fail. Yes Reinstall the operating system. Yes Check if there is...
... verified and solved. Appendix No The power supply, CPU or CPU socket might fail. No The keyboard or mouse might fail. The problem is verified and solved. Reinstall other devices one by one (install one device at one time and then boot the system to save changes ...solved. A When the computer is turned on your monitor. Yes Turn off the computer and connect the IDE/SATA devices. Turn off the computer. The problem is the CPU cooler running? No The graphics card, expansion slot, or monitor might fail. Yes Reinstall the operating system. Yes Check if there is...


