Manual
Page 4
...read or download the information on/from the Support\Motherboard\Technology Guide page on your motherboard revision before updating motherboard BIOS, drivers, or when looking for technical information. Example: All... rights reserved. Disclaimer Information in this manual may be made by copyright laws and is 1.0. The trademarks mentioned in any form or by any means without prior notice. Documentation Classifications In order to assist in this manual is protected by GIGABYTE without GIGABYTE...
...read or download the information on/from the Support\Motherboard\Technology Guide page on your motherboard revision before updating motherboard BIOS, drivers, or when looking for technical information. Example: All... rights reserved. Disclaimer Information in this manual may be made by copyright laws and is 1.0. The trademarks mentioned in any form or by any means without prior notice. Documentation Classifications In order to assist in this manual is protected by GIGABYTE without GIGABYTE...
Manual
Page 7
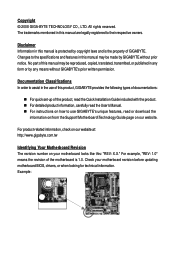
... cable (Part No. 12CF1-1CM001-32R) LPT port cable (Part No. 12CF1-1LP001-01R) - 7 - The box contents are for reference only. Box Contents GA-EP43-DS3LR or GA-EP43-DS3L or GA-EP43-S3L motherboard Motherboard driver disk User's Manual Quick Installation Guide One IDE cable and one floppy disk drive cable Two SATA 3Gb/s cables I/O Shield • The box...
... cable (Part No. 12CF1-1CM001-32R) LPT port cable (Part No. 12CF1-1LP001-01R) - 7 - The box contents are for reference only. Box Contents GA-EP43-DS3LR or GA-EP43-DS3L or GA-EP43-S3L motherboard Motherboard driver disk User's Manual Quick Installation Guide One IDE cable and one floppy disk drive cable Two SATA 3Gb/s cables I/O Shield • The box...

Manual
Page 20
... on the card are completely inserted into the PCI Express x16 slot. Make sure the card is fully inserted into the slot. 4. GA-EP43-DS3LR/DS3L/S3L Motherboard - 20 - Install the driver provided with your expansion card. • Always turn off the computer and unplug the power cord from the power outlet before you begin...
... on the card are completely inserted into the PCI Express x16 slot. Make sure the card is fully inserted into the slot. 4. GA-EP43-DS3LR/DS3L/S3L Motherboard - 20 - Install the driver provided with your expansion card. • Always turn off the computer and unplug the power cord from the power outlet before you begin...
Manual
Page 36
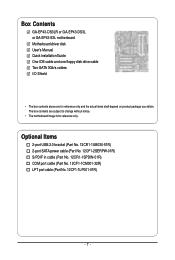
EP43-DS3L F1da . . . . : BIOS Setup : XpressRecovery2 : Boot Menu : Qflash 05/21/2008-P43-ICH10-7A89PG0FC-00 Function Keys Function Keys: : POST Screen Press the key to accept. In Boot Menu, use the up hard drive data using the motherboard driver disk, the key can access Boot Menu ... the device configured in Boot Menu. The system will still be used for one time only. A. To show the BIOS POST screen. GA-EP43-DS3LR/DS3L/S3L Motherboard - 36 - 2-1 Startup Screen The following screens may appear when the computer boots. The LOGO Screen (Default) :POST Screen :BIOS ...
EP43-DS3L F1da . . . . : BIOS Setup : XpressRecovery2 : Boot Menu : Qflash 05/21/2008-P43-ICH10-7A89PG0FC-00 Function Keys Function Keys: : POST Screen Press the key to accept. In Boot Menu, use the up hard drive data using the motherboard driver disk, the key can access Boot Menu ... the device configured in Boot Menu. The system will still be used for one time only. A. To show the BIOS POST screen. GA-EP43-DS3LR/DS3L/S3L Motherboard - 36 - 2-1 Startup Screen The following screens may appear when the computer boots. The LOGO Screen (Default) :POST Screen :BIOS ...

Manual
Page 61
... the system restart, "Xpress Install" will continue to install other applications included in the motherboard driver disk. • For USB 2.0 driver support under the Windows XP operating system, please install the Windows XP Service Pack 1 or later. Drivers Installation Failure to install. the Found New Hardware Wizard) displayed when "Xpress Install" is automatically displayed...
... the system restart, "Xpress Install" will continue to install other applications included in the motherboard driver disk. • For USB 2.0 driver support under the Windows XP operating system, please install the Windows XP Service Pack 1 or later. Drivers Installation Failure to install. the Found New Hardware Wizard) displayed when "Xpress Install" is automatically displayed...

Manual
Page 62
You can click the Install button on the right of an item to install it. 3-3 Technical Manuals This page provides GIGABYTE's application guides, content descriptions for this driver disk, and the motherboard manuals. 3-2 Application Software This page displays all the utilities and applications that GIGABYTE develops and some free software. GA-EP43-DS3LR/DS3L/S3L Motherboard - 62 -
You can click the Install button on the right of an item to install it. 3-3 Technical Manuals This page provides GIGABYTE's application guides, content descriptions for this driver disk, and the motherboard manuals. 3-2 Application Software This page displays all the utilities and applications that GIGABYTE develops and some free software. GA-EP43-DS3LR/DS3L/S3L Motherboard - 62 -

Manual
Page 64
The latest version of the BIOS, drivers, or applications will be displayed. GA-EP43-DS3LR/DS3L/S3L Motherboard - 64 - 3-6 Download Center To update the BIOS, drivers, or applications, click the Download Center button to link to the GIGABYTE Web site.
The latest version of the BIOS, drivers, or applications will be displayed. GA-EP43-DS3LR/DS3L/S3L Motherboard - 64 - 3-6 Download Center To update the BIOS, drivers, or applications, click the Download Center button to link to the GIGABYTE Web site.
Manual
Page 68
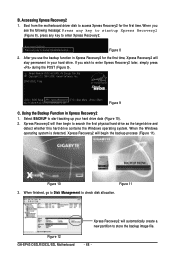
Boot from the motherboard driver disk to enter Xpress Recovery2 later, simply press during the POST (Figure 9). If you wish to access Xpress Recovery2 for the first time, Xpress Recovery2 ... : Qflash 05/21/2008-P43-ICH10-7A89PG0FC-00 Figure 9 C. When finished, go to Disk Management to store the backup image file. - 68 - Figure 12 GA-EP43-DS3LR/DS3L/S3L Motherboard Xpress Recovery2 will begin to start backing up your hard drive. Figure 10 Figure 11 3. Xpress Recovery2 will stay permanent in Xpress Recovery2 1. Award...
Boot from the motherboard driver disk to enter Xpress Recovery2 later, simply press during the POST (Figure 9). If you wish to access Xpress Recovery2 for the first time, Xpress Recovery2 ... : Qflash 05/21/2008-P43-ICH10-7A89PG0FC-00 Figure 9 C. When finished, go to Disk Management to store the backup image file. - 68 - Figure 12 GA-EP43-DS3LR/DS3L/S3L Motherboard Xpress Recovery2 will begin to start backing up your hard drive. Figure 10 Figure 11 3. Xpress Recovery2 will stay permanent in Xpress Recovery2 1. Award...
Manual
Page 77
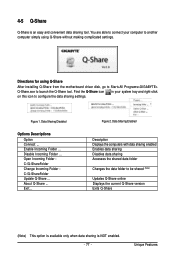
... Folder : C:\Q-ShareFolder Update Q-Share ... Find the Q-Share icon in your computer to another computer simply using Q-Share After installing Q-Share from the motherboard driver disk, go to Start>All Programs>GIGABYTE> Q-Share.exe to launch the Q-Share tool. Figure 2. Disable Incoming Folder ... Figure 1. Unique Features 4-5 Q-Share Q-Share is NOT enabled. - 77 - You are...
... Folder : C:\Q-ShareFolder Update Q-Share ... Find the Q-Share icon in your computer to another computer simply using Q-Share After installing Q-Share from the motherboard driver disk, go to Start>All Programs>GIGABYTE> Q-Share.exe to launch the Q-Share tool. Figure 2. Disable Incoming Folder ... Figure 1. Unique Features 4-5 Q-Share Q-Share is NOT enabled. - 77 - You are...

Manual
Page 79
... to ensure optimal performance, it is set to create RAID, you do not want to AHCI or RAID mode. - 79 - Only for GA-EP43-DS3LR. (Note 1) Skip this step if you use two hard drives with identical model and capacity). Appendix Configure a RAID array in BIOS Setup...SATA hard drive(s) in your computer Attach one hard drive. • An empty formatted floppy disk. • Windows Vista/XP setup disk. • Motherboard driver disk. 5-1-1 Configuring the Onboard SATA Controller A. Configure SATA controller mode in RAID BIOS. (Note 1) D. Chapter 5 Appendix 5-1 Configuring SATA Hard Drive...
... to ensure optimal performance, it is set to create RAID, you do not want to AHCI or RAID mode. - 79 - Only for GA-EP43-DS3LR. (Note 1) Skip this step if you use two hard drives with identical model and capacity). Appendix Configure a RAID array in BIOS Setup...SATA hard drive(s) in your computer Attach one hard drive. • An empty formatted floppy disk. • Windows Vista/XP setup disk. • Motherboard driver disk. 5-1-1 Configuring the Onboard SATA Controller A. Configure SATA controller mode in RAID BIOS. (Note 1) D. Chapter 5 Appendix 5-1 Configuring SATA Hard Drive...

Manual
Page 85
...from the menu. Prepare a startup disk that is/are configured to RAID/AHCI mode, you first have to copy the SATA controller driver from the motherboard driver disk to your optical drive folder, double click the MENU.exe file in Figure 2, select 7) Intel Matrix Storage Manager 32 bit ... the Windows setup process. See the instructions below about how to that in MS-DOS mode(Note). Step 1: Insert the prepared startup disk and motherboard driver disk in your optical drive (example: D:\>). Press after each command (Figure 1): cd bootdrv menu Step 2: When the controller menu (Figure 2) ...
...from the menu. Prepare a startup disk that is/are configured to RAID/AHCI mode, you first have to copy the SATA controller driver from the motherboard driver disk to your optical drive folder, double click the MENU.exe file in Figure 2, select 7) Intel Matrix Storage Manager 32 bit ... the Windows setup process. See the instructions below about how to that in MS-DOS mode(Note). Step 1: Insert the prepared startup disk and motherboard driver disk in your optical drive (example: D:\>). Press after each command (Figure 1): cd bootdrv menu Step 2: When the controller menu (Figure 2) ...
Manual
Page 86
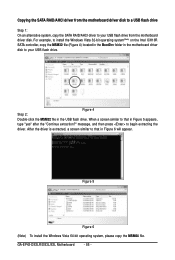
...system, please copy the MSM64 file. Figure 4 Step 2: Double-click the MSM32 file in Figure 6 will appear. After the driver is extracted, a screen similar to that in the motherboard driver disk to install the Windows Vista 32-bit operating system(Note) on the Intel ICH10R SATA controller, copy the MSM32 file... 4) located in the BootDrv folder in Figure 5 appears, type "yes" after the "Continue extraction?" For example, to your USB flash drive from the motherboard driver disk. When a screen similar to begin extracting the driver. GA-EP43-DS3LR/DS3L/S3L Motherboard - 86 -
...system, please copy the MSM64 file. Figure 4 Step 2: Double-click the MSM32 file in Figure 6 will appear. After the driver is extracted, a screen similar to that in the motherboard driver disk to install the Windows Vista 32-bit operating system(Note) on the Intel ICH10R SATA controller, copy the MSM32 file... 4) located in the BootDrv folder in Figure 5 appears, type "yes" after the "Continue extraction?" For example, to your USB flash drive from the motherboard driver disk. When a screen similar to begin extracting the driver. GA-EP43-DS3LR/DS3L/S3L Motherboard - 86 -
Manual
Page 88
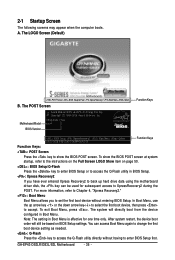
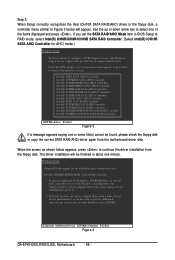
...ICH10R SATA RAID Controller. (Select Intel(R) ICH10R SATA AHCI Controller for AHCI mode.) Windows Setup You have chosen to continue the driver installation from the following mass storage device(s): Intel(R) ICH8R/ICH9R/ICH10R SATA RAID Controller * To specify additional SCSI adapters, CD-..., please check the floppy disk or copy the correct SATA RAID/AHCI driver again from a mass storage device manufacturer, or do not have any device support disks from the motherboard driver disk. S=Specify Additional Device ENTER=Continue F3=Exit Figure 4 GA-EP43-DS3LR/DS3L/S3L Motherboard - 88 -
...ICH10R SATA RAID Controller. (Select Intel(R) ICH10R SATA AHCI Controller for AHCI mode.) Windows Setup You have chosen to continue the driver installation from the following mass storage device(s): Intel(R) ICH8R/ICH9R/ICH10R SATA RAID Controller * To specify additional SCSI adapters, CD-..., please check the floppy disk or copy the correct SATA RAID/AHCI driver again from a mass storage device manufacturer, or do not have any device support disks from the motherboard driver disk. S=Specify Additional Device ENTER=Continue F3=Exit Figure 4 GA-EP43-DS3LR/DS3L/S3L Motherboard - 88 -
Manual
Page 90
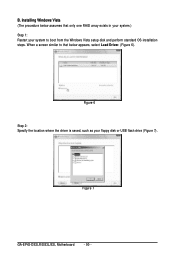
Figure 7 GA-EP43-DS3LR/DS3L/S3L Motherboard - 90 - When a screen similar to boot from the Windows Vista setup disk and perform standard OS installation steps. Installing Windows Vista (The procedure below appears, select Load Driver. (Figure 6). Figure 6 Step 2: Specify the location where the driver is saved, such as your system to that below assumes that only one RAID array exists in your system.) Step 1: Restart your floppy disk or USB flash drive (Figure 7). B.
Figure 7 GA-EP43-DS3LR/DS3L/S3L Motherboard - 90 - When a screen similar to boot from the Windows Vista setup disk and perform standard OS installation steps. Installing Windows Vista (The procedure below appears, select Load Driver. (Figure 6). Figure 6 Step 2: Specify the location where the driver is saved, such as your system to that below assumes that only one RAID array exists in your system.) Step 1: Restart your floppy disk or USB flash drive (Figure 7). B.

Manual
Page 92
... audio streams (in jack and manually configure the jack for High Definition Audio" has been installed from the motherboard driver disk and your microphone to the Mic in and out) to instructions on the back panel which support 2/4/5.1/7.1-channel audio... XP as the example operating system.) Step 1: After installing the audio driver, the Audio Manager icon will be simultaneously processed. Configuring Speakers: (The following for each jack through the audio driver. GA-EP43-DS3LR/DS3L/S3L Motherboard - 92 - 5-2 Configuring Audio Input and Output 5-2-1 Configuring 2/4/5.1/7.1-Channel...
... audio streams (in jack and manually configure the jack for High Definition Audio" has been installed from the motherboard driver disk and your microphone to the Mic in and out) to instructions on the back panel which support 2/4/5.1/7.1-channel audio... XP as the example operating system.) Step 1: After installing the audio driver, the Audio Manager icon will be simultaneously processed. Configuring Speakers: (The following for each jack through the audio driver. GA-EP43-DS3LR/DS3L/S3L Motherboard - 92 - 5-2 Configuring Audio Input and Output 5-2-1 Configuring 2/4/5.1/7.1-Channel...

Manual
Page 96
... jack (pink) on the front panel. Doubleclick the icon to open the volume control panel. Then configure the jack for microphone functionality. GA-EP43-DS3LR/DS3L/S3L Motherboard - 96 - Step 2: Connect your microphone to the Mic in jack (pink) on the front panel and back panel cannot be used... at the same time. 5-2-3 Configuring Microphone Recording Step 1: After installing the audio driver, the Audio Manager icon will appear in your system tray ...
... jack (pink) on the front panel. Doubleclick the icon to open the volume control panel. Then configure the jack for microphone functionality. GA-EP43-DS3LR/DS3L/S3L Motherboard - 96 - Step 2: Connect your microphone to the Mic in jack (pink) on the front panel and back panel cannot be used... at the same time. 5-2-3 Configuring Microphone Recording Step 1: After installing the audio driver, the Audio Manager icon will appear in your system tray ...


