Manual
Page 5
... 65 3-1 Installing Chipset Drivers 65 3-2 Application Software 66 3-3 Technical Manuals 66 3-4 Contact ...67 3-5 System ...67 3-6 Download Center 68 Chapter 4 Unique Features 69 4-1 Xpress ... Driver and Operating System 93 5-2 ConfiguringAudio Input and Output 98 5-2-1 Configuring 2/4/5.1/7.1-Channel Audio 98 5-2-2 Installing the S/PDIF In Cable (Optional 100 5-2-3 Configuring Microphone Recording 102 5-2-4 Using the Sound Recorder 104 5-3 Troubleshooting 105 5-3-1 Frequently Asked Questions 105 5-3-2 Troubleshooting Procedure 106 Regulatory Statements 108 Only for GA-EP43-DS3R....
... 65 3-1 Installing Chipset Drivers 65 3-2 Application Software 66 3-3 Technical Manuals 66 3-4 Contact ...67 3-5 System ...67 3-6 Download Center 68 Chapter 4 Unique Features 69 4-1 Xpress ... Driver and Operating System 93 5-2 ConfiguringAudio Input and Output 98 5-2-1 Configuring 2/4/5.1/7.1-Channel Audio 98 5-2-2 Installing the S/PDIF In Cable (Optional 100 5-2-3 Configuring Microphone Recording 102 5-2-4 Using the Sound Recorder 104 5-3 Troubleshooting 105 5-3-1 Frequently Asked Questions 105 5-3-2 Troubleshooting Procedure 106 Regulatory Statements 108 Only for GA-EP43-DS3R....
Manual
Page 6
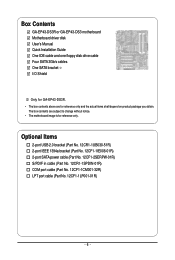
...32R) LPT port cable (Part No. 12CF1-1LP001-01R) - 6 - The box contents are for reference only. Box Contents GA-EP43-DS3R or GA-EP43-DS3 motherboard Motherboard driver disk User's Manual Quick Installation Guide One IDE cable and one floppy disk drive cable Four SATA 3Gb/s cables One SATA bracket ...I/O Shield Only for GA-EP43-DS3R. • The box contents above are subject to change without notice. • The ...
...32R) LPT port cable (Part No. 12CF1-1LP001-01R) - 6 - The box contents are for reference only. Box Contents GA-EP43-DS3R or GA-EP43-DS3 motherboard Motherboard driver disk User's Manual Quick Installation Guide One IDE cable and one floppy disk drive cable Four SATA 3Gb/s cables One SATA bracket ...I/O Shield Only for GA-EP43-DS3R. • The box contents above are subject to change without notice. • The ...
Manual
Page 18
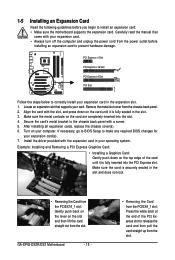
...is securely seated in the expansion slot. 1. If necessary, go to BIOS Setup to make any required BIOS changes for your computer. GA-EP43-DS3R/DS3 Motherboard - 18 - • Removing the Card from the power outlet before you begin to install an expansion card: • ...Make sure the motherboard supports the expansion card. After installing all expansion cards, replace the chassis cover(s). 6. Install the driver provided with a screw. 5. Example: Installing and Removing a PCI Express Graphics Card: • Installing a Graphics Card: Gently push down on...
...is securely seated in the expansion slot. 1. If necessary, go to BIOS Setup to make any required BIOS changes for your computer. GA-EP43-DS3R/DS3 Motherboard - 18 - • Removing the Card from the power outlet before you begin to install an expansion card: • ...Make sure the motherboard supports the expansion card. After installing all expansion cards, replace the chassis cover(s). 6. Install the driver provided with a screw. 5. Example: Installing and Removing a PCI Express Graphics Card: • Installing a Graphics Card: Gently push down on...

Manual
Page 36
... (Default) :POST Screen :BIOS Setup/Q-Flash :XpressRecovery2 :Boot Menu :Qflash Function Keys B. To show the BIOS POST screen. Motherboard Model BIOS Version EP43-DS3R D2 . . . . Function Keys: : BIOS Setup : XpressRecovery2 : Boot Menu : Qflash 04/16/2008-P43-ICH10-7A89PG0CC-00 Function Keys :... Menu, use the up hard drive data using the motherboard driver disk, the key can access Boot Menu again to change the first boot device setting as needed. : Q-Flash Press the key to accept. GA-EP43-DS3R/DS3 Motherboard - 36 - 2-1 Startup Screen The following screens may...
... (Default) :POST Screen :BIOS Setup/Q-Flash :XpressRecovery2 :Boot Menu :Qflash Function Keys B. To show the BIOS POST screen. Motherboard Model BIOS Version EP43-DS3R D2 . . . . Function Keys: : BIOS Setup : XpressRecovery2 : Boot Menu : Qflash 04/16/2008-P43-ICH10-7A89PG0CC-00 Function Keys :... Menu, use the up hard drive data using the motherboard driver disk, the key can access Boot Menu again to change the first boot device setting as needed. : Q-Flash Press the key to accept. GA-EP43-DS3R/DS3 Motherboard - 36 - 2-1 Startup Screen The following screens may...
Manual
Page 51
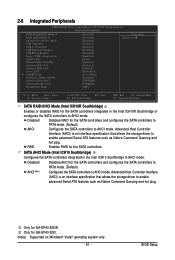
... to PATA mode. (Default) AHCI (Note) Configures the SATA controllers to AHCI mode. Disabled Disables AHCI for GA-EP43-DS3R. BIOS Setup Disabled Disables RAID for GA-EP43-DS3. (Note) Supported on Windows® Vista® operating system only. - 51 - Only for the SATA ...such as Native Command Queuing and hot plug. Advanced Host Controller Interface (AHCI) is an interface specification that allows the storage driver to AHCI mode. 2-6 Integrated Peripherals CMOS Setup Utility-Copyright (C) 1984-2008 Award Software Integrated Peripherals SATA RAID/AHCI Mode 1 ...
... to PATA mode. (Default) AHCI (Note) Configures the SATA controllers to AHCI mode. Disabled Disables AHCI for GA-EP43-DS3R. BIOS Setup Disabled Disables RAID for GA-EP43-DS3. (Note) Supported on Windows® Vista® operating system only. - 51 - Only for the SATA ...such as Native Command Queuing and hot plug. Advanced Host Controller Interface (AHCI) is an interface specification that allows the storage driver to AHCI mode. 2-6 Integrated Peripherals CMOS Setup Utility-Copyright (C) 1984-2008 Award Software Integrated Peripherals SATA RAID/AHCI Mode 1 ...
Manual
Page 66
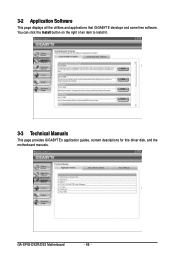
3-2 Application Software This page displays all the utilities and applications that GIGABYTE develops and some free software. GA-EP43-DS3R/DS3 Motherboard - 66 - You can click the Install button on the right of an item to install it. 3-3 Technical Manuals This page provides GIGABYTE's application guides, content descriptions for this driver disk, and the motherboard manuals.
3-2 Application Software This page displays all the utilities and applications that GIGABYTE develops and some free software. GA-EP43-DS3R/DS3 Motherboard - 66 - You can click the Install button on the right of an item to install it. 3-3 Technical Manuals This page provides GIGABYTE's application guides, content descriptions for this driver disk, and the motherboard manuals.
Manual
Page 68
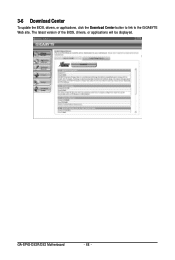
GA-EP43-DS3R/DS3 Motherboard - 68 - The latest version of the BIOS, drivers, or applications will be displayed. 3-6 Download Center To update the BIOS, drivers, or applications, click the Download Center button to link to the GIGABYTE Web site.
GA-EP43-DS3R/DS3 Motherboard - 68 - The latest version of the BIOS, drivers, or applications will be displayed. 3-6 Download Center To update the BIOS, drivers, or applications, click the Download Center button to link to the GIGABYTE Web site.

Manual
Page 72
Figure 8 2. EP43-DS3R D2 . . . . : BIOS Setup : XpressRecovery2 : Boot Menu : Qflash 04/16/2008-P43-ICH10-7A89PG0CC-00 Figure 9 C. Figure 10 Figure 11 3. Boot from the motherboard driver disk to search the first physical hard drive as the target drive and detect whether this ...When the Windows operating system is detected, Xpress Recovery2 will stay permanent in your hard drive data (Figure 10). 2. Figure 12 GA-EP43-DS3R/DS3 Motherboard Xpress Recovery2 will then begin to access Xpress Recovery2 for the first time, Xpress Recovery2 will begin the backup process (Figure ...
Figure 8 2. EP43-DS3R D2 . . . . : BIOS Setup : XpressRecovery2 : Boot Menu : Qflash 04/16/2008-P43-ICH10-7A89PG0CC-00 Figure 9 C. Figure 10 Figure 11 3. Boot from the motherboard driver disk to search the first physical hard drive as the target drive and detect whether this ...When the Windows operating system is detected, Xpress Recovery2 will stay permanent in your hard drive data (Figure 10). 2. Figure 12 GA-EP43-DS3R/DS3 Motherboard Xpress Recovery2 will then begin to access Xpress Recovery2 for the first time, Xpress Recovery2 will begin the backup process (Figure ...

Manual
Page 81
...USB flash drive, users are lost. • After creating the password(s) and key(s) associated the TPM, be sure to Chapter 2, "BIOS Setup," for GA-EP43-DS3R. (Note 1) (Note 2) (Note 3) (Note 4) This feature is being stored on the Ultra TPM icon and select Duplicate. Encrypted files will replace ... to still have to at least two USB flash drives. GIGABYTE is normal. Go to USB flash drive(s), right-click on your computer. Step 3: Install the Ultra TPM utility from the motherboard driver disk (select Infineon TPM Driver). A screen in Figure 1 will render the files encrypted ...
...USB flash drive, users are lost. • After creating the password(s) and key(s) associated the TPM, be sure to Chapter 2, "BIOS Setup," for GA-EP43-DS3R. (Note 1) (Note 2) (Note 3) (Note 4) This feature is being stored on the Ultra TPM icon and select Duplicate. Encrypted files will replace ... to still have to at least two USB flash drives. GIGABYTE is normal. Go to USB flash drive(s), right-click on your computer. Step 3: Install the Ultra TPM utility from the motherboard driver disk (select Infineon TPM Driver). A screen in Figure 1 will render the files encrypted ...

Manual
Page 82
...) This option is available only when data sharing is an easy and convenient data sharing tool. GA-EP43-DS3R/DS3 Motherboard - 82 - Directions for using Q-Share After installing Q-Share from the motherboard driver disk, go to Start>All Programs>GIGABYTE> Q-Share.exe to configure the data sharing settings. Figure 1. Figure 2. Data Sharing Disabled Options Descriptions Option...
...) This option is available only when data sharing is an easy and convenient data sharing tool. GA-EP43-DS3R/DS3 Motherboard - 82 - Directions for using Q-Share After installing Q-Share from the motherboard driver disk, go to Start>All Programs>GIGABYTE> Q-Share.exe to configure the data sharing settings. Figure 1. Figure 2. Data Sharing Disabled Options Descriptions Option...

Manual
Page 85
... BIOS. (Note 1) D. Configure a RAID array in BIOS Setup. Only for GA-EP43-DS3R. - 85 - Chapter 5 Appendix 5-1 Configuring SATA Hard Drive(s) To configure SATA hard drive(s), follow the steps below: A. Then connect the power connector from your computer. Install the SATA RAID/AHCI driver and operating system. (Note 2) Before you begin Please prepare: • At...
... BIOS. (Note 1) D. Configure a RAID array in BIOS Setup. Only for GA-EP43-DS3R. - 85 - Chapter 5 Appendix 5-1 Configuring SATA Hard Drive(s) To configure SATA hard drive(s), follow the steps below: A. Then connect the power connector from your computer. Install the SATA RAID/AHCI driver and operating system. (Note 2) Before you begin Please prepare: • At...
Manual
Page 92
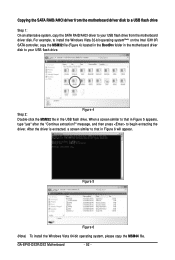
...to that in the USB flash drive. Figure 4 Step 2: Double-click the MSM32 file in Figure 6 will appear. GA-EP43-DS3R/DS3 Motherboard - 92 - When a screen similar to begin extracting the driver. Figure 5 Figure 6 (Note) To install the Windows Vista 64-bit operating system, please copy the MSM64 file. ...Copying the SATA RAID/AHCI driver from the motherboard driver disk. For example, to install the Windows Vista 32-bit operating system(Note) on the Intel ICH10R SATA controller, copy the ...
...to that in the USB flash drive. Figure 4 Step 2: Double-click the MSM32 file in Figure 6 will appear. GA-EP43-DS3R/DS3 Motherboard - 92 - When a screen similar to begin extracting the driver. Figure 5 Figure 6 (Note) To install the Windows Vista 64-bit operating system, please copy the MSM64 file. ...Copying the SATA RAID/AHCI driver from the motherboard driver disk. For example, to install the Windows Vista 32-bit operating system(Note) on the Intel ICH10R SATA controller, copy the ...
Manual
Page 94
... support disks from a mass storage device manufacturer, or do not have chosen to continue the driver installation from the motherboard driver disk. When the screen as shown below will appear. S=Specify Additional Device ENTER=Continue F3=Exit Figure 4 GA-EP43-DS3R/DS3 Motherboard - 94 - Use the up or down arrow key to Figure 3 below appears, press...
... support disks from a mass storage device manufacturer, or do not have chosen to continue the driver installation from the motherboard driver disk. When the screen as shown below will appear. S=Specify Additional Device ENTER=Continue F3=Exit Figure 4 GA-EP43-DS3R/DS3 Motherboard - 94 - Use the up or down arrow key to Figure 3 below appears, press...
Manual
Page 96
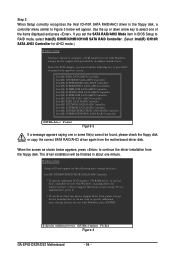
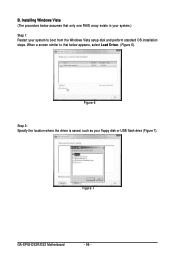
When a screen similar to boot from the Windows Vista setup disk and perform standard OS installation steps. Figure 6 Step 2: Specify the location where the driver is saved, such as your system to that only one RAID array exists in your system.) Step 1: Restart your floppy disk or USB flash drive (Figure 7). Figure 7 GA-EP43-DS3R/DS3 Motherboard - 96 - B. Installing Windows Vista (The procedure below assumes that below appears, select Load Driver. (Figure 6).
When a screen similar to boot from the Windows Vista setup disk and perform standard OS installation steps. Figure 6 Step 2: Specify the location where the driver is saved, such as your system to that only one RAID array exists in your system.) Step 1: Restart your floppy disk or USB flash drive (Figure 7). Figure 7 GA-EP43-DS3R/DS3 Motherboard - 96 - B. Installing Windows Vista (The procedure below assumes that below appears, select Load Driver. (Figure 6).

Manual
Page 98
.../Subwoofer speaker out, and Side speaker out. all at the same time. Configuring Speakers: (The following for each jack through the audio driver. GA-EP43-DS3R/DS3 Motherboard - 98 - 5-2 Configuring Audio Input and Output 5-2-1 Configuring 2/4/5.1/7.1-Channel Audio The motherboard provides six audio jacks on both of the front...the user to the Mic in jack and manually configure the jack for High Definition Audio" has been installed from the motherboard driver disk and your system tray. Doubleclick the icon to the right shows the default audio jack assignments. If you can listen to...
.../Subwoofer speaker out, and Side speaker out. all at the same time. Configuring Speakers: (The following for each jack through the audio driver. GA-EP43-DS3R/DS3 Motherboard - 98 - 5-2 Configuring Audio Input and Output 5-2-1 Configuring 2/4/5.1/7.1-Channel Audio The motherboard provides six audio jacks on both of the front...the user to the Mic in jack and manually configure the jack for High Definition Audio" has been installed from the motherboard driver disk and your system tray. Doubleclick the icon to the right shows the default audio jack assignments. If you can listen to...

Manual
Page 102
Doubleclick the icon to open the volume control panel. GA-EP43-DS3R/DS3 Motherboard - 102 - Then configure the jack for microphone functionality. Step 2: Connect your microphone to the Mic in jack (pink) on the back panel or the ... back panel cannot be used at the same time. Note: The microphone functions on the front panel. 5-2-3 Configuring Microphone Recording Step 1: After installing the audio driver, the Audio Manager icon will appear in your system tray and click it to access the Audio Control Panel.
Doubleclick the icon to open the volume control panel. GA-EP43-DS3R/DS3 Motherboard - 102 - Then configure the jack for microphone functionality. Step 2: Connect your microphone to the Mic in jack (pink) on the back panel or the ... back panel cannot be used at the same time. Note: The microphone functions on the front panel. 5-2-3 Configuring Microphone Recording Step 1: After installing the audio driver, the Audio Manager icon will appear in your system tray and click it to access the Audio Control Panel.


