
Manual
Page 11
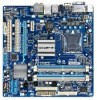
... header 1 x S/PDIF Out header 2 x USB 2.0/1.1 headers 1 x IEEE 1394a header 1 x serial port header 1 x power LED header 1 x chassis intrusion header 1 x clearing CMOS jumper Back Panel 1 x PS/2 keyboard port Connectors 1 x PS/2 mouse port 1 x D-Sub port 1 x DVI-D port (Note 3) (Note 4) 1 x HDMI port (Note 4) ...
... header 1 x S/PDIF Out header 2 x USB 2.0/1.1 headers 1 x IEEE 1394a header 1 x serial port header 1 x power LED header 1 x chassis intrusion header 1 x clearing CMOS jumper Back Panel 1 x PS/2 keyboard port Connectors 1 x PS/2 mouse port 1 x D-Sub port 1 x DVI-D port (Note 3) (Note 4) 1 x HDMI port (Note 4) ...

Manual
Page 26
...handled in accordance with an equivalent one minute. (Or use a metal object like a screwdriver to a low level, or the CMOS values may not be accurate or may clear the CMOS values by removing the battery: 1. Definition 1 MPD+ 1 2 MPD- 3 MPD- Turn off (S5). The LED is on...power cord and restart your computer and unplug the power cord before replacing the battery. • Replace the battery with local environmental regulations. GA-EG41MF-US2H Motherboard - 26 - Replace the battery. 4. System Status LED S0 On S1 Blinking S3/S4/S5 Off 9) BATTERY The battery provides ...
...handled in accordance with an equivalent one minute. (Or use a metal object like a screwdriver to a low level, or the CMOS values may not be accurate or may clear the CMOS values by removing the battery: 1. Definition 1 MPD+ 1 2 MPD- 3 MPD- Turn off (S5). The LED is on...power cord and restart your computer and unplug the power cord before replacing the battery. • Replace the battery with local environmental regulations. GA-EG41MF-US2H Motherboard - 26 - Replace the battery. 4. System Status LED S0 On S1 Blinking S3/S4/S5 Off 9) BATTERY The battery provides ...

Manual
Page 32
...the CPU loading, the more details. Open: Normal Short: Clear CMOS Values • Always turn off your computer and unplug the power cord from the power outlet before clearing the CMOS values. • After clearing the CMOS values and before turning on the two pins to temporarily short...settings (refer to Chapter 4, "Dynamic Energy Saver Advanced," for more the number of lighted LEDs indicates the CPU loading. GA-EG41MF-US2H Motherboard - 32 - To clear the CMOS values, place a jumper cap on your computer, be sure to factory defaults. To enable the Phase LED display function,...
...the CPU loading, the more details. Open: Normal Short: Clear CMOS Values • Always turn off your computer and unplug the power cord from the power outlet before clearing the CMOS values. • After clearing the CMOS values and before turning on the two pins to temporarily short...settings (refer to Chapter 4, "Dynamic Energy Saver Advanced," for more the number of lighted LEDs indicates the CPU loading. GA-EG41MF-US2H Motherboard - 32 - To clear the CMOS values, place a jumper cap on your computer, be sure to factory defaults. To enable the Phase LED display function,...

Manual
Page 33
... system instability or other unexpected results. To see more advanced BIOS Setup menu options, you can press + in the main menu of the battery/clearing CMOS jumper in Chapter 1 for the beep codes description. • It is a Windows-based utility that you do it is turned off, the ...battery on the motherboard. Refer to Chapter 5, "Troubleshooting," for how to clear the CMOS values.) - 33 - BIOS Setup To upgrade the BIOS, use either the GIGABYTE Q-Flash or @BIOS utility . • Q-Flash allows the user to quickly and easily upgrade or back up ...
... system instability or other unexpected results. To see more advanced BIOS Setup menu options, you can press + in the main menu of the battery/clearing CMOS jumper in Chapter 1 for the beep codes description. • It is a Windows-based utility that you do it is turned off, the ...battery on the motherboard. Refer to Chapter 5, "Troubleshooting," for how to clear the CMOS values.) - 33 - BIOS Setup To upgrade the BIOS, use either the GIGABYTE Q-Flash or @BIOS utility . • Q-Flash allows the user to quickly and easily upgrade or back up ...

Manual
Page 37
This page is dependent on your overall system configurations. BIOS Setup If this occurs, clear the CMOS values and reset the board to boot. 2-3 MB Intelligent Tweaker(M.I.T.) CMOS Setup Utility-Copyright (C) 1984-2009 Award Software MB Intelligent Tweaker(M.I.T.) Robust Graphics Booster ...Enter: Select F5: Previous Values +/-/PU/PD: Value F10: Save F6: Fail-Safe Defaults ESC: Exit F1: General Help F7: Optimized Defaults CMOS Setup Utility-Copyright (C) 1984-2009 Award Software MB Intelligent Tweaker(M.I.T.) >>>>> Standard Timing Control x CAS Latency Time 4 x tRCD 4 x tRP ...
This page is dependent on your overall system configurations. BIOS Setup If this occurs, clear the CMOS values and reset the board to boot. 2-3 MB Intelligent Tweaker(M.I.T.) CMOS Setup Utility-Copyright (C) 1984-2009 Award Software MB Intelligent Tweaker(M.I.T.) Robust Graphics Booster ...Enter: Select F5: Previous Values +/-/PU/PD: Value F10: Save F6: Fail-Safe Defaults ESC: Exit F1: General Help F7: Optimized Defaults CMOS Setup Utility-Copyright (C) 1984-2009 Award Software MB Intelligent Tweaker(M.I.T.) >>>>> Standard Timing Control x CAS Latency Time 4 x tRCD 4 x tRP ...

Manual
Page 38
... Booster (R.G.B.) helps to manually set the R.G.B. CPU Clock Ratio (Note) Allows you to alter the clock ratio for automated system reboot, or clear the CMOS values to reset the board to default values. (Default: Disabled) CPU Host Frequency (Mhz) Allows you install a CPU that the CPU frequency...fails to boot after overclocking, please wait for 20 seconds to allow the CPU Host Frequency item below to automatically set the CPU host frequency. GA-EG41MF-US2H Motherboard - 38 - Auto sets the PCIe clock frequency to standard 100 MHz. (Default: Auto) (Note) This item appears only if you...
... Booster (R.G.B.) helps to manually set the R.G.B. CPU Clock Ratio (Note) Allows you to alter the clock ratio for automated system reboot, or clear the CMOS values to reset the board to default values. (Default: Disabled) CPU Host Frequency (Mhz) Allows you install a CPU that the CPU frequency...fails to boot after overclocking, please wait for 20 seconds to allow the CPU Host Frequency item below to automatically set the CPU host frequency. GA-EG41MF-US2H Motherboard - 38 - Auto sets the PCIe clock frequency to standard 100 MHz. (Default: Auto) (Note) This item appears only if you...

Manual
Page 56
... FAN Fail Warning Allows the system to the motherboard CI header. Enabled allows the CPU fan to run at full speed. (Default: Enabled) GA-EG41MF-US2H Motherboard - 56 - If the system chassis cover is not connected or fails. Current CPU/SYSTEM FAN Speed (RPM) Displays current CPU/system ...Voltage(V) Vcore/DDR18V/+3.3V/+12V Displays the current system voltages. If disabled, CPU fan runs at different speed according to CMOS, and then restart your system. To clear the chassis intrusion status record, set Reset Case Open Status to Enabled, save the settings to the CPU temperature. ...
... FAN Fail Warning Allows the system to the motherboard CI header. Enabled allows the CPU fan to run at full speed. (Default: Enabled) GA-EG41MF-US2H Motherboard - 56 - If the system chassis cover is not connected or fails. Current CPU/SYSTEM FAN Speed (RPM) Displays current CPU/system ...Voltage(V) Vcore/DDR18V/+3.3V/+12V Displays the current system voltages. If disabled, CPU fan runs at different speed according to CMOS, and then restart your system. To clear the chassis intrusion status record, set Reset Case Open Status to Enabled, save the settings to the CPU temperature. ...

Manual
Page 57
... Optimized defaults after updating the BIOS or after clearing the CMOS values. - 57 - 2-11 Load Fail-Safe Defaults CMOS Setup Utility-Copyright (C) 1984-2009 Award Software MB Intelligent Tweaker(M.I .T.) PC Health Status Standard CMOS Features Load Fail-Safe Defaults Advanced BIOS...PnP/PCI Configurations Exit Without Saving ESC: Quit F8: Q-Flash Select Item F10: Save & Exit Setup F11: Save CMOS to BIOS F12: Load CMOS from BIOS Load Optimized Defaults Press on this item and then press the key to load the optimal BIOS default settings. ...
... Optimized defaults after updating the BIOS or after clearing the CMOS values. - 57 - 2-11 Load Fail-Safe Defaults CMOS Setup Utility-Copyright (C) 1984-2009 Award Software MB Intelligent Tweaker(M.I .T.) PC Health Status Standard CMOS Features Load Fail-Safe Defaults Advanced BIOS...PnP/PCI Configurations Exit Without Saving ESC: Quit F8: Q-Flash Select Item F10: Save & Exit Setup F11: Save CMOS to BIOS F12: Load CMOS from BIOS Load Optimized Defaults Press on this item and then press the key to load the optimal BIOS default settings. ...

Manual
Page 58
...Fail-Safe Defaults Load Optimized Defaults Set Supervisor Password Set User Password Save & Exit Setup Exit Without Saving F11: Save CMOS to BIOS F12: Load CMOS from BIOS Change/Set/Disable Password Press on the password item and when requested for entering BIOS Setup and making BIOS .... To clear the password, press on this item and type the password with up to continue system boot. User Password When the Password Check item is set to System, you must enter the supervisor password (or user password) at system startup and when entering BIOS Setup. GA-EG41MF-US2H Motherboard -...
...Fail-Safe Defaults Load Optimized Defaults Set Supervisor Password Set User Password Save & Exit Setup Exit Without Saving F11: Save CMOS to BIOS F12: Load CMOS from BIOS Change/Set/Disable Password Press on the password item and when requested for entering BIOS Setup and making BIOS .... To clear the password, press on this item and type the password with up to continue system boot. User Password When the Password Check item is set to System, you must enter the supervisor password (or user password) at system startup and when entering BIOS Setup. GA-EG41MF-US2H Motherboard -...
Manual
Page 84
... First, make sure the Microsoft UAA Bus Driver for High Definition Audio and select Disable and Uninstall. If not, please update it from GIGABYTE's website to show the advanced options. Then make sure Service Pack 1 or Service Pack 2 has been installed (check in Chapter 1 to... beeps: Graphics card not inserted properly 1 long, 2 short: Monitor or graphics card error Continuous short beeps: Power error GA-EG41MF-US2H Motherboard - 84 - Q: Why cannot I clear the CMOS values? Q: Why is present in Chapter 1. For more FAQs for your board doesn't have this jumper, refer to the...
... First, make sure the Microsoft UAA Bus Driver for High Definition Audio and select Disable and Uninstall. If not, please update it from GIGABYTE's website to show the advanced options. Then make sure Service Pack 1 or Service Pack 2 has been installed (check in Chapter 1 to... beeps: Graphics card not inserted properly 1 long, 2 short: Monitor or graphics card error Continuous short beeps: Power error GA-EG41MF-US2H Motherboard - 84 - Q: Why cannot I clear the CMOS values? Q: Why is present in Chapter 1. For more FAQs for your board doesn't have this jumper, refer to the...


