
Manual
Page 9
...pad or within an electrostatic shielding container. • Before unplugging the power supply cable from the motherboard, make sure the power supply has been turned off. • Before turning on the power, make sure the power supply voltage has been set according to the local voltage standard. •...; Before using the product, please verify that all cables and power connectors of your hardware ...
...pad or within an electrostatic shielding container. • Before unplugging the power supply cable from the motherboard, make sure the power supply has been turned off. • Before turning on the power, make sure the power supply voltage has been set according to the local voltage standard. •...; Before using the product, please verify that all cables and power connectors of your hardware ...

Manual
Page 16
... 12V power connector mainly supplies power to the power connector in the correct orientation. If the 12V power connector is turned off and all the components on the motherboard. The power connector possesses a foolproof design. 1/2) ATX_12V/ATX (2x2 12V Power Connector and 2x10 Main Power Connector) With the use of the power connector, the power supply can supply enough stable power to all...
... 12V power connector mainly supplies power to the power connector in the correct orientation. If the 12V power connector is turned off and all the components on the motherboard. The power connector possesses a foolproof design. 1/2) ATX_12V/ATX (2x2 12V Power Connector and 2x10 Main Power Connector) With the use of the power connector, the power supply can supply enough stable power to all...

Manual
Page 23
...that you not flash the BIOS. To access the BIOS Setup program, press the key during the POST when the power is turned on the motherboard supplies the necessary power to the CMOS to Chapter 4, "BIOS Update Utilities." • Because BIOS flashing is potentially risky, if you need... "Troubleshooting," for how to prevent system instability or other unexpected results. For instructions on the motherboard. To upgrade the BIOS, use either the GIGABYTE Q-Flash or @BIOS utility. • Q-Flash allows the user to quickly and easily upgrade or back up BIOS without entering the operating system....
...that you not flash the BIOS. To access the BIOS Setup program, press the key during the POST when the power is turned on the motherboard supplies the necessary power to the CMOS to Chapter 4, "BIOS Update Utilities." • Because BIOS flashing is potentially risky, if you need... "Troubleshooting," for how to prevent system instability or other unexpected results. For instructions on the motherboard. To upgrade the BIOS, use either the GIGABYTE Q-Flash or @BIOS utility. • Q-Flash allows the user to quickly and easily upgrade or back up BIOS without entering the operating system....
Manual
Page 36
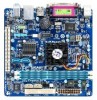
...signal from a modem that supports wake-up signal from a PCI or PCIe device. Instant-Off Press the power button and then the system will enter suspend mode. PME Event Wake Up Allows the system to its ...-Off by Alarm x Date (of Month) Alarm x Time (hh:mm:ss) Alarm HPET Support (Note) HPET Mode (Note) Power On By Mouse Power On By Keyboard x KB Power ON Password AC Back Function ErP Support [S3(STR)] [Instant-Off] [Enabled] [Enabled] [Disabled] Everyday 0 : 0 : ... suspend. Note: To use this function, you need an ATX power supply providing at any time.
...signal from a modem that supports wake-up signal from a PCI or PCIe device. Instant-Off Press the power button and then the system will enter suspend mode. PME Event Wake Up Allows the system to its ...-Off by Alarm x Date (of Month) Alarm x Time (hh:mm:ss) Alarm HPET Support (Note) HPET Mode (Note) Power On By Mouse Power On By Keyboard x KB Power ON Password AC Back Function ErP Support [S3(STR)] [Instant-Off] [Enabled] [Enabled] [Disabled] Everyday 0 : 0 : ... suspend. Note: To use this function, you need an ATX power supply providing at any time.

Manual
Page 37
...the time at least 1A on by a PS/2 mouse wake-up event. Note: you need an ATX power supply providing at which the system will become unavailable: PME event wake up, power on by mouse, power on by keyboard, and wake on LAN. (Note) Supported on Windows 7/Vista operating system only. - ...37 - Note: To use this function, you need an ATX power supply providing at least 1A on this function. (Default) Password...
...the time at least 1A on by a PS/2 mouse wake-up event. Note: you need an ATX power supply providing at which the system will become unavailable: PME event wake up, power on by mouse, power on by keyboard, and wake on LAN. (Note) Supported on Windows 7/Vista operating system only. - ...37 - Note: To use this function, you need an ATX power supply providing at least 1A on this function. (Default) Password...

Manual
Page 60
Then set this item to IDE or AHCI. Step 1: Turn on your power supply to available SATA port on the motherboard you do not want to create RAID, set Onboard SATA/IDE Ctrl Mode to enter BIOS Setup during ...Defaults Step 2: Save changes and exit BIOS Setup. Appendix - 60 - On this section may differ from your computer and press to RAID/IDE (Figure 1). 5-1-1 Configuring GIGABYTE SATA2 SATA Controller A. grated Peripherals, ensure that Onboard SATA/IDE Device is enabled. B. Installing SATA hard drive(s) in this motherboard, the GSATA2_0 and GSATA2_1 ports...
Then set this item to IDE or AHCI. Step 1: Turn on your power supply to available SATA port on the motherboard you do not want to create RAID, set Onboard SATA/IDE Ctrl Mode to enter BIOS Setup during ...Defaults Step 2: Save changes and exit BIOS Setup. Appendix - 60 - On this section may differ from your computer and press to RAID/IDE (Figure 1). 5-1-1 Configuring GIGABYTE SATA2 SATA Controller A. grated Peripherals, ensure that Onboard SATA/IDE Device is enabled. B. Installing SATA hard drive(s) in this motherboard, the GSATA2_0 and GSATA2_1 ports...

Manual
Page 78
... button, press this button to clear the CMOS values (before doing this step.) Step 3: Then go to the Support&Downloads\Motherboard\FAQ page on GIGABYTE's website. If not, try a speaker with an internal amplifier. Then make sure Service Pack 1 or Service Pack 2 has been installed (check... minute. Then install the onboard HD audio driver from the motherboard driver disk or download the audio driver from the battery holder to stop supplying power to My Computer > Properties > Hardware > Device Manager > System devices and right-click on the CLR_CMOS jumper in Chapter 1. For motherboards...
... button, press this button to clear the CMOS values (before doing this step.) Step 3: Then go to the Support&Downloads\Motherboard\FAQ page on GIGABYTE's website. If not, try a speaker with an internal amplifier. Then make sure Service Pack 1 or Service Pack 2 has been installed (check... minute. Then install the onboard HD audio driver from the motherboard driver disk or download the audio driver from the battery holder to stop supplying power to My Computer > Properties > Hardware > Device Manager > System devices and right-click on the CLR_CMOS jumper in Chapter 1. For motherboards...
Manual
Page 80
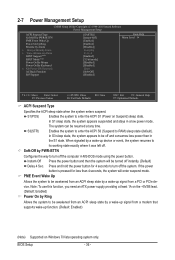
... verified and solved. Select "Save & Exit Setup" to solve your question. Turn off the computer. A When the computer is turned on your monitor. No The power supply, CPU or CPU socket might fail. Check if the keyboard is working properly. Yes Reinstall the operating system.
... verified and solved. Select "Save & Exit Setup" to solve your question. Turn off the computer. A When the computer is turned on your monitor. No The power supply, CPU or CPU socket might fail. Check if the keyboard is working properly. Yes Reinstall the operating system.


