Manual
Page 3
..., transmitted, or published in any form or by any means without prior notice. No part of GIGABYTE. Disclaimer Information in the use of the motherboard is protected by GIGABYTE without GIGABYTE's prior written permission. „„ In order to assist in this : "REV: X.X." For...132;„ For product-related information, check on our website at: http://www.gigabyte.com Identifying Your Motherboard Revision The revision number on your motherboard revision before updating motherboard BIOS, drivers, or when looking for technical information. Check your motherboard looks like this...
..., transmitted, or published in any form or by any means without prior notice. No part of GIGABYTE. Disclaimer Information in the use of the motherboard is protected by GIGABYTE without GIGABYTE's prior written permission. „„ In order to assist in this : "REV: X.X." For...132;„ For product-related information, check on our website at: http://www.gigabyte.com Identifying Your Motherboard Revision The revision number on your motherboard revision before updating motherboard BIOS, drivers, or when looking for technical information. Check your motherboard looks like this...
Manual
Page 4
... Contents GA-B75N Motherboard Layout 5 GA-B75N Motherboard Block Diagram 6 Chapter 1 Hardware Installation 7 1-1 Installation Precautions 7 1-2 Product Specifications 8 1-3 Installing the CPU and CPU Cooler 10 1-4 Installing the Memory 11 1-5 Installing an Expansion Card 11 1-6 Back Panel Connectors 12 1-7 Internal Connectors 14 Chapter 2 BIOS Setup 22 2-1 Startup Screen 22 2-2 The Main Menu 23 2-3 M.I.T...24 2-4 System...32 2-5 BIOS Features...
... Contents GA-B75N Motherboard Layout 5 GA-B75N Motherboard Block Diagram 6 Chapter 1 Hardware Installation 7 1-1 Installation Precautions 7 1-2 Product Specifications 8 1-3 Installing the CPU and CPU Cooler 10 1-4 Installing the Memory 11 1-5 Installing an Expansion Card 11 1-6 Back Panel Connectors 12 1-7 Internal Connectors 14 Chapter 2 BIOS Setup 22 2-1 Startup Screen 22 2-2 The Main Menu 23 2-3 M.I.T...24 2-4 System...32 2-5 BIOS Features...
Manual
Page 6
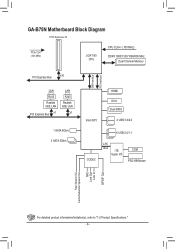
GA-B75N Motherboard Block Diagram 1 PCI Express x16 PCIe CLK (100 MHz) LGA1155 CPU CPU CLK+/- (100 MHz) DDR3 1600/1333/1066/800 MHz Dual Channel Memory PCI Express Bus x16 LAN RJ45 Realtek GbE LAN PCI Express Bus x1 LAN RJ45 Realtek GbE LAN x1 1 SATA 6Gb/s 3 SATA 3Gb/s DMI Interface FDI Interface Intel® B75 HDMI DVI-I Dual BIOS 4 USB 3.0/2.0 6 USB 2.0/1.1 CODEC LPC Bus iTE Super I/O COM PS/2 KB/Mouse Rear Speaker Out Center/Subwoofer Speaker Out MIC Line Out Line In S/PDIF Out For detailed product information/limitation(s), refer to "1-2 Product Specifications." - 6 -
GA-B75N Motherboard Block Diagram 1 PCI Express x16 PCIe CLK (100 MHz) LGA1155 CPU CPU CLK+/- (100 MHz) DDR3 1600/1333/1066/800 MHz Dual Channel Memory PCI Express Bus x16 LAN RJ45 Realtek GbE LAN PCI Express Bus x1 LAN RJ45 Realtek GbE LAN x1 1 SATA 6Gb/s 3 SATA 3Gb/s DMI Interface FDI Interface Intel® B75 HDMI DVI-I Dual BIOS 4 USB 3.0/2.0 6 USB 2.0/1.1 CODEC LPC Bus iTE Super I/O COM PS/2 KB/Mouse Rear Speaker Out Center/Subwoofer Speaker Out MIC Line Out Line In S/PDIF Out For detailed product information/limitation(s), refer to "1-2 Product Specifications." - 6 -
Manual
Page 9
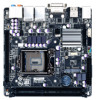
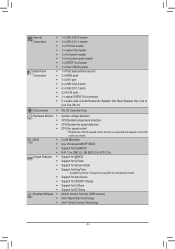
...(Center/Subwoofer Speaker Out, Rear Speaker Out, Line In, Line Out, Mic In) I/O Controller ŠŠ iTE I/O Controller Chip Hardware Monitor BIOS Unique Features Bundled Software ŠŠ System voltage detection ŠŠ CPU/System temperature detection ŠŠ CPU/System fan speed detection Š&#...138;Š 2 x 64 Mbit flash ŠŠ Use of licensed AMI EFI BIOS ŠŠ Support for DualBIOS™ ŠŠ PnP 1.0a, DMI 2.0, SM BIOS 2.6, ACPI 2.0a ŠŠ Support for @BIOS ŠŠ Support for Q-Flash ŠŠ Support for Xpress Install Š...
...(Center/Subwoofer Speaker Out, Rear Speaker Out, Line In, Line Out, Mic In) I/O Controller ŠŠ iTE I/O Controller Chip Hardware Monitor BIOS Unique Features Bundled Software ŠŠ System voltage detection ŠŠ CPU/System temperature detection ŠŠ CPU/System fan speed detection Š&#...138;Š 2 x 64 Mbit flash ŠŠ Use of licensed AMI EFI BIOS ŠŠ Support for DualBIOS™ ŠŠ PnP 1.0a, DMI 2.0, SM BIOS 2.6, ACPI 2.0a ŠŠ Support for @BIOS ŠŠ Support for Q-Flash ŠŠ Support for Xpress Install Š...
Manual
Page 11
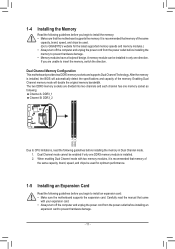
... the memory: •• Make sure that memory of the same capacity, brand, speed, and chips be used . (Go to GIGABYTE's website for optimum performance. 1-5 Installing an Expansion Card Read the following guidelines before installing an expansion card to install an expansion card: ...foolproof design. Carefully read the following guidelines before installing the memory in only one DDR3 memory module is installed, the BIOS will double the original memory bandwidth. It is recommended that the motherboard supports the memory. After the memory is installed. 2. DDR3_1 DDR3_2...
... the memory: •• Make sure that memory of the same capacity, brand, speed, and chips be used . (Go to GIGABYTE's website for optimum performance. 1-5 Installing an Expansion Card Read the following guidelines before installing an expansion card to install an expansion card: ...foolproof design. Carefully read the following guidelines before installing the memory in only one DDR3 memory module is installed, the BIOS will double the original memory bandwidth. It is recommended that the motherboard supports the memory. After the memory is installed. 2. DDR3_1 DDR3_2...
Manual
Page 12
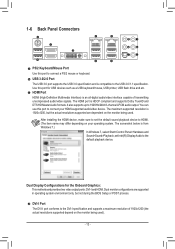
...: DVI-I specification and supports a maximum resolution of transmitting uncompressed audio/video signals. HDMI Port HDMI (High-Definition Multimedia Interface) is 1920x1200, but not during the BIOS Setup or POST process. Dual monitor confgurations are supported in operating system environment only, but the actual resolutions supported are dependent on the monitor being...
...: DVI-I specification and supports a maximum resolution of transmitting uncompressed audio/video signals. HDMI Port HDMI (High-Definition Multimedia Interface) is 1920x1200, but not during the BIOS Setup or POST process. Dual monitor confgurations are supported in operating system environment only, but the actual resolutions supported are dependent on the monitor being...
Manual
Page 16
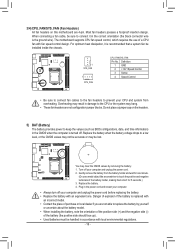
... the power cord. 2. 3/4) CPU_FAN/SYS_FAN (Fan Headers) All fan headers on the headers. 5) BAT (Battery) The battery provides power to keep the values (such as BIOS configurations, date, and time information) in the CMOS when the computer is turned off.
... the power cord. 2. 3/4) CPU_FAN/SYS_FAN (Fan Headers) All fan headers on the headers. 5) BAT (Battery) The battery provides power to keep the values (such as BIOS configurations, date, and time information) in the CMOS when the computer is turned off.

Manual
Page 18
...): System Status LED Connects to perform a normal restart. •• NC (Purple): No connection. When connecting your system using the power switch (refer to Chapter 2, "BIOS Setup," "Power Management Setup," for more information). •• HD (Hard Drive Activity LED, Blue): Connects to the power switch on the chassis front panel...
...): System Status LED Connects to perform a normal restart. •• NC (Purple): No connection. When connecting your system using the power switch (refer to Chapter 2, "BIOS Setup," "Power Management Setup," for more information). •• HD (Hard Drive Activity LED, Blue): Connects to the power switch on the chassis front panel...

Manual
Page 19
...9 4 -ACZ_DET 5 LINE2_R 4 NC 5 Line Out (R) 6 GND 6 NC 7 FAUDIO_JD 7 NC 8 No Pin 8 No Pin 9 LINE2_L 9 Line Out (L) Voltage measurement points(G1.Sniper 3) BIOS Switcher (SW4) 10 GND 10 NC •• The front panel audio header supports HD audio by default. •• Audio signals will make the...wire assignments, please contact the chassis manufacturer. DIP 1 23 PCIe power connector (SATA)(X58A-OC) DIP 1 23 1 PWM Switch (X58A-OC) BIOS Switcher (X58A-OC) 1 M_ F_USB30 TPM w/housing 10) F_USB30 (USB 3.0/2.0 Header) DIP The header conforms to work or even damage it....
...9 4 -ACZ_DET 5 LINE2_R 4 NC 5 Line Out (R) 6 GND 6 NC 7 FAUDIO_JD 7 NC 8 No Pin 8 No Pin 9 LINE2_L 9 Line Out (L) Voltage measurement points(G1.Sniper 3) BIOS Switcher (SW4) 10 GND 10 NC •• The front panel audio header supports HD audio by default. •• Audio signals will make the...wire assignments, please contact the chassis manufacturer. DIP 1 23 PCIe power connector (SATA)(X58A-OC) DIP 1 23 1 PWM Switch (X58A-OC) BIOS Switcher (X58A-OC) 1 M_ F_USB30 TPM w/housing 10) F_USB30 (USB 3.0/2.0 Header) DIP The header conforms to work or even damage it....
Manual
Page 21
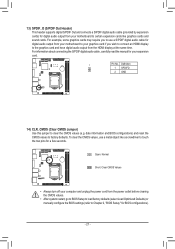
...may require you wish to connect an HDMI display to the graphics card and have digital audio output from your motherboard to Chapter 2, "BIOS Setup," for BIOS configurations). - 21 - To clear the CMOS values, use a S/PDIF digital audio cable for digital audio output from your motherboard to...from the power outlet before clearing the CMOS values. •• After system restart, go to BIOS Setup to load factory defaults (select Load Optimized Defaults) or manually configure the BIOS settings (refer to certain expansion cards like graphics cards and sound cards. 13) SPDIF_O (S/PDIF Out...
...may require you wish to connect an HDMI display to the graphics card and have digital audio output from your motherboard to Chapter 2, "BIOS Setup," for BIOS configurations). - 21 - To clear the CMOS values, use a S/PDIF digital audio cable for digital audio output from your motherboard to...from the power outlet before clearing the CMOS values. •• After system restart, go to BIOS Setup to load factory defaults (select Load Optimized Defaults) or manually configure the BIOS settings (refer to certain expansion cards like graphics cards and sound cards. 13) SPDIF_O (S/PDIF Out...
Manual
Page 22
...system instability or other unexpected results. To upgrade the BIOS, use either the GIGABYTE Q-Flash or @BIOS utility. •• Q-Flash allows the user to quickly and easily upgrade or back up BIOS without entering the operating system. •• @BIOS is a Windows-based utility that you do it... the settings may result in system malfunction. •• It is turned off, the battery on . Function Keys To access the BIOS Setup program, press the key during system startup, saving system parameters and loading operating system, etc. If this occurs, try to clear...
...system instability or other unexpected results. To upgrade the BIOS, use either the GIGABYTE Q-Flash or @BIOS utility. •• Q-Flash allows the user to quickly and easily upgrade or back up BIOS without entering the operating system. •• @BIOS is a Windows-based utility that you do it... the settings may result in system malfunction. •• It is turned off, the battery on . Function Keys To access the BIOS Setup program, press the key during system startup, saving system parameters and loading operating system, etc. If this occurs, try to clear...

Manual
Page 23
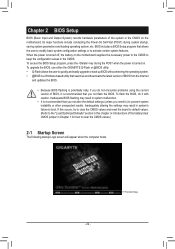
... Program On the main menu of the BIOS Setup Program.) B. The 3D BIOS Screen (Default) On GIGABYTE's uniquely designed 3D BIOS screen, you can click the function menu icons at the bottom of the screen or press to switch to the main menu of the BIOS Setup program. (If a mouse is not connected..., the 3D BIOS screen will automatically switch to ...
... Program On the main menu of the BIOS Setup Program.) B. The 3D BIOS Screen (Default) On GIGABYTE's uniquely designed 3D BIOS screen, you can click the function menu icons at the bottom of the screen or press to switch to the main menu of the BIOS Setup program. (If a mouse is not connected..., the 3D BIOS screen will automatically switch to ...
Manual
Page 24
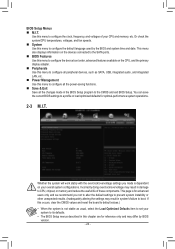
... you not to alter the default settings to prevent system instability or other unexpected results. (Inadequately altering the settings may differ by the BIOS and system time and date. This page is for reference only and may result in this menu to configure all the changes made is...& Exit Save all peripheral devices, such as usual, select the Load Optimized Defaults item to set your system to its defaults. •• The BIOS Setup menus described in system's failure to default values.) •• When the system is dependent on the CPU, and the primary display adapter. &#...
... you not to alter the default settings to prevent system instability or other unexpected results. (Inadequately altering the settings may differ by the BIOS and system time and date. This page is for reference only and may result in this menu to configure all the changes made is...& Exit Save all peripheral devices, such as usual, select the Load Optimized Defaults item to set your system to its defaults. •• The BIOS Setup menus described in system's failure to default values.) •• When the system is dependent on the CPU, and the primary display adapter. &#...

Manual
Page 25
Current Status This screen provides information on the BIOS version, CPU base clock, CPU frequency, memory frequency, total memory size, CPU temperature, Vcore, and memory voltage. `` M.I.T. The adjustable range is from 400 MHz to set the onboard graphics clock. This section provides information on CPU/memory frequencies/parameters. `` Advanced Frequency Settings && Processor Graphics Clock Allows you to 1600 MHz. (Default: Auto) - 25 -
Current Status This screen provides information on the BIOS version, CPU base clock, CPU frequency, memory frequency, total memory size, CPU temperature, Vcore, and memory voltage. `` M.I.T. The adjustable range is from 400 MHz to set the onboard graphics clock. This section provides information on CPU/memory frequencies/parameters. `` Advanced Frequency Settings && Processor Graphics Clock Allows you to 1600 MHz. (Default: Auto) - 25 -
Manual
Page 26
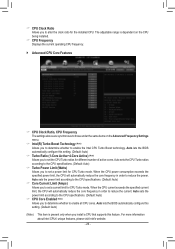
...CPU specifications. (Default: Auto) && Core Current Limit (Amps) Allows you to set the CPU Turbo ratios for the installed CPU. Auto lets the BIOS automatically configure this setting. (Default: Auto) (Note) This item is dependent on the CPU being installed. && CPU Frequency Displays the current operating CPU... exceeds the specified current limit, the CPU will automatically reduce the core frequency in order to reduce the power. Auto lets the BIOS automatically configure this feature. && CPU Clock Ratio Allows you to alter the clock ratio for different number of active cores. The ...
...CPU specifications. (Default: Auto) && Core Current Limit (Amps) Allows you to set the CPU Turbo ratios for the installed CPU. Auto lets the BIOS automatically configure this setting. (Default: Auto) (Note) This item is dependent on the CPU being installed. && CPU Frequency Displays the current operating CPU... exceeds the specified current limit, the CPU will automatically reduce the core frequency in order to reduce the power. Auto lets the BIOS automatically configure this feature. && CPU Clock Ratio Allows you to alter the clock ratio for different number of active cores. The ...
Manual
Page 27
... CPU core frequency and voltage will be reduced during system halt state to decrease average power consumption and heat production. Auto lets the BIOS automatically configure this setting. (Default: Auto) && CPU EIST Function (Note 1) Enables or disables Enhanced Intel SpeedStep Technology (EIST). This... feature only works for operating systems that support this setting. (Default: Auto) && Extreme Memory Profile (X.M.P.) (Note 2) Allows the BIOS to read the SPD data on CPU loading, Intel EIST technology can dynamically and effectively lower the CPU voltage and core frequency to ...
... CPU core frequency and voltage will be reduced during system halt state to decrease average power consumption and heat production. Auto lets the BIOS automatically configure this setting. (Default: Auto) && CPU EIST Function (Note 1) Enables or disables Enhanced Intel SpeedStep Technology (EIST). This... feature only works for operating systems that support this setting. (Default: Auto) && Extreme Memory Profile (X.M.P.) (Note 2) Allows the BIOS to read the SPD data on CPU loading, Intel EIST technology can dynamically and effectively lower the CPU voltage and core frequency to ...
Manual
Page 28
... configure this feature. - 28 - Auto lets the BIOS automatically configure this setting. (Default: Auto) (Note) This item is present only when you install a CPU and a memory module that support this setting. (Default: Auto) && ...
... configure this feature. - 28 - Auto lets the BIOS automatically configure this setting. (Default: Auto) (Note) This item is present only when you install a CPU and a memory module that support this setting. (Default: Auto) && ...
Manual
Page 31
Auto lets the BIOS automatically configure this setting. (Default: Auto) && Legacy BenchMark Enhancement Allows you to Gen 1, Gen 2, or Gen 3. Gen X Allows you to determine whether to Gen 2 mode only. For example, the PCI Express x1 slots can support up to enhance some legacy benchmark performance. (Default: Disabled) - 31 - `` Miscellaneous Settings && PEG - Actual operation mode is subject to the hardware specification of the PCI Express slots to set the operation mode of each slot.
Auto lets the BIOS automatically configure this setting. (Default: Auto) && Legacy BenchMark Enhancement Allows you to Gen 1, Gen 2, or Gen 3. Gen X Allows you to determine whether to Gen 2 mode only. For example, the PCI Express x1 slots can support up to enhance some legacy benchmark performance. (Default: Disabled) - 31 - `` Miscellaneous Settings && PEG - Actual operation mode is subject to the hardware specification of the PCI Express slots to set the operation mode of each slot.
Manual
Page 32
...The time format is 13:0:0. Use to switch between the Hour, Minute, and Second fields and use the or key to certain BIOS settings but not all BIOS settings; The date format is set the desired value. && Access Level Displays the current access level depending on the type of password...year. For example, 1 p.m. You can also select the default language used by Intel Chipset. You can enable/disable each SATA port controlled by the BIOS. && System Date Sets the system date. the User level only allows you to make changes to set the system time. && System Language Selects the ...
...The time format is 13:0:0. Use to switch between the Hour, Minute, and Second fields and use the or key to certain BIOS settings but not all BIOS settings; The date format is set the desired value. && Access Level Displays the current access level depending on the type of password...year. For example, 1 p.m. You can also select the default language used by Intel Chipset. You can enable/disable each SATA port controlled by the BIOS. && System Date Sets the system date. the User level only allows you to make changes to set the system time. && System Language Selects the ...
Manual
Page 33
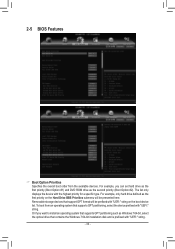
..., only hard drive defined as the first priority on the Hard Drive BBS Priorities submenu will be presented here. To boot from the available devices. 2-5 BIOS Features && Boot Option Priorities Specifies the overall boot order from an operating system that supports GPT partitioning, select the device prefixed with "UEFI:" string. The...
..., only hard drive defined as the first priority on the Hard Drive BBS Priorities submenu will be presented here. To boot from the available devices. 2-5 BIOS Features && Boot Option Priorities Specifies the overall boot order from an operating system that supports GPT partitioning, select the device prefixed with "UEFI:" string. The...


