Manual
Page 4
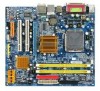
Table of Contents OptionalItems ...6 Box Contents ...6 GA-946GMX-S2 Motherboard Layout 7 Block Diagram ...8 Chapter 1 Hardware Installation 9 1-1 Installation Precautions 9 1-2 Product Specifications 10 1-3 Installing the CPU and CPU Cooler 12 1-3-1 Installing the CPU 12 1-3-2 Installing the CPU Cooler 14 1-4 Installing the Memory 15 1-4-1 Dual Channel Memory Configuration 15 1-4-2 Installing a Memory 16 1-5 Installing an Expansion Card 17 1-6 Back Panel Connectors 18...
Table of Contents OptionalItems ...6 Box Contents ...6 GA-946GMX-S2 Motherboard Layout 7 Block Diagram ...8 Chapter 1 Hardware Installation 9 1-1 Installation Precautions 9 1-2 Product Specifications 10 1-3 Installing the CPU and CPU Cooler 12 1-3-1 Installing the CPU 12 1-3-2 Installing the CPU Cooler 14 1-4 Installing the Memory 15 1-4-1 Dual Channel Memory Configuration 15 1-4-2 Installing a Memory 16 1-5 Installing an Expansion Card 17 1-6 Back Panel Connectors 18...
Manual
Page 6
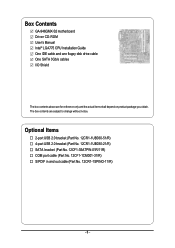
...) COM port cable (Part No. 12CF1-1CM001-31/R) S/PDIF in and out cable (Part No. 12CR1-1SPINO-11/R) - 6 - Box Contents GA-946GMX-S2 motherboard Driver CD-ROM User's Manual Intel® LGA775 CPU Installation Guide One IDE cable and one floppy disk drive cable One SATA 3Gb/s cables I/O Shield The box contents above are...
...) COM port cable (Part No. 12CF1-1CM001-31/R) S/PDIF in and out cable (Part No. 12CR1-1SPINO-11/R) - 6 - Box Contents GA-946GMX-S2 motherboard Driver CD-ROM User's Manual Intel® LGA775 CPU Installation Guide One IDE cable and one floppy disk drive cable One SATA 3Gb/s cables I/O Shield The box contents above are...
Manual
Page 8
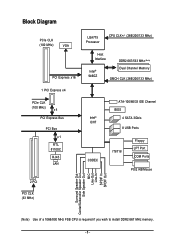
... 1 PCI Express x4 PCIe CLK (100 MHz) x4 PCI Express Bus PCI Bus x1 RTL 8110SC RJ45 LAN 2 PCI PCI CLK (33 MHz) LGA775 Processor CPU CLK+/- (266/200/133 MHz) Host Interface DDR2 667/533 MHz (Note) Intel® 946GZ Dual Channel Memory GMCH CLK (266/200/133 MHz) Intel... Speaker Out Center/Subwoofer Speaker Out Side Speaker Out MIC Line-Out Line-In SPDIF In SPDIF Out (Note) Use of a 1066/800 MHz FSB CPU is required if you wish to install DDR2 667 MHz memory. - 8 -
... 1 PCI Express x4 PCIe CLK (100 MHz) x4 PCI Express Bus PCI Bus x1 RTL 8110SC RJ45 LAN 2 PCI PCI CLK (33 MHz) LGA775 Processor CPU CLK+/- (266/200/133 MHz) Host Interface DDR2 667/533 MHz (Note) Intel® 946GZ Dual Channel Memory GMCH CLK (266/200/133 MHz) Intel... Speaker Out Center/Subwoofer Speaker Out Side Speaker Out MIC Line-Out Line-In SPDIF In SPDIF Out (Note) Use of a 1066/800 MHz FSB CPU is required if you wish to install DDR2 667 MHz memory. - 8 -

Manual
Page 9
... about any metal leads or connectors. • It is best to wear an electrostatic discharge (ESD) wrist strap when handling electronic components such as a motherboard, CPU or memory. If you are connected tightly and securely. • When handling the motherboard, avoid touching any installation steps or have it on top of...
... about any metal leads or connectors. • It is best to wear an electrostatic discharge (ESD) wrist strap when handling electronic components such as a motherboard, CPU or memory. If you are connected tightly and securely. • When handling the motherboard, avoid touching any installation steps or have it on top of...

Manual
Page 10
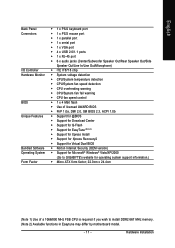
... Š Dual channel memory architecture Š Support for DDR2 667/533 MHz (Note 1) memory modules (Go to GIGABYTE's website for the latest memory support list.) Onboard Graphics Š Integrated in the North Bridge Audio Š Realtek ALC888... 4 x SATA 3Gb/s connectors Š 1 x CPU fan header Š 1 x system fan header Š 1 x front panel header Š 1 x front panel audio header Š 1 x CD In connector Š 1 x S/PDIF In/Out header Š 2 x USB 2.0/1.1 headers Š 1 x chassis intrusion header Š 1 x power LED header GA-946GMX-S2 Motherboard - 10 -
... Š Dual channel memory architecture Š Support for DDR2 667/533 MHz (Note 1) memory modules (Go to GIGABYTE's website for the latest memory support list.) Onboard Graphics Š Integrated in the North Bridge Audio Š Realtek ALC888... 4 x SATA 3Gb/s connectors Š 1 x CPU fan header Š 1 x system fan header Š 1 x front panel header Š 1 x front panel audio header Š 1 x CD In connector Š 1 x S/PDIF In/Out header Š 2 x USB 2.0/1.1 headers Š 1 x chassis intrusion header Š 1 x power LED header GA-946GMX-S2 Motherboard - 10 -
Manual
Page 11
... Out/Line In/Line Out/Microphone) Š iTE IT8718 chip Š System voltage detection Š CPU/System temperature detection Š CPU/System fan speed detection Š CPU overheating warning Š CPU/System fan fail warning Š CPU fan speed control Š 1 x 4 Mbit flash Š Use of licensed AWARD BIOS Š... Dual BIOS Š Norton Internet Security (OEM version) Š Support for Microsoft® Windows® Vista/XP/2000 (Go to GIGABYTE's website for operating system support information.) Š Micro ATX form factor; 22.0cm x 24.4cm (Note 1) Use of a 1066/800 MHz FSB...
... Out/Line In/Line Out/Microphone) Š iTE IT8718 chip Š System voltage detection Š CPU/System temperature detection Š CPU/System fan speed detection Š CPU overheating warning Š CPU/System fan fail warning Š CPU fan speed control Š 1 x 4 Mbit flash Š Use of licensed AWARD BIOS Š... Dual BIOS Š Norton Internet Security (OEM version) Š Support for Microsoft® Windows® Vista/XP/2000 (Go to GIGABYTE's website for operating system support information.) Š Micro ATX form factor; 22.0cm x 24.4cm (Note 1) Use of a 1066/800 MHz FSB...
Manual
Page 12
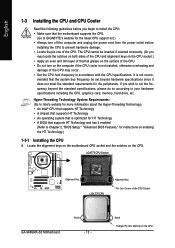
...power outlet before you begin to install the CPU: • Make sure that the motherboard supports the CPU. (Go to GIGABYTE's website for the latest CPU support list.) • Always turn on the CPU Locate the alignment keys on the motherboard CPU socket and the notches on enabling the HT ... the CPU, graphics card, memory, hard drive, etc. If you wish to set beyond the standard specifications, please do so according to prevent hardware damage. • Locate the pin one of the CPU Socket GA-946GMX-S2 Motherboard Notch - 12 - LGA775 CPU Socket Alignment Key LGA 775 CPU Alignment ...
...power outlet before you begin to install the CPU: • Make sure that the motherboard supports the CPU. (Go to GIGABYTE's website for the latest CPU support list.) • Always turn on the CPU Locate the alignment keys on the motherboard CPU socket and the notches on enabling the HT ... the CPU, graphics card, memory, hard drive, etc. If you wish to set beyond the standard specifications, please do so according to prevent hardware damage. • Locate the pin one of the CPU Socket GA-946GMX-S2 Motherboard Notch - 12 - LGA775 CPU Socket Alignment Key LGA 775 CPU Alignment ...

Manual
Page 13
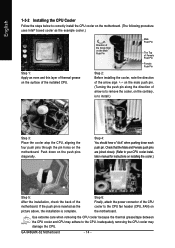
... properly inserted, replace the load plate and push the CPU socket lever back into position. CPU Socket Lever Step 1: Completely raise the CPU socket lever. Follow the steps below to the CPU. English B. Step 3: Lift the metal load plate on the CPU socket. Before installing the CPU, make sure to turn off the computer and unplug...
... properly inserted, replace the load plate and push the CPU socket lever back into position. CPU Socket Lever Step 1: Completely raise the CPU socket lever. Follow the steps below to the CPU. English B. Step 3: Lift the metal load plate on the CPU socket. Before installing the CPU, make sure to turn off the computer and unplug...
Manual
Page 14
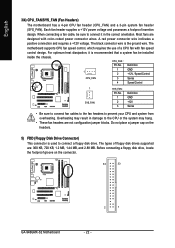
... pins through the pin holes on the motherboard. If the push pin is inserted as the picture above, the installation is to correctly install the CPU cooler on the motherboard. (The following procedure uses Intel® boxed cooler as the example cooler.) Step 1: Apply an even and thin layer of thermal... installing the cooler, note the direction of the arrow sign on the male push pin. (Turning the push pin along the direction of the installed CPU. GA-946GMX-S2 Motherboard - 14 -
... pins through the pin holes on the motherboard. If the push pin is inserted as the picture above, the installation is to correctly install the CPU cooler on the motherboard. (The following procedure uses Intel® boxed cooler as the example cooler.) Step 1: Apply an even and thin layer of thermal... installing the cooler, note the direction of the arrow sign on the male push pin. (Turning the push pin along the direction of the installed CPU. GA-946GMX-S2 Motherboard - 14 -

Manual
Page 21
... the main power connector on the motherboard. Before connecting the power connector, first make sure the power supply is used that can lead to the CPU.
... the main power connector on the motherboard. Before connecting the power connector, first make sure the power supply is used that can lead to the CPU.
Manual
Page 22
...Speed Control 1 SYS_FAN SYS_FAN : Pin No. 1 2 3 Definition GND +12V Sense • Be sure to connect fan cables to the fan headers to the CPU or the system may hang. • These fan headers are not configuration jumper blocks. Before connecting a floppy disk drive, locate the foolproof groove on the... that a system fan be sure to connect it is used to connect a floppy disk drive. Do not place a jumper cap on the connector. 34 33 GA-946GMX-S2 Motherboard 2 1 - 22 - Most fans are : 360 KB, 720 KB, 1.2 MB, 1.44 MB, and 2.88 MB. English 3/4) CPU_FAN/SYS_FAN (Fan Headers) The...
...Speed Control 1 SYS_FAN SYS_FAN : Pin No. 1 2 3 Definition GND +12V Sense • Be sure to connect fan cables to the fan headers to the CPU or the system may hang. • These fan headers are not configuration jumper blocks. Before connecting a floppy disk drive, locate the foolproof groove on the... that a system fan be sure to connect it is used to connect a floppy disk drive. Do not place a jumper cap on the connector. 34 33 GA-946GMX-S2 Motherboard 2 1 - 22 - Most fans are : 360 KB, 720 KB, 1.2 MB, 1.44 MB, and 2.88 MB. English 3/4) CPU_FAN/SYS_FAN (Fan Headers) The...
Manual
Page 34
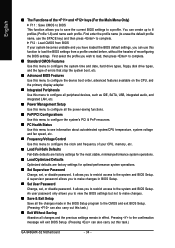
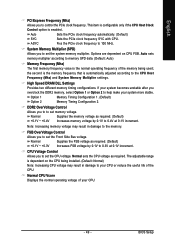
... Use this menu to configure the system's PCI & PnP resources. „ PC Health Status Use this menu to see information about autodetected system/CPU temperature, system voltage and fan speed, etc. „ Frequency/Voltage Control Use this menu to configure the clock and frequency of your system becomes...key) and then press to the CMOS and exit BIOS Setup. (Pressing can create up to a profile. You can also carry out this task.) GA-946GMX-S2 Motherboard - 34 - First enter the profile name (to erase the default profile name, use this function to load the BIOS settings from a profile ...
... Use this menu to configure the system's PCI & PnP resources. „ PC Health Status Use this menu to see information about autodetected system/CPU temperature, system voltage and fan speed, etc. „ Frequency/Voltage Control Use this menu to configure the clock and frequency of your system becomes...key) and then press to the CMOS and exit BIOS Setup. (Pressing can create up to a profile. You can also carry out this task.) GA-946GMX-S2 Motherboard - 34 - First enter the profile name (to erase the default profile name, use this function to load the BIOS settings from a profile ...

Manual
Page 37
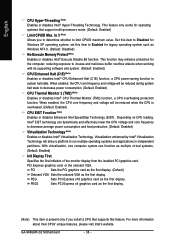
...disables the S.M.A.R.T. (Self Monitoring and Reporting Technology) capability of the hard drive and to move it up or down on the list. Capability CPU Hyper-Threading (Note) Limit CPUID Max. Use the up or down arrow key to select a hard drive, then press the plus key... please visit Intel's website. - 37 - to exit this feature. Press to 3 (Note) No-Execute Memory Protect (Note) CPU Enhanced Halt (C1E) (Note) CPU Thermal Monitor 2(TM2) (Note) CPU EIST Function (Note) Virtualization Technology (Note) Init Display First Onboard VGA On-Chip Frame Buffer Size [Press Enter] [Floppy] [...
...disables the S.M.A.R.T. (Self Monitoring and Reporting Technology) capability of the hard drive and to move it up or down on the list. Capability CPU Hyper-Threading (Note) Limit CPUID Max. Use the up or down arrow key to select a hard drive, then press the plus key... please visit Intel's website. - 37 - to exit this feature. Press to 3 (Note) No-Execute Memory Protect (Note) CPU Enhanced Halt (C1E) (Note) CPU Thermal Monitor 2(TM2) (Note) CPU EIST Function (Note) Virtualization Technology (Note) Init Display First Onboard VGA On-Chip Frame Buffer Size [Press Enter] [Floppy] [...
Manual
Page 38
... card as the first display. For more information about Intel CPUs' unique features, please visit Intel's website. GA-946GMX-S2 Motherboard - 38 - English CPU Hyper-Threading (Note) Enables or disables Intel® Hyper-Threading Technology. This function may enhance protection for operating... (Default: Enabled) Virtualization Technology (Note) Enables or disables Intel® Virtualization Technology. to 3 (Note) Allows you install a CPU that support multi-processors mode. (Default: Enabled) Limit CPUID Max. Set this item to Disabled for legacy operating system such as ...
... card as the first display. For more information about Intel CPUs' unique features, please visit Intel's website. GA-946GMX-S2 Motherboard - 38 - English CPU Hyper-Threading (Note) Enables or disables Intel® Hyper-Threading Technology. This function may enhance protection for operating... (Default: Enabled) Virtualization Technology (Note) Enables or disables Intel® Virtualization Technology. to 3 (Note) Allows you install a CPU that support multi-processors mode. (Default: Enabled) Limit CPUID Max. Set this item to Disabled for legacy operating system such as ...

Manual
Page 46
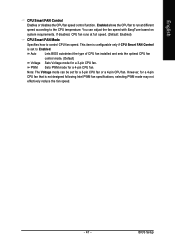
...are: Disabled (default), 60oC/140oF, 70oC/158oF, 80oC/176oF, 90oC/194oF. CPU/SYSTEM FAN Fail Warning Allows the system to emit warning sound if the CPU/system fan is removed, this occurs. (Default: Disabled) GA-946GMX-S2 Motherboard - 46 - Check the fan condition or fan connection when this field... Status Case Opened Vcore DDR18V +3.3V +12V Current System Temperature Current CPU Temperature Current CPU FAN Speed Current SYSTEM FAN Speed CPU Warning Temperature CPU FAN Fail Warning SYSTEM FAN Fail Warning CPU Smart FAN Control CPU Smart FAN Mode [Disabled] No OK OK OK OK 47oC 47oC 3375...
...are: Disabled (default), 60oC/140oF, 70oC/158oF, 80oC/176oF, 90oC/194oF. CPU/SYSTEM FAN Fail Warning Allows the system to emit warning sound if the CPU/system fan is removed, this occurs. (Default: Disabled) GA-946GMX-S2 Motherboard - 46 - Check the fan condition or fan connection when this field... Status Case Opened Vcore DDR18V +3.3V +12V Current System Temperature Current CPU Temperature Current CPU FAN Speed Current SYSTEM FAN Speed CPU Warning Temperature CPU FAN Fail Warning SYSTEM FAN Fail Warning CPU Smart FAN Control CPU Smart FAN Mode [Disabled] No OK OK OK OK 47oC 47oC 3375...
Manual
Page 47
...adjust the fan speed with EasyTune based on system requirements. However, for a 4-pin CPU fan that is set for a 3-pin CPU fan or a 4-pin CPU fan. BIOS Setup This item is configurable only if CPU Smart FAN Control is not designed following Intel PWM fan specifications, selecting PWM mode may...Voltage mode for a 4-pin CPU fan. PWM Sets PWM mode for a 3-pin CPU fan. Enabled allows the CPU fan to run at full speed. (Default: Enabled) CPU Smart FAN Mode Specifies how to the CPU temperature. If disabled, CPU fan runs at different speed according to control CPU fan speed. You can be ...
...adjust the fan speed with EasyTune based on system requirements. However, for a 4-pin CPU fan that is set for a 3-pin CPU fan or a 4-pin CPU fan. BIOS Setup This item is configurable only if CPU Smart FAN Control is not designed following Intel PWM fan specifications, selecting PWM mode may...Voltage mode for a 4-pin CPU fan. PWM Sets PWM mode for a 3-pin CPU fan. Enabled allows the CPU fan to run at full speed. (Default: Enabled) CPU Smart FAN Mode Specifies how to the CPU temperature. If disabled, CPU fan runs at different speed according to control CPU fan speed. You can be ...
Manual
Page 48
... unlocked clock ratio is for advanced users only and we recommend you install a CPU that the CPU frequency be configurable. GA-946GMX-S2 Motherboard - 48 - This item is configurable only if the CPU Host Clock Control option is present only if a CPU with the CPU specifications. (Note) This item appears only if you not to alter the default...
... unlocked clock ratio is for advanced users only and we recommend you install a CPU that the CPU frequency be configurable. GA-946GMX-S2 Motherboard - 48 - This item is configurable only if the CPU Host Clock Control option is present only if a CPU with the CPU specifications. (Note) This item appears only if you not to alter the default...
Manual
Page 49
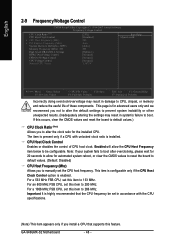
...the memory voltage as required. (Default) +0.1V ~ +0.4V Increases memory voltage by 0.1V to 0.3V at 0.1V increment. Normal sets the CPU voltage as required. (Default) +0.1V ~ +0.3V Increases FSB voltage by 0.1V to 0.4V at 0.1V increment. Auto sets memory multiplier according ... Memory Timing Configuration 2. English PCI Express Frequency (Mhz) Allows you to set the Front Side Bus voltage. Options are dependent on the CPU being used; Normal Supplies the FSB voltage as required. Auto Sets the PCIe clock frequency automatically. (Default) SYC Sets the PCIe clock ...
...the memory voltage as required. (Default) +0.1V ~ +0.4V Increases memory voltage by 0.1V to 0.3V at 0.1V increment. Normal sets the CPU voltage as required. (Default) +0.1V ~ +0.3V Increases FSB voltage by 0.1V to 0.4V at 0.1V increment. Auto sets memory multiplier according ... Memory Timing Configuration 2. English PCI Express Frequency (Mhz) Allows you to set the Front Side Bus voltage. Options are dependent on the CPU being used; Normal Supplies the FSB voltage as required. Auto Sets the PCIe clock frequency automatically. (Default) SYC Sets the PCIe clock ...
Manual
Page 67
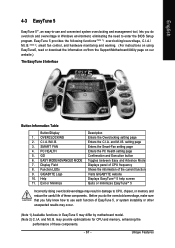
...Health setting page Confirmation and Execution button Toggles between Easy and Advance Mode Displays panel of CPU frequency Shows the information of the current function Visits GIGABYTE website Displays EasyTuneTM 5 help screen Quits or minimizes EasyTuneTM 5 Incorrectly doing overclock/overvoltage ...may provide optimizations for CPU and memory, enhancing the performance of these components. EASY MODE/ADVANCED MODE 7. GIGABYTE Logo 10. Before you do the overclock/overvoltage, make sure that you fully ...
...Health setting page Confirmation and Execution button Toggles between Easy and Advance Mode Displays panel of CPU frequency Shows the information of the current function Visits GIGABYTE website Displays EasyTuneTM 5 help screen Quits or minimizes EasyTuneTM 5 Incorrectly doing overclock/overvoltage ...may provide optimizations for CPU and memory, enhancing the performance of these components. EASY MODE/ADVANCED MODE 7. GIGABYTE Logo 10. Before you do the overclock/overvoltage, make sure that you fully ...

Manual
Page 78
...is verified and solved. Connect the ATX main power cable and the 12V power cable. The problem is attached to the CPU securely. Press to solve the problem. English 5-2-2 Troubleshooting Procedure If you encounter any troubles during system startup, follow the ... short circuit. Secure the CPU No cooler on the memory slot. Connect the CPU cooler power cable to save changes and exit BIOS Setup. No Correctly insert the memory into the memory socket. Select "Load Fail-Safe Defaults" (or "Load Optimized Defaults"). A (Continued...) GA-946GMX-S2 Motherboard - 78 - Yes...
...is verified and solved. Connect the ATX main power cable and the 12V power cable. The problem is attached to the CPU securely. Press to solve the problem. English 5-2-2 Troubleshooting Procedure If you encounter any troubles during system startup, follow the ... short circuit. Secure the CPU No cooler on the memory slot. Connect the CPU cooler power cable to save changes and exit BIOS Setup. No Correctly insert the memory into the memory socket. Select "Load Fail-Safe Defaults" (or "Load Optimized Defaults"). A (Continued...) GA-946GMX-S2 Motherboard - 78 - Yes...


