
Manual
Page 10
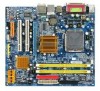
...174; Pentium® 4 processor/ Intel® Celeron® D processor in the LGA 775 package (Go to GIGABYTE's website for the latest CPU support list.) Š Support for Intel® Hyper-Threading Technology Š L2 ...Dual channel memory architecture Š Support for DDR2 667/533 MHz (Note 1) memory modules (Go to GIGABYTE's website for the latest memory support list.) Onboard Graphics Š Integrated in the North Bridge Audio Š...In/Out header Š 2 x USB 2.0/1.1 headers Š 1 x chassis intrusion header Š 1 x power LED header GA-946GMX-S2 Motherboard - 10 -
...174; Pentium® 4 processor/ Intel® Celeron® D processor in the LGA 775 package (Go to GIGABYTE's website for the latest CPU support list.) Š Support for Intel® Hyper-Threading Technology Š L2 ...Dual channel memory architecture Š Support for DDR2 667/533 MHz (Note 1) memory modules (Go to GIGABYTE's website for the latest memory support list.) Onboard Graphics Š Integrated in the North Bridge Audio Š...In/Out header Š 2 x USB 2.0/1.1 headers Š 1 x chassis intrusion header Š 1 x power LED header GA-946GMX-S2 Motherboard - 10 -
Manual
Page 12
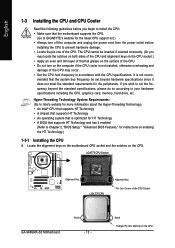
... power cord from the power outlet before installing the CPU to prevent hardware damage. • Locate the pin one of the CPU Socket GA-946GMX-S2 Motherboard Notch - 12 - The CPU cannot be set the frequency beyond hardware specifications since it enabled (Refer to your hardware specifications including the... Read the following guidelines before you begin to install the CPU: • Make sure that the motherboard supports the CPU. (Go to GIGABYTE's website for the latest CPU support list.) • Always turn on the CPU Locate the alignment keys on the motherboard CPU socket and...
... power cord from the power outlet before installing the CPU to prevent hardware damage. • Locate the pin one of the CPU Socket GA-946GMX-S2 Motherboard Notch - 12 - The CPU cannot be set the frequency beyond hardware specifications since it enabled (Refer to your hardware specifications including the... Read the following guidelines before you begin to install the CPU: • Make sure that the motherboard supports the CPU. (Go to GIGABYTE's website for the latest CPU support list.) • Always turn on the CPU Locate the alignment keys on the motherboard CPU socket and...
Manual
Page 54
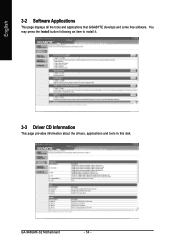
English 3-2 Software Applications This page displays all the tools and applications that GIGABYTE develops and some free software. You may press the Install button following an item to install it. 3-3 Driver CD Information This page provides information about the drivers, applications and tools in this disk. GA-946GMX-S2 Motherboard - 54 -
English 3-2 Software Applications This page displays all the tools and applications that GIGABYTE develops and some free software. You may press the Install button following an item to install it. 3-3 Driver CD Information This page provides information about the drivers, applications and tools in this disk. GA-946GMX-S2 Motherboard - 54 -
Manual
Page 62
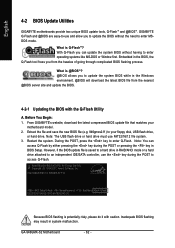
GA-946GMX-S2 Motherboard - 62 - What is potentially risky, please do it with the Q-Flash Utility ... without having to access Q-Flash. During the POST, press the key to a hard drive in BIOS Setup. GIGABYTE Q-Flash and @BIOS are easy-to-use and allow you can access Q-Flash by either pressing the key during...FAT32/16/12 file system. 3. Restart the system. English 4-2 BIOS Update Utilities GIGABYTE motherboards provide two unique BIOS update tools, Q-FlashTM and @BIOSTM. From GIGABYTE's website, download the latest compressed BIOS update file that matches your floppy disk, ...
GA-946GMX-S2 Motherboard - 62 - What is potentially risky, please do it with the Q-Flash Utility ... without having to access Q-Flash. During the POST, press the key to a hard drive in BIOS Setup. GIGABYTE Q-Flash and @BIOS are easy-to-use and allow you can access Q-Flash by either pressing the key during...FAT32/16/12 file system. 3. Restart the system. English 4-2 BIOS Update Utilities GIGABYTE motherboards provide two unique BIOS update tools, Q-FlashTM and @BIOSTM. From GIGABYTE's website, download the latest compressed BIOS update file that matches your floppy disk, ...
Manual
Page 66
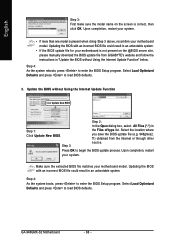
f1) obtained from GIGABYTE's website and follow the instructions in "Update the BIOS without Using the Internet Update Function Click Update New BIOS Step 2: In the Open dialog box, .... Upon completion, restart your system. • If more than one model is present when doing Step 3 above, recomfirm your motherboard is correct, then click OK. GA-946GMX-S2 Motherboard - 66 - Select Load Optimized Defaults and press to load BIOS defaults. 3. English Step 3: First make sure the model name on the screen is not...
f1) obtained from GIGABYTE's website and follow the instructions in "Update the BIOS without Using the Internet Update Function Click Update New BIOS Step 2: In the Open dialog box, .... Upon completion, restart your system. • If more than one model is present when doing Step 3 above, recomfirm your motherboard is correct, then click OK. GA-946GMX-S2 Motherboard - 66 - Select Load Optimized Defaults and press to load BIOS defaults. 3. English Step 3: First make sure the model name on the screen is not...


