
Manual
Page 10
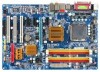
...processor/ Intel® Celeron® D processor in the LGA 775 package (Go to GIGABYTE's website for the latest CPU support list.) Š Support for Intel® Hyper-Threading Technology Š L2 cache varies with CPU Š 1066/800/533 MHz FSB Š North Bridge: Intel® 946GZ ...SATA 3Gb/s connectors supporting up to 4 SATA 3Gb/s devices Š Integrated in the South Bridge Š Up to 8 USB 2.0/1.1 ports (4 on the back panel, 4 via the USB brackets connected to the internal USB headers) "*" Only the GA-946-DS3 adopts All-Solid Capacitor design. GA-946-DS3/S3 Motherboard - 10...
...processor/ Intel® Celeron® D processor in the LGA 775 package (Go to GIGABYTE's website for the latest CPU support list.) Š Support for Intel® Hyper-Threading Technology Š L2 cache varies with CPU Š 1066/800/533 MHz FSB Š North Bridge: Intel® 946GZ ...SATA 3Gb/s connectors supporting up to 4 SATA 3Gb/s devices Š Integrated in the South Bridge Š Up to 8 USB 2.0/1.1 ports (4 on the back panel, 4 via the USB brackets connected to the internal USB headers) "*" Only the GA-946-DS3 adopts All-Solid Capacitor design. GA-946-DS3/S3 Motherboard - 10...

Manual
Page 13
... instructions on the computer if the CPU cooler is optimized for HT Technology • A BIOS that supports HT Technology and has it does not meet the standard requirements for the latest CPU support list.) • Always turn on enabling the HT Technology.) 1-3-1 Installing the CPU A. mended that the system bus ... thermal grease on the surface of the CPU. • Do not turn off the computer and unplug the power cord from the power outlet before you begin to install the CPU: • Make sure that the motherboard supports the CPU. (Go to GIGABYTE's website for the peripherals. It is ...
... instructions on the computer if the CPU cooler is optimized for HT Technology • A BIOS that supports HT Technology and has it does not meet the standard requirements for the latest CPU support list.) • Always turn on enabling the HT Technology.) 1-3-1 Installing the CPU A. mended that the system bus ... thermal grease on the surface of the CPU. • Do not turn off the computer and unplug the power cord from the power outlet before you begin to install the CPU: • Make sure that the motherboard supports the CPU. (Go to GIGABYTE's website for the peripherals. It is ...
Manual
Page 16
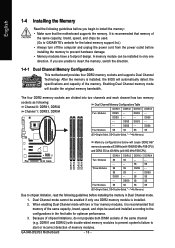
... that memory of the same capacity, brand, speed, and chips be used . (Go to GIGABYTE's website for optimum performance. 3. After the memory is installed. 2. DS/SS - - -...cause DDR2 667 memory to operate at 533 MHz (with 1066/800 MHz FSB CPU) and DDR2 533 at 400 MHz (with double-sided memory modules to prevent...GA-946-DS3/S3 Motherboard - 16 - SS SS - - If you begin to install the memory: • Make sure that memory of the same capacity, brand, speed, and chips be used and installed according to the configurations in the first table for the latest memory support list...
... that memory of the same capacity, brand, speed, and chips be used . (Go to GIGABYTE's website for optimum performance. 3. After the memory is installed. 2. DS/SS - - -...cause DDR2 667 memory to operate at 533 MHz (with 1066/800 MHz FSB CPU) and DDR2 533 at 400 MHz (with double-sided memory modules to prevent...GA-946-DS3/S3 Motherboard - 16 - SS SS - - If you begin to install the memory: • Make sure that memory of the same capacity, brand, speed, and chips be used and installed according to the configurations in the first table for the latest memory support list...

Manual
Page 37
...the BIOS Setup program. (Default) System A password is required every time the system boots, or only when you install a CPU that supports this feature. Press to move it up or down on the list. Use the up or down arrow key to select a hard drive, then press the plus key (or ) or the... minus key (or ) to exit this item, set the password(s) under the Set Supervisor/User Password item in the BIOS Main Menu. HDD S.M.A.R.T. to 3 (Note) No-Execute Memory Protect (Note) CPU...
...the BIOS Setup program. (Default) System A password is required every time the system boots, or only when you install a CPU that supports this feature. Press to move it up or down on the list. Use the up or down arrow key to select a hard drive, then press the plus key (or ) or the... minus key (or ) to exit this item, set the password(s) under the Set Supervisor/User Password item in the BIOS Main Menu. HDD S.M.A.R.T. to 3 (Note) No-Execute Memory Protect (Note) CPU...

