Manual
Page 5
Channel Audio Function Introduction 62 4-2 Troubleshooting 67 - 5 - Chapter 3 Install Drivers 51 3-1 Install Chipset Drivers 51 3-2 SoftwareApplications 52 3-3 Driver CD Information 52 3-4 Hardware Information 53 3-5 Contact Us ...53 Chapter 4 Appendix 55 4-1 Unique Software Utilities 55 4-1-1 EasyTune 5 Introduction 55 4-1-2 Xpress Recovery2 Introduction 56 4-1-3 Flash BIOS Method Introduction 58 4-1-4 2- / 4- / 6- / 8-
Channel Audio Function Introduction 62 4-2 Troubleshooting 67 - 5 - Chapter 3 Install Drivers 51 3-1 Install Chipset Drivers 51 3-2 SoftwareApplications 52 3-3 Driver CD Information 52 3-4 Hardware Information 53 3-5 Contact Us ...53 Chapter 4 Appendix 55 4-1 Unique Software Utilities 55 4-1-1 EasyTune 5 Introduction 55 4-1-2 Xpress Recovery2 Introduction 56 4-1-3 Flash BIOS Method Introduction 58 4-1-4 2- / 4- / 6- / 8-

Manual
Page 15
...expansion card by following explanations due to the limitation of expansion card from the slot. - 15 - English Dual Channel Memory Configuration The GA-945GZM-S2 supports the Dual Channel Technology. After operating the Dual Channel Technology, the bandwidth of Memory Bus will not be enabled if only one... expansion card. 6. Replace the screw to operate the Dual Channel Technology, please note the following the steps outlined below: 1. Install related driver from the computer. 3. Make sure the card is recommended to use memory modules of identical brand, size, chips, and speed), you ...
...expansion card by following explanations due to the limitation of expansion card from the slot. - 15 - English Dual Channel Memory Configuration The GA-945GZM-S2 supports the Dual Channel Technology. After operating the Dual Channel Technology, the bandwidth of Memory Bus will not be enabled if only one... expansion card. 6. Replace the screw to operate the Dual Channel Technology, please note the following the steps outlined below: 1. Install related driver from the computer. 3. Make sure the card is recommended to use memory modules of identical brand, size, chips, and speed), you ...

Manual
Page 16
... Nvidia ATi Maker Gigabyte Gigabyte Gigabyte Gigabyte Gigabyte Gigabyte Gigabyte Gigabyte Gigabyte Gigabyte Gigabyte Gigabyte Gigabyte Gigabyte Gigabyte Gigabyte Gigabyte Gigabyte Gigabyte Gigabyte Nvidia Nvidia ASUS MSI WinFast Gigabyte Gigabyte Gigabyte Gigabyte Gigabyte Gigabyte Gigabyte Gigabyte Gigabyte Gigabyte Gigabyte Gigabyte Gigabyte Gigabyte Gigabyte Gigabyte ASUS ASUS MSI ... AX800XT AX700PRO RX600 XT-TD128 GA-945GZM-S2 Motherboard - 16 - When using an add-on graphics card, please first delete the onboard graphics driver before installing the driver for the add-on graphics ...
... Nvidia ATi Maker Gigabyte Gigabyte Gigabyte Gigabyte Gigabyte Gigabyte Gigabyte Gigabyte Gigabyte Gigabyte Gigabyte Gigabyte Gigabyte Gigabyte Gigabyte Gigabyte Gigabyte Gigabyte Gigabyte Gigabyte Nvidia Nvidia ASUS MSI WinFast Gigabyte Gigabyte Gigabyte Gigabyte Gigabyte Gigabyte Gigabyte Gigabyte Gigabyte Gigabyte Gigabyte Gigabyte Gigabyte Gigabyte Gigabyte Gigabyte ASUS ASUS MSI ... AX800XT AX700PRO RX600 XT-TD128 GA-945GZM-S2 Motherboard - 16 - When using an add-on graphics card, please first delete the onboard graphics driver before installing the driver for the add-on graphics ...
Manual
Page 17
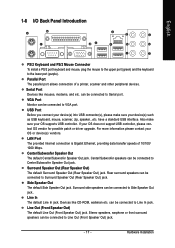
... like mouses, modems, and etc. For more information please contact your OS does not support USB controller, please contact OS vendor for possible patch or driver upgrade. Also make sure your OS supports USB controller. Stereo speakers, earphone or front surround speakers can be connected to VGA port. Center/Subwoofer Speaker...
... like mouses, modems, and etc. For more information please contact your OS does not support USB controller, please contact OS vendor for possible patch or driver upgrade. Also make sure your OS supports USB controller. Stereo speakers, earphone or front surround speakers can be connected to VGA port. Center/Subwoofer Speaker...

Manual
Page 21
... are: 360 KB, 720 KB, 1.2 MB, 1.44 MB and 2.88 MB. Please refer to the BIOS setting for the SATA 3Gb/s and install the proper driver in the FDD connector. 34 33 2 1 7) SATAII 0 / 1 / 2 / 3 (SATA 3Gb/s Connector) SATA 3Gb/s can provide up to the FDD drive...
... are: 360 KB, 720 KB, 1.2 MB, 1.44 MB and 2.88 MB. Please refer to the BIOS setting for the SATA 3Gb/s and install the proper driver in the FDD connector. 34 33 2 1 7) SATAII 0 / 1 / 2 / 3 (SATA 3Gb/s Connector) SATA 3Gb/s can provide up to the FDD drive...
Manual
Page 23
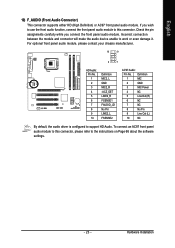
... Audio: Pin No. Hardware Installation Definition 1 MIC 2 GND 3 MIC Power 4 NC 5 Line Out (R) 6 NC 7 NC 8 No Pin 9 Line Out (L) 10 NC By default, the audio driver is configured to work or even damage it. To connect an AC97 front panel audio module to the instructions on Page 66 about the software...
... Audio: Pin No. Hardware Installation Definition 1 MIC 2 GND 3 MIC Power 4 NC 5 Line Out (R) 6 NC 7 NC 8 No Pin 9 Line Out (L) 10 NC By default, the audio driver is configured to work or even damage it. To connect an AC97 front panel audio module to the instructions on Page 66 about the software...
Manual
Page 51
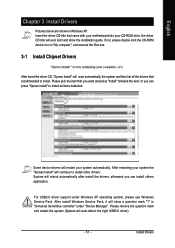
... CD-ROM device icon in "My computer", and execute the Run.exe. 3-1 Install Chipset Drivers After insert the driver CD, "Xpress Install" will auto-detect the right USB2.0 driver). - 51 - Please pick the item that came with your motherboard into your CD-ROM ...auto start and show a question mark "?" Insert the driver CD-title that you can press "Xpress Install" to install all the drivers that recommended to install other drivers. For USB2.0 driver support under "Device Manager". Install Drivers After restarting your system automatically. After install Windows Service ...
... CD-ROM device icon in "My computer", and execute the Run.exe. 3-1 Install Chipset Drivers After insert the driver CD, "Xpress Install" will auto-detect the right USB2.0 driver). - 51 - Please pick the item that came with your motherboard into your CD-ROM ...auto start and show a question mark "?" Insert the driver CD-title that you can press "Xpress Install" to install all the drivers that recommended to install other drivers. For USB2.0 driver support under "Device Manager". Install Drivers After restarting your system automatically. After install Windows Service ...

Manual
Page 52
English 3-2 Software Applications This page displays all the tools that Gigabyte developed and some free software, you can choose anyone you want and press "install" to install them. 3-3 Driver CD Information This page lists the contents of software and drivers in this CD-title. GA-945GZM-S2 Motherboard - 52 -
English 3-2 Software Applications This page displays all the tools that Gigabyte developed and some free software, you can choose anyone you want and press "install" to install them. 3-3 Driver CD Information This page lists the contents of software and drivers in this CD-title. GA-945GZM-S2 Motherboard - 52 -

Manual
Page 53
Install Drivers English 3-4 Hardware Information This page lists all device you have for this motherboard. 3-5 Contact Us Please see the last page for details. - 53 -
Install Drivers English 3-4 Hardware Information This page lists all device you have for this motherboard. 3-5 Contact Us Please see the last page for details. - 53 -

Manual
Page 56
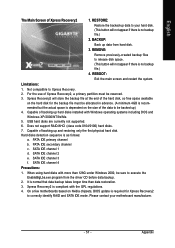
...above are completed, subsequent access to startup XpressRecovery2..... It is able to enter Xpress Recovery2 without the CD-ROM. Insert the provided driver CD into your hard disk. Supporting Microsoft operating systems including Windows XP/2000/NT/98/Me and DOS, and file systems including ...Feature and set to enter Xpress Recovery2. If you have already entered Xpress Recovery2 by pressing the key in your CD-ROM drive. GA-945GZM-S2 Motherboard - 56 - Intel x86 platforms 2. After Xpress Recovery2 is designed to provide quick backup and restoration of hard disk data. ...
...above are completed, subsequent access to startup XpressRecovery2..... It is able to enter Xpress Recovery2 without the CD-ROM. Insert the provided driver CD into your hard disk. Supporting Microsoft operating systems including Windows XP/2000/NT/98/Me and DOS, and file systems including ...Feature and set to enter Xpress Recovery2. If you have already entered Xpress Recovery2 by pressing the key in your CD-ROM drive. GA-945GZM-S2 Motherboard - 56 - Intel x86 platforms 2. After Xpress Recovery2 is designed to provide quick backup and restoration of hard disk data. ...
Manual
Page 57
....) 2. On a few motherboards based on the size of backing up ) 4. BACKUP: Back up data to Xpress Recovery. 2. RESTORE: Restore the backed-up data from the driver CD before data backup. 2. For the use of the hard disk, so free space available on the hard disk for Xpress Recovery2 to correctly identify...
....) 2. On a few motherboards based on the size of backing up ) 4. BACKUP: Back up data to Xpress Recovery. 2. RESTORE: Restore the backed-up data from the driver CD before data backup. 2. For the use of the hard disk, so free space available on the hard disk for Xpress Recovery2 to correctly identify...
Manual
Page 62
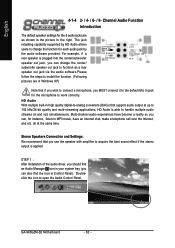
Multi-channel audio experiences have an Internet chat, make a telephone call over the Internet, and etc. GA-945GZM-S2 Motherboard - 62 - Channel Audio Function Introduction The default speaker settings for each audio jack by HD Audio allows users to handle multiple audio streams (in... speaker out jack, you can , for the microphone to work correctly. For example, if a rear speaker is applied. STEP 1 : After installation of the audio driver, you should find the icon in the picture to MP3 music, have become a reality so you use the speaker with amplifier to open the Audio...
Multi-channel audio experiences have an Internet chat, make a telephone call over the Internet, and etc. GA-945GZM-S2 Motherboard - 62 - Channel Audio Function Introduction The default speaker settings for each audio jack by HD Audio allows users to handle multiple audio streams (in... speaker out jack, you can , for the microphone to work correctly. For example, if a rear speaker is applied. STEP 1 : After installation of the audio driver, you should find the icon in the picture to MP3 music, have become a reality so you use the speaker with amplifier to open the Audio...
Manual
Page 63
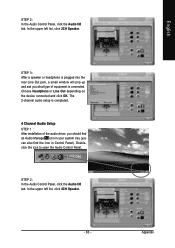
... 1 : After installation of equipment is plugged into the rear Line Out jack, a small window will pop up and ask you what type of the audio driver, you should find an Audio Manager icon in your system tray (you can also find the icon in Control Panel). Doubleclick the icon to open...
... 1 : After installation of equipment is plugged into the rear Line Out jack, a small window will pop up and ask you what type of the audio driver, you should find an Audio Manager icon in your system tray (you can also find the icon in Control Panel). Doubleclick the icon to open...
Manual
Page 64
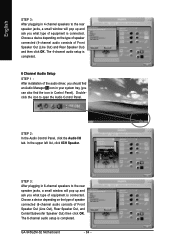
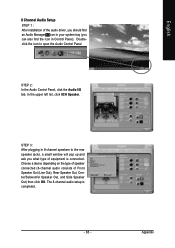
...STEP 3: After plugging in 6-channel speakers to the rear speaker jacks, a small window will pop up and ask you what type of equipment is connected. GA-945GZM-S2 Motherboard - 64 - In the upper left list, click 6CH Speaker. English STEP 3: After plugging in 4-channel speakers to the rear speaker jacks, a ...is connected. The 4-channel audio setup is completed. Choose a device depending on the type of speaker connected (6-channel audio consists of the audio driver, you should find an Audio Manager icon in your system tray (you can also find the icon in Control Panel). STEP 2: In the Audio...
...STEP 3: After plugging in 6-channel speakers to the rear speaker jacks, a small window will pop up and ask you what type of equipment is connected. GA-945GZM-S2 Motherboard - 64 - In the upper left list, click 6CH Speaker. English STEP 3: After plugging in 4-channel speakers to the rear speaker jacks, a ...is connected. The 4-channel audio setup is completed. Choose a device depending on the type of speaker connected (6-channel audio consists of the audio driver, you should find an Audio Manager icon in your system tray (you can also find the icon in Control Panel). STEP 2: In the Audio...
Manual
Page 65
... Manager icon in your system tray (you what type of equipment is completed. - 65 - Appendix English 8 Channel Audio Setup STEP 1 : After installation of the audio driver, you should find the icon in Control Panel). STEP 3: After plugging in 8-channel speakers to open the Audio Control Panel.
... Manager icon in your system tray (you what type of equipment is completed. - 65 - Appendix English 8 Channel Audio Setup STEP 1 : After installation of the audio driver, you should find the icon in Control Panel). STEP 3: After plugging in 8-channel speakers to open the Audio Control Panel.


