Manual
Page 5
... 53 3-2 Software Applications 54 3-3 Driver CD Information 54 3-4 Hardware Information 55 3-5 Contact Us ...55 Chapter 4 Unique Features 57 4-1 Xpress Recovery2 57 4-2 BIOS Update Utilities 62 4-2-1 Updating the BIOS with the Q-Flash Utility 62 4-2-2 Updating the BIOS with the @BIOS Utility 65 4-3 EasyTune 5 ...67 4-4 Windows Vista ReadyBoost 68 Chapter 5 Appendix ...69 5-1 Configuring Audio Input and Output 69 5-1-1 Configuring 2/4/5.1-Channel Audio 69...
... 53 3-2 Software Applications 54 3-3 Driver CD Information 54 3-4 Hardware Information 55 3-5 Contact Us ...55 Chapter 4 Unique Features 57 4-1 Xpress Recovery2 57 4-2 BIOS Update Utilities 62 4-2-1 Updating the BIOS with the Q-Flash Utility 62 4-2-2 Updating the BIOS with the @BIOS Utility 65 4-3 EasyTune 5 ...67 4-4 Windows Vista ReadyBoost 68 Chapter 5 Appendix ...69 5-1 Configuring Audio Input and Output 69 5-1-1 Configuring 2/4/5.1-Channel Audio 69...
Manual
Page 31
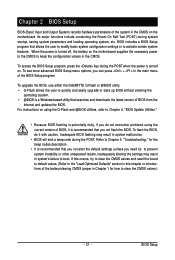
... CMOS on using the Q-Flash and @BIOS utilities, refer to Chapter 4, "BIOS Update Utilities." • Because BIOS flashing is potentially risky, if you do it is recommended that allows the user to modify basic system configuration settings or to activate certain system features. To upgrade the BIOS, use either the GIGABYTE Q-Flash or @BIOS utility. • Q-Flash allows the user...
... CMOS on using the Q-Flash and @BIOS utilities, refer to Chapter 4, "BIOS Update Utilities." • Because BIOS flashing is potentially risky, if you do it is recommended that allows the user to modify basic system configuration settings or to activate certain system features. To upgrade the BIOS, use either the GIGABYTE Q-Flash or @BIOS utility. • Q-Flash allows the user...

Manual
Page 50
...key to operate in optimum state. GA-945GCM-S2L/S2C Motherboard - 50 - In case system instability occurs, you may try to load Fail-Safe defaults, which are the safest and most stable BIOS settings for the motherboard. 2-11 Load Optimized Defaults CMOS Setup Utility-Copyright (C) 1984-2007 Award Software... & Exit Setup Load Optimized Defaults Press on this item and then press the key to load the optimal BIOS default settings. Always load the Optimized defaults after updating the BIOS or after clearing the CMOS values. The BIOS defaults settings helps the system to load the safest...
...key to operate in optimum state. GA-945GCM-S2L/S2C Motherboard - 50 - In case system instability occurs, you may try to load Fail-Safe defaults, which are the safest and most stable BIOS settings for the motherboard. 2-11 Load Optimized Defaults CMOS Setup Utility-Copyright (C) 1984-2007 Award Software... & Exit Setup Load Optimized Defaults Press on this item and then press the key to load the optimal BIOS default settings. Always load the Optimized defaults after updating the BIOS or after clearing the CMOS values. The BIOS defaults settings helps the system to load the safest...
Manual
Page 62
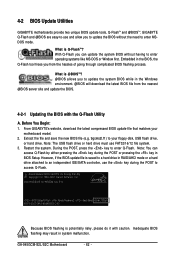
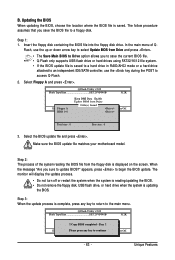
... a hard drive attached to enter Q-Flash. Restart the system. GA-945GCM-S2L/S2C Motherboard - 62 - 4-2 BIOS Update Utilities GIGABYTE motherboards provide two unique BIOS update tools, Q-FlashTM and @BIOS .TM GIGABYTE Q-Flash and @BIOS are easy-to-use and allow you from the nearest @BIOS server site and update the BIOS. 4-2-1 Updating the BIOS with caution. TM @BIOS allows you can access Q-Flash by either pressing the key...
... a hard drive attached to enter Q-Flash. Restart the system. GA-945GCM-S2L/S2C Motherboard - 62 - 4-2 BIOS Update Utilities GIGABYTE motherboards provide two unique BIOS update tools, Q-FlashTM and @BIOS .TM GIGABYTE Q-Flash and @BIOS are easy-to-use and allow you from the nearest @BIOS server site and update the BIOS. 4-2-1 Updating the BIOS with caution. TM @BIOS allows you can access Q-Flash by either pressing the key...
Manual
Page 63
Insert the floppy disk containing the BIOS file into the floppy disk drive. Q-Flash Utility v2.02 Flash Type/Size SST 25VF040B 512K EnteFr l:oRppuyn A HDD 0-0 Keep DMI Data Enable Update BIOS from the floppy disk is saved to a hard drive in RAID/AHCI ...0 Free size : 0 3. Q-Flash Utility v2.02 Flash Type/Size SST 25VF040B 512K Enter : Run Keep DMI Data Enable !! Unique Features Flash, use the key during the POST to update BIOS?" CopUypBdIaOteSBcIoOmSpflerotemd -DPriavses !! Step 1: 1. Select Floppy A and press . Select the BIOS update file and press . Step 2: The ...
Insert the floppy disk containing the BIOS file into the floppy disk drive. Q-Flash Utility v2.02 Flash Type/Size SST 25VF040B 512K EnteFr l:oRppuyn A HDD 0-0 Keep DMI Data Enable Update BIOS from the floppy disk is saved to a hard drive in RAID/AHCI ...0 Free size : 0 3. Q-Flash Utility v2.02 Flash Type/Size SST 25VF040B 512K Enter : Run Keep DMI Data Enable !! Unique Features Flash, use the key during the POST to update BIOS?" CopUypBdIaOteSBcIoOmSpflerotemd -DPriavses !! Step 1: 1. Select Floppy A and press . Select the BIOS update file and press . Step 2: The ...

Manual
Page 64
...BIOS update, so we recommend that you should see the new BIOS version is present on the POST screen. Select Load Optimized Defaults and press to CMOS and exit BIOS Setup. GA-945GCM-S2L/S2C Motherboard - 64 - As the system boots, you reload BIOS defaults. CMOS Setup Utility...-Copyright (C) 1984-2007 Award Software ` Standard CMOS Features ` Advanced BIOS Features ` Integrated Peripherals ` Power Management Setup ...
...BIOS update, so we recommend that you should see the new BIOS version is present on the POST screen. Select Load Optimized Defaults and press to CMOS and exit BIOS Setup. GA-945GCM-S2L/S2C Motherboard - 64 - As the system boots, you reload BIOS defaults. CMOS Setup Utility...-Copyright (C) 1984-2007 Award Software ` Standard CMOS Features ` Advanced BIOS Features ` Integrated Peripherals ` Power Management Setup ...
Manual
Page 65
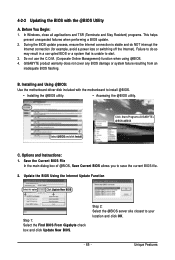
... this option Click Update New BIOS Step 1: Select the Find BIOS From Gigabyte check box and click Update New BIOS. In Windows, close all applications and TSR (Terminate and Stay Resident) programs. This helps prevent unexpected failures when performing a BIOS update. 2. Installing and Using @BIOS: Use the motherboard driver disk included with the @BIOS Utility A. Click Start>Programs>GIGABYTE> @BIOS>@BIOS C. B. Options and Instructions...
... this option Click Update New BIOS Step 1: Select the Find BIOS From Gigabyte check box and click Update New BIOS. In Windows, close all applications and TSR (Terminate and Stay Resident) programs. This helps prevent unexpected failures when performing a BIOS update. 2. Installing and Using @BIOS: Use the motherboard driver disk included with the @BIOS Utility A. Click Start>Programs>GIGABYTE> @BIOS>@BIOS C. B. Options and Instructions...


