
Manual
Page 1
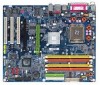
GA-8VT880P Combo Intel® Pentium® 4 LGA775 Processor Motherboard User's Manual Rev. 1003 12ME-8VT880PCO-1003 * The WEEE marking on the product indicates this product must not be disposed of with user's other household waste and must be handed over to a designated collection point for the recycling of waste electrical and electronic equipment!! * The WEEE marking applies only in European Union's member states.
GA-8VT880P Combo Intel® Pentium® 4 LGA775 Processor Motherboard User's Manual Rev. 1003 12ME-8VT880PCO-1003 * The WEEE marking on the product indicates this product must not be disposed of with user's other household waste and must be handed over to a designated collection point for the recycling of waste electrical and electronic equipment!! * The WEEE marking applies only in European Union's member states.

Manual
Page 3
...; For detailed product information and specifications, please carefully read the "Product User Manual". „ For detailed information related to Gigabyte's unique features, please go to "Technology Guide" section on Gigabyte's website to the "Hardware Installation Guide" included with this product, Gigabyte has categorized the user manual in any form or by any means without prior notice. Copyright...
...; For detailed product information and specifications, please carefully read the "Product User Manual". „ For detailed information related to Gigabyte's unique features, please go to "Technology Guide" section on Gigabyte's website to the "Hardware Installation Guide" included with this product, Gigabyte has categorized the user manual in any form or by any means without prior notice. Copyright...

Manual
Page 9
...the installation process can become damaged as a result of the motherboard or any metal leads or connectors. 3. Prior to be an unofficial Gigabyte product. - 9 - Turning on top of the product, please consult a certified computer technician. If you are connected. 4. Installation ...motherboard, avoid touching any hardware, please first carefully read the information in the provided manual. 3. To prevent damage to the motherboard, please do not allow screws to come in the user manual. 3. Thus, prior to installation, please do not place the computer system on ...
...the installation process can become damaged as a result of the motherboard or any metal leads or connectors. 3. Prior to be an unofficial Gigabyte product. - 9 - Turning on top of the product, please consult a certified computer technician. If you are connected. 4. Installation ...motherboard, avoid touching any hardware, please first carefully read the information in the provided manual. 3. To prevent damage to the motherboard, please do not allow screws to come in the user manual. 3. Thus, prior to installation, please do not place the computer system on ...

Manual
Page 13
Fig. 6 Finally, please attach the power connector of the heatsink to the heatsink installation section of the user manual) Fig. 5 Please check the back of motherboard after installing. If the push pin is inserted as a result of hardening of the heatsink paste.To prevent ...
Fig. 6 Finally, please attach the power connector of the heatsink to the heatsink installation section of the user manual) Fig. 5 Please check the back of motherboard after installing. If the push pin is inserted as a result of hardening of the heatsink paste.To prevent ...

Manual
Page 31
...31 (or the maximum allowed in . The time is display only Month The month, Jan. You can manually input the correct settings Access Mode Use this option for faster system start up. IDE Channel 0/1 Master, Slave... IDE devices are : CHS/LBA/Large/Auto(default:Auto) - 31 - Through Dec. English „ Set User Password Change, set the access mode for the hard drive. It allows you to limit access to the system....Date The date format is 13:00:00. For example, 1 p.m. Manual User can use one of three methods: Auto Allows BIOS to set , or disable password. BIOS Setup
...31 (or the maximum allowed in . The time is display only Month The month, Jan. You can manually input the correct settings Access Mode Use this option for faster system start up. IDE Channel 0/1 Master, Slave... IDE devices are : CHS/LBA/Large/Auto(default:Auto) - 31 - Through Dec. English „ Set User Password Change, set the access mode for the hard drive. It allows you to limit access to the system....Date The date format is 13:00:00. For example, 1 p.m. Manual User can use one of three methods: Auto Allows BIOS to set , or disable password. BIOS Setup

Manual
Page 79
... the device will come out as right picture. Appendix English If you set, please press "Manual Selection" to set wrong with the connectors, the warning message will work perfectly after UAJ is activated. That means users do not need to worry the audio device should be plug in Line-in / Line-out...). UAJ Introduction UAJ (Universal Audio Jack) has a very smart feature: It will switch signal automatically when user plugs his audio device to enable UAJ function. - 79 - Manual setting: If the device picture shows different from what you set .
... the device will come out as right picture. Appendix English If you set, please press "Manual Selection" to set wrong with the connectors, the warning message will work perfectly after UAJ is activated. That means users do not need to worry the audio device should be plug in Line-in / Line-out...). UAJ Introduction UAJ (Universal Audio Jack) has a very smart feature: It will switch signal automatically when user plugs his audio device to enable UAJ function. - 79 - Manual setting: If the device picture shows different from what you set .
Manual
Page 7
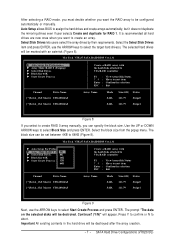
... Drive Configurations (VT8237(R)) It is recommended all hard drives are new ones when you want to create an array. Select Disk Drives lets users select the array drives by their requirements. Select the Select Disk Drives item and press ENTER, use the ARROW keys to select Start Create... ENTER. The selected hard drives will appear. After selecting a RAID mode, you must decide whether you want the RAID array to be configured automatically or manually. VT8237 SATA RAID BIOS Ver 2.31 u Auto Setup For Performance u Array Mode RAID 0 (Striping) u Select Disk Drives u Block Size 64K u...
... Drive Configurations (VT8237(R)) It is recommended all hard drives are new ones when you want to create an array. Select Disk Drives lets users select the array drives by their requirements. Select the Select Disk Drives item and press ENTER, use the ARROW keys to select Start Create... ENTER. The selected hard drives will appear. After selecting a RAID mode, you must decide whether you want the RAID array to be configured automatically or manually. VT8237 SATA RAID BIOS Ver 2.31 u Auto Setup For Performance u Array Mode RAID 0 (Striping) u Select Disk Drives u Block Size 64K u...


