
Manual
Page 4
Table of Contents GA-8VT880P Combo Motherboard Layout 6 Block Diagram ...7 Chapter 1 Hardware Installation 9 1-1 Considerations Prior to Installation 9 1-2 Feature Summary 10 1-3 Installation of the CPU and Heatsink 12 1-3-1 Installation of the CPU 12 1-3-2 Installation of the Heatsink 13 1-4 Installation of Memory 14 1-5 Installation of Expansion Cards 16 1-5-1 Recommended PCI Express x 16 graphics cards for the GA-8VT880 Combo17 1-6 I/O Back Panel Introduction 18 1-7 Connectors Introduction 19 Chapter 2 BIOS Setup 29 The Main Menu (For example: BIOS Ver. : FD 30 2-1 Standard ...
Table of Contents GA-8VT880P Combo Motherboard Layout 6 Block Diagram ...7 Chapter 1 Hardware Installation 9 1-1 Considerations Prior to Installation 9 1-2 Feature Summary 10 1-3 Installation of the CPU and Heatsink 12 1-3-1 Installation of the CPU 12 1-3-2 Installation of the Heatsink 13 1-4 Installation of Memory 14 1-5 Installation of Expansion Cards 16 1-5-1 Recommended PCI Express x 16 graphics cards for the GA-8VT880 Combo17 1-6 I/O Back Panel Introduction 18 1-7 Connectors Introduction 19 Chapter 2 BIOS Setup 29 The Main Menu (For example: BIOS Ver. : FD 30 2-1 Standard ...

Manual
Page 15
... the Dual Channel Technology, the bandwidth of the same color. To enable Dual Channel mode with 2 memory modules (it is recommended to the limitation of Intel chipset specifications. 1. The following explanations due to use memory modules of identical brand, size, chips, and speed), you must install them into DIMM sockets of Memory Bus will not be enabled if only one DDR/DDR II memory module is not supported. - 15 - English Dual Channel Memory Configuration GA-8VT880P Combo supports the Dual Channel Technology. Dual Channel mode will...
... the Dual Channel Technology, the bandwidth of the same color. To enable Dual Channel mode with 2 memory modules (it is recommended to the limitation of Intel chipset specifications. 1. The following explanations due to use memory modules of identical brand, size, chips, and speed), you must install them into DIMM sockets of Memory Bus will not be enabled if only one DDR/DDR II memory module is not supported. - 15 - English Dual Channel Memory Configuration GA-8VT880P Combo supports the Dual Channel Technology. Dual Channel mode will...

Manual
Page 22
.../IDE2 (IDE Connector) An IDE device connects to work properly. Pin No. Definition 1 GND 7 1 2 TXP 3 TXN 4 GND 5 RXN 6 RXP 7 GND GA-8VT880P Combo Motherboard - 22 - Please refer to the BIOS setting for information on settings, please refer to the instructions located on the IDE device). 40 39 2 1 7) SATA0/SATA1 (Serial ATA Connector) Serial ATA can provide up to two IDE devices (hard drive or optical drive). If you wish to connect two IDE devices, please set the jumper on one IDE cable, and...
.../IDE2 (IDE Connector) An IDE device connects to work properly. Pin No. Definition 1 GND 7 1 2 TXP 3 TXN 4 GND 5 RXN 6 RXP 7 GND GA-8VT880P Combo Motherboard - 22 - Please refer to the BIOS setting for information on settings, please refer to the instructions located on the IDE device). 40 39 2 1 7) SATA0/SATA1 (Serial ATA Connector) Serial ATA can provide up to two IDE devices (hard drive or optical drive). If you wish to connect two IDE devices, please set the jumper on one IDE cable, and...
Manual
Page 23
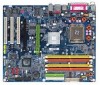
... LED/Power/Sleep LED) (Yellow) NC ( Purple) Reset Switch IDE Hard Disk Active LED Pin 1: LED anode(+) Pin 2: LED cathode(-) Pin 1: Power Pin 2- Pin 3: NC Pin 4: Data(-) Open: Normal Close: Reset Hardware System Open: Normal Close: Power On/Off Pin 1: LED anode(+) Pin 2: LED cathode(-) NC 9) PWR_LED PWR_LED is connect with the system power indicator to the pin assignment below. Definition 1 1 MPD+ 2 MPD- 3 MPD- - 23 - Hardware Installation Pin No. Message LED/ Power/ Sleep LED Speaker Connector Power Switch MSG+ MSG- It will blink when the system enters suspend mode...
... LED/Power/Sleep LED) (Yellow) NC ( Purple) Reset Switch IDE Hard Disk Active LED Pin 1: LED anode(+) Pin 2: LED cathode(-) Pin 1: Power Pin 2- Pin 3: NC Pin 4: Data(-) Open: Normal Close: Reset Hardware System Open: Normal Close: Power On/Off Pin 1: LED anode(+) Pin 2: LED cathode(-) NC 9) PWR_LED PWR_LED is connect with the system power indicator to the pin assignment below. Definition 1 1 MPD+ 2 MPD- 3 MPD- - 23 - Hardware Installation Pin No. Message LED/ Power/ Sleep LED Speaker Connector Power Switch MSG+ MSG- It will blink when the system enters suspend mode...
Manual
Page 30
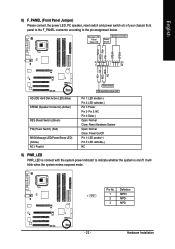
... the setting you want, please press "Ctrl+F1" to accept or enter the sub-menu. It allows you enter Award BIOS CMOS Setup Utility, the Main Menu (as figure below) will appear on the screen. GA-8VT880P Combo Motherboard - 30 - CMOS Setup Utility-Copyright (C) 1984-2005 Award Software ` Standard CMOS Features ` Advanced BIOS Features ` Integrated Peripherals ` Power Management Setup ` PnP/PCI Configurations ` PC Health Status ` MB Intelligent Tweaker(M.I .T.) This setup page is control CPU clock and frequency ratio. „ Load Fail-Safe Defaults Fail-Safe Defaults indicates...
... the setting you want, please press "Ctrl+F1" to accept or enter the sub-menu. It allows you enter Award BIOS CMOS Setup Utility, the Main Menu (as figure below) will appear on the screen. GA-8VT880P Combo Motherboard - 30 - CMOS Setup Utility-Copyright (C) 1984-2005 Award Software ` Standard CMOS Features ` Advanced BIOS Features ` Integrated Peripherals ` Power Management Setup ` PnP/PCI Configurations ` PC Health Status ` MB Intelligent Tweaker(M.I .T.) This setup page is control CPU clock and frequency ratio. „ Load Fail-Safe Defaults Fail-Safe Defaults indicates...

Manual
Page 31
...) Time (hh:mm:ss) CMOS Setup Utility-Copyright (C) 1984-2005 Award Software Standard CMOS Features Mon, Feb 14 2005 15:31:24 Item Help Menu Level` ` IDE Channel 0 Master ` IDE Channel 0 Slave ` IDE Channel 1 Master ` IDE Channel 1 Slave ` IDE Channel 2 Master ` IDE Channel 3 Master Drive A Drive B Floppy 3 Mode Support Halt On [None] [None] [None] [None] [None] [None] [1.44M, 3.5"] [None] [Disabled] [All, But Keyboard] Change the day, month, year Sun. The four options are used and the system will skip...
...) Time (hh:mm:ss) CMOS Setup Utility-Copyright (C) 1984-2005 Award Software Standard CMOS Features Mon, Feb 14 2005 15:31:24 Item Help Menu Level` ` IDE Channel 0 Master ` IDE Channel 0 Slave ` IDE Channel 1 Master ` IDE Channel 1 Slave ` IDE Channel 2 Master ` IDE Channel 3 Master Drive A Drive B Floppy 3 Mode Support Halt On [None] [None] [None] [None] [None] [None] [1.44M, 3.5"] [None] [Disabled] [All, But Keyboard] Change the day, month, year Sun. The four options are used and the system will skip...
Manual
Page 35
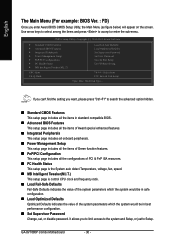
...Disabled Disable onboard 2nd channel IDE port. OnChip Serial ATA Enabled Disabled Enable VT8237R Serial ATA support. (Default value) Disable this function. - 35 - BIOS Setup Please note that this feature is only working Disabled for windows XP. (Default value) 2-3 Integrated Peripherals CMOS Setup Utility-Copyright (C) 1984-2005 Award Software Integrated Peripherals OnChip IDE Channel 0 OnChip IDE Channel 1 OnChip Serial ATA SATA Mode AC97 Audio USB 1.1 Controller USB 2.0 Controller USB Keyboard Support USB Mouse Support Onboard H/W LAN OnBoard LAN Boot ROM Onboard Serial Port...
...Disabled Disable onboard 2nd channel IDE port. OnChip Serial ATA Enabled Disabled Enable VT8237R Serial ATA support. (Default value) Disable this function. - 35 - BIOS Setup Please note that this feature is only working Disabled for windows XP. (Default value) 2-3 Integrated Peripherals CMOS Setup Utility-Copyright (C) 1984-2005 Award Software Integrated Peripherals OnChip IDE Channel 0 OnChip IDE Channel 1 OnChip Serial ATA SATA Mode AC97 Audio USB 1.1 Controller USB 2.0 Controller USB Keyboard Support USB Mouse Support Onboard H/W LAN OnBoard LAN Boot ROM Onboard Serial Port...
Manual
Page 38
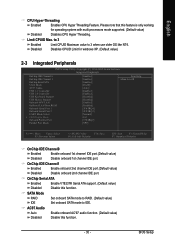
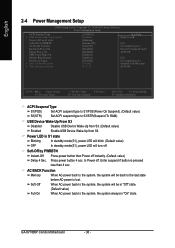
...-Safe Defaults ESC: Exit F1: General Help F7: Optimized Defaults ACPI Suspend Type S1(POS) Set ACPI suspend type to S1/POS(Power On Suspend). (Default value) S3(STR) Set ACPI suspend type to the last state before AC-power is pressed less than 4 sec. AC BACK Function Memory When AC-power back to Power off . GA-8VT880P Combo Motherboard - 38 - English 2-4 Power Management Setup CMOS Setup Utility-Copyright (C) 1984-2005 Award Software Power Management Setup ACPI Suspend Type x USB Device Wake-Up From S3 Power LED...
...-Safe Defaults ESC: Exit F1: General Help F7: Optimized Defaults ACPI Suspend Type S1(POS) Set ACPI suspend type to S1/POS(Power On Suspend). (Default value) S3(STR) Set ACPI suspend type to the last state before AC-power is pressed less than 4 sec. AC BACK Function Memory When AC-power back to Power off . GA-8VT880P Combo Motherboard - 38 - English 2-4 Power Management Setup CMOS Setup Utility-Copyright (C) 1984-2005 Award Software Power Management Setup ACPI Suspend Type x USB Device Wake-Up From S3 Power LED...

Manual
Page 42
... For power end-user use a CPU fan with 3-pin or 4-pin power cables. CPU Host Clock Control Please note that if your system. Incorrectly using these features may damage your system is overclocked and cannot restart, please wait 20secs. C.I .A. Disabled Disable this function. (Default value) Enabled Enable this function may cause your system broken. GA-8VT880P Combo Motherboard - 42 - CPU Clock 200MHz ~ 600MHz Set CPU Host Clock from 200MHz to maximize system performance. Frequency (Mhz) x Fixed AGP/PCI Frequency AGP/PCI Frequency DRAM Clock CPU Voltage Control...
... For power end-user use a CPU fan with 3-pin or 4-pin power cables. CPU Host Clock Control Please note that if your system. Incorrectly using these features may damage your system is overclocked and cannot restart, please wait 20secs. C.I .A. Disabled Disable this function. (Default value) Enabled Enable this function may cause your system broken. GA-8VT880P Combo Motherboard - 42 - CPU Clock 200MHz ~ 600MHz Set CPU Host Clock from 200MHz to maximize system performance. Frequency (Mhz) x Fixed AGP/PCI Frequency AGP/PCI Frequency DRAM Clock CPU Voltage Control...

Manual
Page 45
... being disabled. BIOS Setup Type the password, up to enter Setup Menu. Once the password is rebooted or any time you try to enter Setup. - 45 - You will be prompted only when you can enter Setup freely. English 2-10 Set Supervisor/User Password CMOS Setup Utility-Copyright (C) 1984-2005 Award Software ` Standard CMOS Features ` Advanced BIOS Features ` Integrated Peripherals ` Power Management Setup ` PnP/PCI ConfigurationEsnter Password: ` PC Health Status ` MB Intelligent Tweaker(M.I.T.) Load Fail-Safe Defaults Load Optimized Defaults Set Supervisor Password Set User...
... being disabled. BIOS Setup Type the password, up to enter Setup Menu. Once the password is rebooted or any time you try to enter Setup. - 45 - You will be prompted only when you can enter Setup freely. English 2-10 Set Supervisor/User Password CMOS Setup Utility-Copyright (C) 1984-2005 Award Software ` Standard CMOS Features ` Advanced BIOS Features ` Integrated Peripherals ` Power Management Setup ` PnP/PCI ConfigurationEsnter Password: ` PC Health Status ` MB Intelligent Tweaker(M.I.T.) Load Fail-Safe Defaults Load Optimized Defaults Set Supervisor Password Set User...
Manual
Page 54
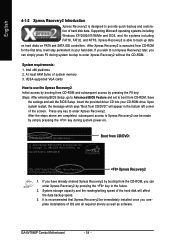
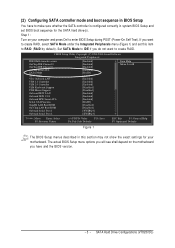
... corner of hard disk data. Intel x86 platforms 2. Save the settings and exit the BIOS Setup. Boot from CD/DVD: Xpress Recovery2 1. Press any key to startup XpressRecovery2..... If you wish to run Xpress Recovery2 later, you can enter Xpress Recovery2 by pressing the key in your CD-ROM drive. VESA-supported VGA cards How to use the Xpress Recovery2 Initial access by booting from CD-ROM. Award Modular BIOS v6...
... corner of hard disk data. Intel x86 platforms 2. Save the settings and exit the BIOS Setup. Boot from CD/DVD: Xpress Recovery2 1. Press any key to startup XpressRecovery2..... If you wish to run Xpress Recovery2 later, you can enter Xpress Recovery2 by pressing the key in your CD-ROM drive. VESA-supported VGA cards How to use the Xpress Recovery2 Initial access by booting from CD-ROM. Award Modular BIOS v6...
Manual
Page 57
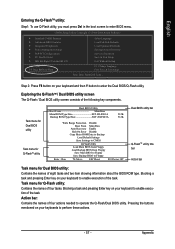
... Power Management Setup PnP/PCI Configurations PC Health Status MB Intelligent Tweaker(M.I.T.) ESC: Quit F8: Dual BIOS/Q-Flash Select Language Load Fail-Safe Defaults Load Optimized Defaults Set Supervisor Password Set User Password Save & Exit Setup Exit Without Saving F3: Change Language F10: Save & Exit Setup Time, Date, Hard Disk Type... Exploring the Q-FlashTM / Dual BIOS utility screen The Q-Flash / Dual BIOS utility screen consists of the task. Pressing the buttons mentioned on your keyboards to enter BIOS menu. Blocking a task and pressing Enter key on your keyboard to enable...
... Power Management Setup PnP/PCI Configurations PC Health Status MB Intelligent Tweaker(M.I.T.) ESC: Quit F8: Dual BIOS/Q-Flash Select Language Load Fail-Safe Defaults Load Optimized Defaults Set Supervisor Password Set User Password Save & Exit Setup Exit Without Saving F3: Change Language F10: Save & Exit Setup Time, Date, Hard Disk Type... Exploring the Q-FlashTM / Dual BIOS utility screen The Q-Flash / Dual BIOS utility screen consists of the task. Pressing the buttons mentioned on your keyboards to enter BIOS menu. Blocking a task and pressing Enter key on your keyboard to enable...
Manual
Page 59
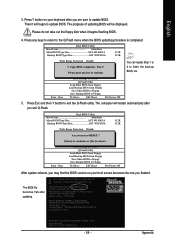
... your boot screen becomes the one you exit Q-Flash. The computer will restart automatically after you flashed. Load Default Settings Save Settings to CMOS Q-Flash Utility Load Main BIOS from Floppy Load Backup BIOS from Floppy Save Main BIOS to Floppy Save Backup BIOS to Floppy Enter : Run :Move ESC:Reset F10:Power Off You can repeat Step 1 to 4 to exit the Q-Flash utility. Award Modular BIOS v6.00PG, An Energy Star Ally Copyright (C) 1984-2003, Award Software, Inc. uCtopRyecBoIvOeSrycomEnpalebtled - Appendix Dual BIOS Utility Boot From Main Bios Main ROM Type/Size...
... your boot screen becomes the one you exit Q-Flash. The computer will restart automatically after you flashed. Load Default Settings Save Settings to CMOS Q-Flash Utility Load Main BIOS from Floppy Load Backup BIOS from Floppy Save Main BIOS to Floppy Save Backup BIOS to Floppy Enter : Run :Move ESC:Reset F10:Power Off You can repeat Step 1 to 4 to exit the Q-Flash utility. Award Modular BIOS v6.00PG, An Energy Star Ally Copyright (C) 1984-2003, Award Software, Inc. uCtopRyecBoIvOeSrycomEnpalebtled - Appendix Dual BIOS Utility Boot From Main Bios Main ROM Type/Size...

Manual
Page 60
... & Exit Setup Time, Date, Hard Disk Type... This part guides users of single-BIOS motherboards how to save and exit. Therefore, we highly recommend reloading the BIOS defaults after BIOS has been upgraded. GA-8VT880P Combo Motherboard - 60 - English 6. CMOS Setup Utility-Copyright (C) 1984-2004 Award Software Standard CMOS Features Select Language Advanced BIOS Features Load Fail-Safe Defaults Integrated Peripherals Load Optimized Defaults Power Management Setup Load Fail-Safe Defaults (YS/eNt )S?uYpervisor Password PnP/PCI Configurations Set User Password PC Health...
... & Exit Setup Time, Date, Hard Disk Type... This part guides users of single-BIOS motherboards how to save and exit. Therefore, we highly recommend reloading the BIOS defaults after BIOS has been upgraded. GA-8VT880P Combo Motherboard - 60 - English 6. CMOS Setup Utility-Copyright (C) 1984-2004 Award Software Standard CMOS Features Select Language Advanced BIOS Features Load Fail-Safe Defaults Integrated Peripherals Load Optimized Defaults Power Management Setup Load Fail-Safe Defaults (YS/eNt )S?uYpervisor Password PnP/PCI Configurations Set User Password PC Health...

Manual
Page 66
... the window disappears. VIA VT8237 Serial ATA RAID BIOS Setting Utility V2.41 Copyright (C) VIA Technologies, Inc. Serial_Ch0 Master : ST3120026AS Serial_Ch1 Master : ST3120026AS Press Tab to next item Enter : Confirm the selection ESC : Exit Array Name Mode SATA SATA Size(GB) 111.79 111.79 Status Hdd Hdd GA-8VT880P Combo Motherboard - 66 - VT8237 SATA RAID BIOS Ver 2.41 Create Array Delete Array Create/Delete Spare Select Boot Array Serial Number View Channel Drive Name...
... the window disappears. VIA VT8237 Serial ATA RAID BIOS Setting Utility V2.41 Copyright (C) VIA Technologies, Inc. Serial_Ch0 Master : ST3120026AS Serial_Ch1 Master : ST3120026AS Press Tab to next item Enter : Confirm the selection ESC : Exit Array Name Mode SATA SATA Size(GB) 111.79 111.79 Status Hdd Hdd GA-8VT880P Combo Motherboard - 66 - VT8237 SATA RAID BIOS Ver 2.41 Create Array Delete Array Create/Delete Spare Select Boot Array Serial Number View Channel Drive Name...

Manual
Page 71
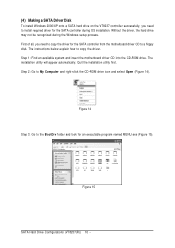
..., change to exit when finished. At the D:\> prompt, type the following two commands. Press 0 to the CD-ROM drive (example: D:\>). Fig.1 Fig. 2 Step 3: After completing the steps, boot from the startup disk. After that in MS-DOS mode(Note1). A command prompt window will have to be installed under Windows once for the SATA controller from the menu. Step 1: Insert the prepared startup disk and motherboard driver...
..., change to exit when finished. At the D:\> prompt, type the following two commands. Press 0 to the CD-ROM drive (example: D:\>). Fig.1 Fig. 2 Step 3: After completing the steps, boot from the startup disk. After that in MS-DOS mode(Note1). A command prompt window will have to be installed under Windows once for the SATA controller from the menu. Step 1: Insert the prepared startup disk and motherboard driver...

Manual
Page 80
... AWARD BIOS Beep Codes 1 short: System boots successfully 2 short: CMOS setting error 1 long 1 short: DRAM or M/B error 1 long 2 short: Monitor or display card error 1 long 3 short: Keyboard error 1 long 9 short: BIOS ROM error Continuous long beeps: DRAM error Continuous short beeps: Power error GA-8VT880P Combo Motherboard - 80 - Question 3: How do I still get a weak sound after turning up . Answer: If your board doesn't have such jumper, you are always fatal. 1 beep Refresh failure 2 beeps Parity error 3 beeps Base 64K memory failure 4 beeps Timer not operational 5 beeps Processor...
... AWARD BIOS Beep Codes 1 short: System boots successfully 2 short: CMOS setting error 1 long 1 short: DRAM or M/B error 1 long 2 short: Monitor or display card error 1 long 3 short: Keyboard error 1 long 9 short: BIOS ROM error Continuous long beeps: DRAM error Continuous short beeps: Power error GA-8VT880P Combo Motherboard - 80 - Question 3: How do I still get a weak sound after turning up . Answer: If your board doesn't have such jumper, you are always fatal. 1 beep Refresh failure 2 beeps Parity error 3 beeps Base 64K memory failure 4 beeps Timer not operational 5 beeps Processor...
Manual
Page 3
... Setup menu options you want to RAID (RAID by default). CMOS Setup Utility-Copyright (C) 1984-2004 Award Software Integrated Peripherals IDE DMA transfer access OnChip IDE Channel 0 OnChip IDE Channel 1 OnChip Serial ATA SATA Mode AC97 Audio VIA Onboard LAN USB 1.1 Controller USB 2.0 Controller USB Keyboard Support USB Mouse Support Onboard H/W LAN Onboard H/W 1394 Onboard H/W Serial ATA Serial ATA Function GigaBit LAN Boot ROM On-Chip LAN Boot ROM Onboard Serial Port 1 Onboard Serial Port 2 [Enabled] [Enabled] [Enabled] [Enabled] [RAID] [Auto] [Enabled] [Enabled] [Enabled] [Disabled...
... Setup menu options you want to RAID (RAID by default). CMOS Setup Utility-Copyright (C) 1984-2004 Award Software Integrated Peripherals IDE DMA transfer access OnChip IDE Channel 0 OnChip IDE Channel 1 OnChip Serial ATA SATA Mode AC97 Audio VIA Onboard LAN USB 1.1 Controller USB 2.0 Controller USB Keyboard Support USB Mouse Support Onboard H/W LAN Onboard H/W 1394 Onboard H/W Serial ATA Serial ATA Function GigaBit LAN Boot ROM On-Chip LAN Boot ROM Onboard Serial Port 1 Onboard Serial Port 2 [Enabled] [Enabled] [Enabled] [Enabled] [RAID] [Auto] [Enabled] [Enabled] [Enabled] [Disabled...
Manual
Page 10
... the CD-ROM drive icon and select Open (Figure 14). Figure 15 SATA Hard Drive Configurations (VT8237(R)) 10 - Ác (4) Making a SATA Driver Disk Åé To install Windows 2000/XP onto a SATA hard drive on the VT8237 controller successfully, you need to install required driver for the SATA controller during the Windows setup process. ¤å First of all, you need to copy the driver for an executable program named MENU.exe (Figure...
... the CD-ROM drive icon and select Open (Figure 14). Figure 15 SATA Hard Drive Configurations (VT8237(R)) 10 - Ác (4) Making a SATA Driver Disk Åé To install Windows 2000/XP onto a SATA hard drive on the VT8237 controller successfully, you need to install required driver for the SATA controller during the Windows setup process. ¤å First of all, you need to copy the driver for an executable program named MENU.exe (Figure...

Manual
Page 12
... prepared the SATA driver disk and configured BIOS settings, you are ready to install a 3rd party SCSI or RAID driver. Windows Setup Setup could not determine the type of some files being loaded before you need to specify additional mass storage devices for use with Windows, including those for the following is an example of ¤¤ Windows XP installation. ¤å Step 1: Restart your SATA hard drive with Windows, press ENTER. Ác (5) Installing SATA controller driver during OS installation Å...
... prepared the SATA driver disk and configured BIOS settings, you are ready to install a 3rd party SCSI or RAID driver. Windows Setup Setup could not determine the type of some files being loaded before you need to specify additional mass storage devices for use with Windows, including those for the following is an example of ¤¤ Windows XP installation. ¤å Step 1: Restart your SATA hard drive with Windows, press ENTER. Ác (5) Installing SATA controller driver during OS installation Å...


