Manual
Page 5
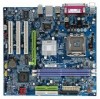
Chapter 3 Drivers Installation 49 3-1 Install Chipset Drivers 49 3-2 SoftwareApplication 50 3-3 Software Information 50 3-4 Hardware Information 51 3-5 Contact Us ...51 Chapter 4 Appendix 53 4-1 Unique Software Utilities 53 4-1-1 EasyTune 5 Introduction 54 4-1-2 Xpress Recovery2 Introduction 55 4-1-3 Flash BIOS Method Introduction 57 4-1-4 Serial ATA BIOS Setting Utility Introduction 66 4-1-5 2 / 4 / 6 Channel Audio Function Introduction 73 4-2 Troubleshooting 79 - 5 -
Chapter 3 Drivers Installation 49 3-1 Install Chipset Drivers 49 3-2 SoftwareApplication 50 3-3 Software Information 50 3-4 Hardware Information 51 3-5 Contact Us ...51 Chapter 4 Appendix 53 4-1 Unique Software Utilities 53 4-1-1 EasyTune 5 Introduction 54 4-1-2 Xpress Recovery2 Introduction 55 4-1-3 Flash BIOS Method Introduction 57 4-1-4 Serial ATA BIOS Setting Utility Introduction 66 4-1-5 2 / 4 / 6 Channel Audio Function Introduction 73 4-2 Troubleshooting 79 - 5 -

Manual
Page 15
Remove your expansion card by the small white-drawable bar. - 15 - Install related driver from BIOS. 8. English 1-5 Installation of Expansion Cards You can install your computer's chassis cover, screws and slot bracket from the computer. 3. Replace the screw to ...
Remove your expansion card by the small white-drawable bar. - 15 - Install related driver from BIOS. 8. English 1-5 Installation of Expansion Cards You can install your computer's chassis cover, screws and slot bracket from the computer. 3. Replace the screw to ...
Manual
Page 16
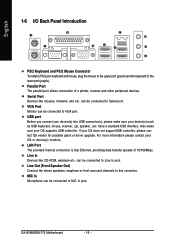
Also make sure your OS does not supportUSB controller, please contact OS vendor for possible patch or driver upgrade. For more information please contact your OS supports USB controller. Line In Devices like mouses, modems, and etc. MIC In Microphone ... transfer speeds of a printer, scanner and other peripheral devices. can be connected to VGA port. VGA Port Monitor can be connected to Line In jack. GA-8VM800M-775 Motherboard - 16 - English 1-6 I/O Back Panel Introduction PS/2 Keyboard and PS/2 Mouse Connector To install a PS/2 port keyboard and mouse, plug the mouse ...
Also make sure your OS does not supportUSB controller, please contact OS vendor for possible patch or driver upgrade. For more information please contact your OS supports USB controller. Line In Devices like mouses, modems, and etc. MIC In Microphone ... transfer speeds of a printer, scanner and other peripheral devices. can be connected to VGA port. VGA Port Monitor can be connected to Line In jack. GA-8VM800M-775 Motherboard - 16 - English 1-6 I/O Back Panel Introduction PS/2 Keyboard and PS/2 Mouse Connector To install a PS/2 port keyboard and mouse, plug the mouse ...
Manual
Page 20
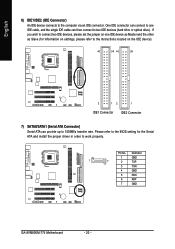
... on one IDE cable, and the single IDE cable can then connect to work properly. Pin No. Definition 1 GND 1 7 2 TXP 3 TXN 4 GND 5 RXN 6 RXP 7 GND GA-8VM800M-775 Motherboard - 20 - One IDE connector can provide up to the computer via an IDE connector. If you wish to connect two IDE devices, please set... ATA Connector) Serial ATA can connect to one IDE device as Master and the other as Slave (for the Serial ATA and install the proper driver in order to two IDE devices (hard drive or optical drive).
... on one IDE cable, and the single IDE cable can then connect to work properly. Pin No. Definition 1 GND 1 7 2 TXP 3 TXN 4 GND 5 RXN 6 RXP 7 GND GA-8VM800M-775 Motherboard - 20 - One IDE connector can provide up to the computer via an IDE connector. If you wish to connect two IDE devices, please set... ATA Connector) Serial ATA can connect to one IDE device as Master and the other as Slave (for the Serial ATA and install the proper driver in order to two IDE devices (hard drive or optical drive).
Manual
Page 49
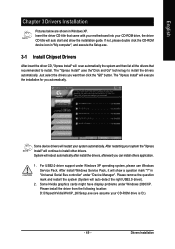
...Service Pack, it will execute the installation for you automatically. The "Xpress Install" uses the"Click and Go" technology to install other drivers. The "Xpress Install" will show the installation guide. After restarting your system the "Xpress Install" will scan automatically the system and ... question mark "?" Some Nvidia graphics cards might have display problems under Windows XP operating system, please use Windows Service Pack. Insert the driver CD-title that recommended to install. If not, please double click the CD-ROM device icon in "My computer", and execute the ...
...Service Pack, it will execute the installation for you automatically. The "Xpress Install" uses the"Click and Go" technology to install other drivers. The "Xpress Install" will show the installation guide. After restarting your system the "Xpress Install" will scan automatically the system and ... question mark "?" Some Nvidia graphics cards might have display problems under Windows XP operating system, please use Windows Service Pack. Insert the driver CD-title that recommended to install. If not, please double click the CD-ROM device icon in "My computer", and execute the ...
Manual
Page 50
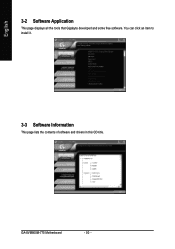
GA-8VM800M-775 Motherboard - 50 - English 3-2 Software Application This page displays all the tools that Gigabyte developed and some free software. You can click an item to install it. 3-3 Software Information This page lists the contents of software and drivers in this CD-title.
GA-8VM800M-775 Motherboard - 50 - English 3-2 Software Application This page displays all the tools that Gigabyte developed and some free software. You can click an item to install it. 3-3 Software Information This page lists the contents of software and drivers in this CD-title.
Manual
Page 51
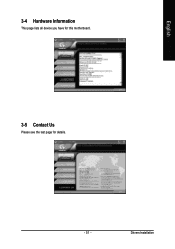
English 3-4 Hardware Information This page lists all device you have for this motherboard. 3-5 Contact Us Please see the last page for details. - 51 - Drivers Installation
English 3-4 Hardware Information This page lists all device you have for this motherboard. 3-5 Contact Us Please see the last page for details. - 51 - Drivers Installation

Manual
Page 53
...changes, the U-Plus D.P.S. As well, 4 blue LED's are able to optimize memory performance by the user. Through GIGABYTE M.I .T.'s integration of the user PC and provides the user with the current system information as well as future Intel&#...M.I.B.2 (Memory Intelligent Booster 2) Built on the motherboard to reset the system back to access and change system settings such as the latest drivers for users. Appendix S.O.S. (System Overclock Saver) System Overclock Saver (S.O.S.) is designed especially to 10%. M.I.T. (Motherboard Intelligent Tweaker) Motherboard Intelligent...
...changes, the U-Plus D.P.S. As well, 4 blue LED's are able to optimize memory performance by the user. Through GIGABYTE M.I .T.'s integration of the user PC and provides the user with the current system information as well as future Intel&#...M.I.B.2 (Memory Intelligent Booster 2) Built on the motherboard to reset the system back to access and change system settings such as the latest drivers for users. Appendix S.O.S. (System Overclock Saver) System Overclock Saver (S.O.S.) is designed especially to 10%. M.I.T. (Motherboard Intelligent Tweaker) Motherboard Intelligent...
Manual
Page 55
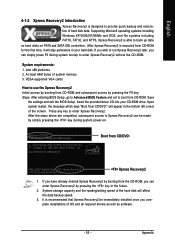
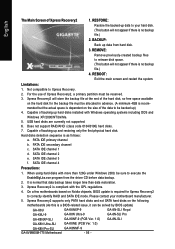
...: Steps: After entering BIOS Setup, go to Advanced BIOS Feature and set to run Xpress Recovery2 later, you complete installations of OS and all required drivers as well as software. - 55 - If you wish to boot from CD-ROM. VESA-supported VGA cards How to back up data on hard disks... restart, the message which says "Boot from CD/DVD:" will stay permanent in the future. 2. Press any key to enter Xpress Recovery2. Insert the provided driver CD into your hard disk. Intel x86 platforms 2.
...: Steps: After entering BIOS Setup, go to Advanced BIOS Feature and set to run Xpress Recovery2 later, you complete installations of OS and all required drivers as well as software. - 55 - If you wish to boot from CD-ROM. VESA-supported VGA cards How to back up data on hard disks... restart, the message which says "Boot from CD/DVD:" will stay permanent in the future. 2. Press any key to enter Xpress Recovery2. Insert the provided driver CD into your hard disk. Intel x86 platforms 2.
Manual
Page 56
...time than 128G under Windows 2000, be sure to be solved by BIOS update) GA-K8U GA-K8NXP-9 GA-K8U-9 GA-K8N Ultra-9 GA-K8NXP-SLI GA-K8NF-9 (PCB Ver. 1.0) GA-K8N Ultra-SLI GA-K8NE (PCB Ver. 1.0) GA-K8N Pro-SLI GA-K8NMF-9 GA-8VM800M-775 Motherboard - 56 - PATA IDE secondary channel c . Xpress Recovery2 supports only PATA...on the size of backing up ) 4. USB hard disks are currently not supported. 6. GA-8N-SLI Royal GA-8N-SLI Pro GA-8N-SLI The Main Screen of backing up data from the driver CD before data backup. 2. Xpress Recovery2 is dependent on the hard disk for Xpress ...
...time than 128G under Windows 2000, be sure to be solved by BIOS update) GA-K8U GA-K8NXP-9 GA-K8U-9 GA-K8N Ultra-9 GA-K8NXP-SLI GA-K8NF-9 (PCB Ver. 1.0) GA-K8N Ultra-SLI GA-K8NE (PCB Ver. 1.0) GA-K8N Pro-SLI GA-K8NMF-9 GA-8VM800M-775 Motherboard - 56 - PATA IDE secondary channel c . Xpress Recovery2 supports only PATA...on the size of backing up ) 4. USB hard disks are currently not supported. 6. GA-8N-SLI Royal GA-8N-SLI Pro GA-8N-SLI The Main Screen of backing up data from the driver CD before data backup. 2. Xpress Recovery2 is dependent on the hard disk for Xpress ...
Manual
Page 67
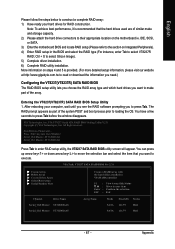
...VIA Technologies, Inc. Scan Devices, Please wait... Serial_Ch0 Master : ST3120026AS Serial_Ch1 Master : ST3120026AS Press Tab to select Silicon Image). 5) Complete driver installation. 6) Complete RAID utility installation. More information on Integrated Peripherals). 4) Enter RAID setup in the BIOS and select the RAID type (...Note: To achieve best performance, it is provided. (For more detailed setup information, please visit our website at http:\\www.gigabyte.com.tw to read or download the information you need.) Configuring the VT8237(VT8237R) SATA RAID BIOS The RAID BIOS setup ...
...VIA Technologies, Inc. Scan Devices, Please wait... Serial_Ch0 Master : ST3120026AS Serial_Ch1 Master : ST3120026AS Press Tab to select Silicon Image). 5) Complete driver installation. 6) Complete RAID utility installation. More information on Integrated Peripherals). 4) Enter RAID setup in the BIOS and select the RAID type (...Note: To achieve best performance, it is provided. (For more detailed setup information, please visit our website at http:\\www.gigabyte.com.tw to read or download the information you need.) Configuring the VT8237(VT8237R) SATA RAID BIOS The RAID BIOS setup ...
Manual
Page 72
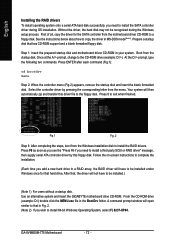
... be installed under Windows once for the SATA controller from the Windows installation disk to install the RAID drivers. Use an alternative system and insert the GIGABYTE motherboard drive CD-ROM. GA-8VM800M-775 Motherboard - 72 - Without the driver, the hard disk may not be installed.) (Note 1) For users without a startup disk. Follow the on-screen...
... be installed under Windows once for the SATA controller from the Windows installation disk to install the RAID drivers. Use an alternative system and insert the GIGABYTE motherboard drive CD-ROM. GA-8VM800M-775 Motherboard - 72 - Without the driver, the hard disk may not be installed.) (Note 1) For users without a startup disk. Follow the on-screen...
Manual
Page 73
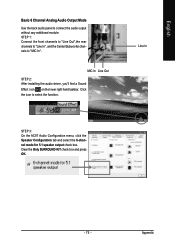
English 4-1-5 2 / 4 / 6 Channel Audio Function Introduction 2 Channel Audio Setup We recommend that you 'll find a Sound Effect icon on the lower right hand taskbar. Appendix Click the icon to get the best sound effect if the stereo output is applied. STEP 1: Connect the stereo speakers or earphone to "Line Out." STEP 3: On the AC97 Audio Configuration menu, click the Speaker Configuration tab and select the 2-channel mode for stereo speaker output check box. - 73 - Line Out STEP 2: After installing the audio driver, you use speakers with amplifier to select the function.
English 4-1-5 2 / 4 / 6 Channel Audio Function Introduction 2 Channel Audio Setup We recommend that you 'll find a Sound Effect icon on the lower right hand taskbar. Appendix Click the icon to get the best sound effect if the stereo output is applied. STEP 1: Connect the stereo speakers or earphone to "Line Out." STEP 3: On the AC97 Audio Configuration menu, click the Speaker Configuration tab and select the 2-channel mode for stereo speaker output check box. - 73 - Line Out STEP 2: After installing the audio driver, you use speakers with amplifier to select the function.
Manual
Page 74
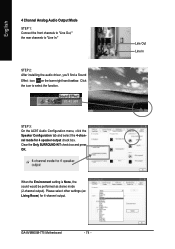
Click the icon to "Line In." When the Environment setting is None, the sound would be performed as stereo mode (2-channel output). GA-8VM800M-775 Motherboard - 74 - Clear the Only SURROUND-KIT check box and press OK. English 4 Channel Analog Audio Output Mode STEP 1: Connect the front channels to "Line .... STEP 3: On the AC97 Audio Configuration menu, click the Speaker Configuration tab and select the 4-channel mode for 4-channel output. STEP 2: After installing the audio driver, you'll find a Sound Effect icon on the lower right hand taskbar. Line Out Line In
Click the icon to "Line In." When the Environment setting is None, the sound would be performed as stereo mode (2-channel output). GA-8VM800M-775 Motherboard - 74 - Clear the Only SURROUND-KIT check box and press OK. English 4 Channel Analog Audio Output Mode STEP 1: Connect the front channels to "Line .... STEP 3: On the AC97 Audio Configuration menu, click the Speaker Configuration tab and select the 4-channel mode for 4-channel output. STEP 2: After installing the audio driver, you'll find a Sound Effect icon on the lower right hand taskbar. Line Out Line In
Manual
Page 75
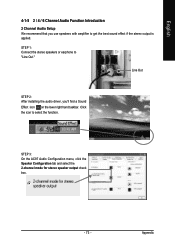
MIC In Line Out STEP 2: After installing the audio driver, you'll find a Sound Effect icon on the lower right hand taskbar. English Basic 6 Channel Analog Audio Output Mode Use the back audio panel to "...
MIC In Line Out STEP 2: After installing the audio driver, you'll find a Sound Effect icon on the lower right hand taskbar. English Basic 6 Channel Analog Audio Output Mode Use the back audio panel to "...
Manual
Page 77
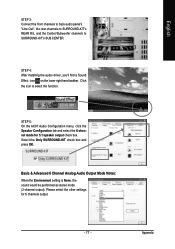
... audio panel's "Line Out", the rear channels to SURROUND-KIT's REAR R/L, and the Center/Subwoofer channels to select the function. STEP 4: After installing the audio driver, you'll find a Sound Effect icon on the lower right hand taskbar. Select the Only SURROUND-KIT check box and press OK. Basic & Advanced 6 Channel...
... audio panel's "Line Out", the rear channels to SURROUND-KIT's REAR R/L, and the Center/Subwoofer channels to select the function. STEP 4: After installing the audio driver, you'll find a Sound Effect icon on the lower right hand taskbar. Select the Only SURROUND-KIT check box and press OK. Basic & Advanced 6 Channel...


