User Manual
Page 19
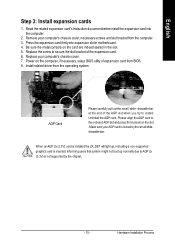
... end of the expansion card. 6. Hardware Installation Process Read the related expansion card's instruction documentbefore install the expansion card into expansion slotin motherboard. 4. Install related driver from BIOS. 8. AGP Card Please carefully pull outthe small white- Replace the screw to secure the slot bracket of the AGP slot when you try...
... end of the expansion card. 6. Hardware Installation Process Read the related expansion card's instruction documentbefore install the expansion card into expansion slotin motherboard. 4. Install related driver from BIOS. 8. AGP Card Please carefully pull outthe small white- Replace the screw to secure the slot bracket of the AGP slot when you try...
User Manual
Page 21
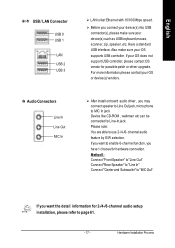
... eed. If yo ur OS does not supp ort USB controller, please contact OS vendor for hardware connection. After install onboard audio driver, you have 1 choose for possible patch or driver upgrade. Befo re you connect your device(s) into USB connector(s), plea se make sure you want to enable 6-channel function, you...
... eed. If yo ur OS does not supp ort USB controller, please contact OS vendor for hardware connection. After install onboard audio driver, you have 1 choose for possible patch or driver upgrade. Befo re you connect your device(s) into USB connector(s), plea se make sure you want to enable 6-channel function, you...
User Manual
Page 25
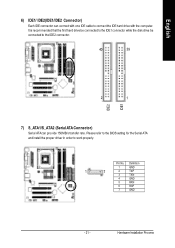
.... Definition 1 GND 1 7 2 TXP 3 TXN 4 GND 5 RXN 6 RXP 7 GND - 21 - Pin No. Please refer to the BIOS setting for the Serial ATA and install the proper driver in order to connect the IDE hard drive with the computer.
.... Definition 1 GND 1 7 2 TXP 3 TXN 4 GND 5 RXN 6 RXP 7 GND - 21 - Pin No. Please refer to the BIOS setting for the Serial ATA and install the proper driver in order to connect the IDE hard drive with the computer.
User Manual
Page 53
.... Besides, no more than a click. Or you could have a internet BIOS update from internetand update it costs? Again, Gigabyte's innovative product erects a milestone in the attached driver CD. The above process is a smart BIOS update software. you may want to update it . You are using, if ...quite a lot of "@BIOS", BIOS updating is , but always hesitate to keep a backup for your BIOS easily. Now, if you buy a Gigabyte's motherboard, you to do it first. It could not just do it too much it . Impossible! Certainly, you wonder why motherboard vendors could help...
.... Besides, no more than a click. Or you could have a internet BIOS update from internetand update it costs? Again, Gigabyte's innovative product erects a milestone in the attached driver CD. The above process is a smart BIOS update software. you may want to update it . You are using, if ...quite a lot of "@BIOS", BIOS updating is , but always hesitate to keep a backup for your BIOS easily. Now, if you buy a Gigabyte's motherboard, you to do it first. It could not just do it too much it . Impossible! Certainly, you wonder why motherboard vendors could help...

User Manual
Page 65
... out put". - 61 - STEP 2 : After installation of the screen. Click the audio icon "Sound Effect" from the windows tray at the bottom of the audio driver, you use the speaker with amplifier to "Line Out". STEP 1: Connect the stereo speakers or earphone to acqiire the best sound effect if the stereo...
... out put". - 61 - STEP 2 : After installation of the screen. Click the audio icon "Sound Effect" from the windows tray at the bottom of the audio driver, you use the speaker with amplifier to "Line Out". STEP 1: Connect the stereo speakers or earphone to acqiire the best sound effect if the stereo...
User Manual
Page 66
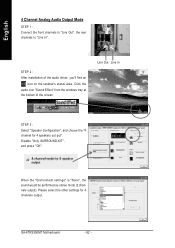
... the windows tray at the bottom of the audio driver, you'll find an icon on the taskbar's status area. Please select the other settings for 4 speakers out put". Disable "Only SURROUND-KIT", and press "OK". STEP 2 : After installation of the screen. GA-8TRS350MT Motherboard - 62 - When the "Environment settings" is "None", the...
... the windows tray at the bottom of the audio driver, you'll find an icon on the taskbar's status area. Please select the other settings for 4 speakers out put". Disable "Only SURROUND-KIT", and press "OK". STEP 2 : After installation of the screen. GA-8TRS350MT Motherboard - 62 - When the "Environment settings" is "None", the...

User Manual
Page 67
... Mode Use the back audio panel to "MIC In". Click the audio icon "Sound Effect" from the windows tray at the bottom of the audio driver, you'll find an icon on the taskbar's status area. Technical Reference STEP 1 : Connect the front channels to "Line Out", the rear channels to "Line...
... Mode Use the back audio panel to "MIC In". Click the audio icon "Sound Effect" from the windows tray at the bottom of the audio driver, you'll find an icon on the taskbar's status area. Technical Reference STEP 1 : Connect the front channels to "Line Out", the rear channels to "Line...
User Manual
Page 73
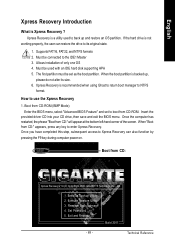
... Master 3. Must be used to back up , please do not alter its original state. 1. Xpress Recovery is Xpress Recovery ? Insert the provided driver CD into your CD drive, then save and exit the BIOS menu. When the boot partition is backed up and restore an OS partition. Boot... from CD-ROM (BMP Mode) Enter the BIOS menu, select "Advanced BIOS Feature" and set as the boot partition. GIGABYTE Technology CO. , Ltd. 1. Execute Restore Utility 3. Technical Reference If the hard drive is a utility used with an IDE hard disk supporting HPA 5. ...
... Master 3. Must be used to back up , please do not alter its original state. 1. Xpress Recovery is Xpress Recovery ? Insert the provided driver CD into your CD drive, then save and exit the BIOS menu. When the boot partition is backed up and restore an OS partition. Boot... from CD-ROM (BMP Mode) Enter the BIOS menu, select "Advanced BIOS Feature" and set as the boot partition. GIGABYTE Technology CO. , Ltd. 1. Execute Restore Utility 3. Technical Reference If the hard drive is a utility used with an IDE hard disk supporting HPA 5. ...
User Manual
Page 74
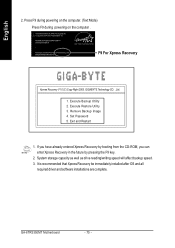
GA-8TRS350MT Motherboard - 70 - It is recommended that Xpress Recovery be immediately installed after OS and all required driver and software installations are complete. PressDELtoenterSETUP/ Q-Flash,F9ForXpressRecovery 08/16/2002-I845GE-6A69YG01C-00 F9 For Xpress Recovery Xpress Recovery V1.0 (C) Copy Right 2003. Execute ... have already entered Xpress Recovery by booting from the CD-ROM, you can enter Xpress Recovery in the future by pressing the F9 key. 2. English 2. GIGABYTE Technology CO. , Ltd. 1. Remove Backup Image 4.
GA-8TRS350MT Motherboard - 70 - It is recommended that Xpress Recovery be immediately installed after OS and all required driver and software installations are complete. PressDELtoenterSETUP/ Q-Flash,F9ForXpressRecovery 08/16/2002-I845GE-6A69YG01C-00 F9 For Xpress Recovery Xpress Recovery V1.0 (C) Copy Right 2003. Execute ... have already entered Xpress Recovery by booting from the CD-ROM, you can enter Xpress Recovery in the future by pressing the F9 key. 2. English 2. GIGABYTE Technology CO. , Ltd. 1. Remove Backup Image 4.
User Manual
Page 77
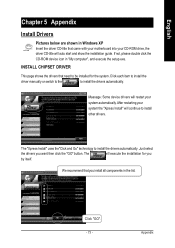
...click the CD-ROM device icon in the list. After restarting your CD-ROM drive, the driver CD-title will auto start and show the installation guide. Just select the drivers you by itself. We recommend that you install all components in "My computer", and execute ...with your motherboard into your system the "Xpress Install" will continue to install other drivers. Click each item to install the driver manually or switch to the to install the drivers automatically. Appendix Massage: Some device drivers will execute the installation for the system. Click "GO". - 73 - The ...
...click the CD-ROM device icon in the list. After restarting your CD-ROM drive, the driver CD-title will auto start and show the installation guide. Just select the drivers you by itself. We recommend that you install all components in "My computer", and execute ...with your motherboard into your system the "Xpress Install" will continue to install other drivers. Click each item to install the driver manually or switch to the to install the drivers automatically. Appendix Massage: Some device drivers will execute the installation for the system. Click "GO". - 73 - The ...

User Manual
Page 78
... (System will show a question mark "?" you to reboot system!! Item Description n ATi AGP Driver Install ATi AGP driver. n ATi VGA Driver VGA driver for the most updated driver. GA-8TRS350MT Motherboard - 74 - n USB Patch for 81xx series chips. English Driver install finished!! For USB2.0 driver support under "Device Manager". After install Windows Service Pack, it will auto-detect the...
... (System will show a question mark "?" you to reboot system!! Item Description n ATi AGP Driver Install ATi AGP driver. n ATi VGA Driver VGA driver for the most updated driver. GA-8TRS350MT Motherboard - 74 - n USB Patch for 81xx series chips. English Driver install finished!! For USB2.0 driver support under "Device Manager". After install Windows Service Pack, it will auto-detect the...

User Manual
Page 80
GA-8TRS350MT Motherboard - 76 - HARDWARE INFORMATION This page lists all device you have for details. English SOFTWARE INFORMATION This page list the contects of softwares and drivers in this motherboard. CONTACT US Please see the last page for this CD title.
GA-8TRS350MT Motherboard - 76 - HARDWARE INFORMATION This page lists all device you have for details. English SOFTWARE INFORMATION This page list the contects of softwares and drivers in this motherboard. CONTACT US Please see the last page for this CD title.
User Manual
Page 81
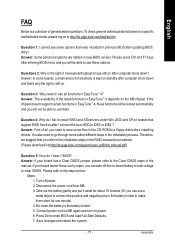
... steps in the RAID manual at http://tw.giga-byte.com/support/user_pdf/raid_manual.pdf) Question 5: How do I fail to install RAID and ATA drivers under Win 2000 and XP on boards that support RAID function after computer shuts down and that were included in previous BIOS after entering BIOS... MB. 3. Re-insert the battery to the steps below: Steps: 1. Connect power cord to MB again and turn on to a floppy disk before installing drivers. Why? You also need to connect the positive and negative pins in EasyTune™ 4? Take out the battery gently and put it at our website...
... steps in the RAID manual at http://tw.giga-byte.com/support/user_pdf/raid_manual.pdf) Question 5: How do I fail to install RAID and ATA drivers under Win 2000 and XP on boards that support RAID function after computer shuts down and that were included in previous BIOS after entering BIOS... MB. 3. Re-insert the battery to the steps below: Steps: 1. Connect power cord to MB again and turn on to a floppy disk before installing drivers. Why? You also need to connect the positive and negative pins in EasyTune™ 4? Take out the battery gently and put it at our website...


