
Manual
Page 11
... discharge (ESD) cuff when handling electronic components (CPU, RAM). 4. Hardware Installation Prior to installing the electronic components, please have a problem related to the use of the product, please consult a certified computer technician. Please do not remove the stickers on the motherboard or within.... 4. Instances of Non-Warranty 1. Before using the product, please verify that the power supply is best to be an unofficial Gigabyte product. - 11 - Please verify that all cables and power connectors are required for warranty validation. 2. Damage due to come ...
... discharge (ESD) cuff when handling electronic components (CPU, RAM). 4. Hardware Installation Prior to installing the electronic components, please have a problem related to the use of the product, please consult a certified computer technician. Please do not remove the stickers on the motherboard or within.... 4. Instances of Non-Warranty 1. Before using the product, please verify that the power supply is best to be an unofficial Gigabyte product. - 11 - Please verify that all cables and power connectors are required for warranty validation. 2. Damage due to come ...
Manual
Page 91
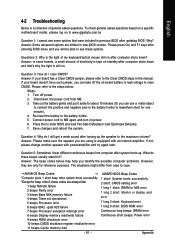
...Question 5: Sometimes I clear CMOS? Questions 2: Why is the light of general asked questions based on a specific motherboard model, please log on to www.gigabyte.com.tw Question 1: I still get a weak sound after turning up . If your board has a Clear CMOS jumper, please refer to the steps ...power. 6. Question 4: Why do I cannot see these beeps usually stand for? Answer: Please make sure the speaker you identify the possible computer problems. However, they are hidden in the manual. Answer: The beep codes below : Steps: 1. Connect power cord to MB again and turn on ...
...Question 5: Sometimes I clear CMOS? Questions 2: Why is the light of general asked questions based on a specific motherboard model, please log on to www.gigabyte.com.tw Question 1: I still get a weak sound after turning up . If your board has a Clear CMOS jumper, please refer to the steps ...power. 6. Question 4: Why do I cannot see these beeps usually stand for? Answer: Please make sure the speaker you identify the possible computer problems. However, they are hidden in the manual. Answer: The beep codes below : Steps: 1. Connect power cord to MB again and turn on ...
Manual
Page 14
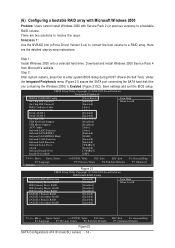
Ác (6) Configuring a bootable RAID array with Microsoft Windows 2000 Problem: Users cannot install Windows 2000 with Service Pack 2 (or previous versions) to a RAID array. Save settings and exit the BIOS setup. Solutions 1: Use the NVRAID ... Menu Level} higf: Move Enter: Select +/-/PU/PD: Value F10: Save F3: Language F5: Previous Values F6: Fail-Safe Defaults Figure22 SATA Configurations (P4 nForce4 SLI series) - 14 -
Ác (6) Configuring a bootable RAID array with Microsoft Windows 2000 Problem: Users cannot install Windows 2000 with Service Pack 2 (or previous versions) to a RAID array. Save settings and exit the BIOS setup. Solutions 1: Use the NVRAID ... Menu Level} higf: Move Enter: Select +/-/PU/PD: Value F10: Save F3: Language F5: Previous Values F6: Fail-Safe Defaults Figure22 SATA Configurations (P4 nForce4 SLI series) - 14 -
Manual
Page 14
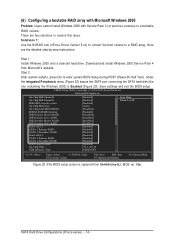
... the boot volume to enter system BIOS Setup during POST (Power-On Self Test). Ác (6) Configuring a bootable RAID array with Microsoft Windows 2000 Åé Problem: Users cannot install Windows 2000 with Service Pack 2 (or previous versions) to a bootable RAID volume. ¤¤ There are the detailed step-by-step instructions... port connecting the SATA hard disk (the one containing the Windows 2000) is captured from Microsoft's website. Download and install Windows 2000 Service Pack 4 from GA-K8N Ultra-SLI, BIOS ver. Here are two solutions to resolve this issue.
... the boot volume to enter system BIOS Setup during POST (Power-On Self Test). Ác (6) Configuring a bootable RAID array with Microsoft Windows 2000 Åé Problem: Users cannot install Windows 2000 with Service Pack 2 (or previous versions) to a bootable RAID volume. ¤¤ There are the detailed step-by-step instructions... port connecting the SATA hard disk (the one containing the Windows 2000) is captured from Microsoft's website. Download and install Windows 2000 Service Pack 4 from GA-K8N Ultra-SLI, BIOS ver. Here are two solutions to resolve this issue.


