Manual
Page 1
GA-8N-SLI Royal/ GA-8N-SLI Pro/ GA-8N-SLI Intel® Pentium® Processor Extreme Edition Intel® Pentium® D / Pentium® 4 LGA775 Processor Motherboard User's Manual Rev. 1004 12ME-8NSLIRO-1004
GA-8N-SLI Royal/ GA-8N-SLI Pro/ GA-8N-SLI Intel® Pentium® Processor Extreme Edition Intel® Pentium® D / Pentium® 4 LGA775 Processor Motherboard User's Manual Rev. 1004 12ME-8NSLIRO-1004
Manual
Page 5
...any means without prior notice. No part of this product is the property of this product, Gigabyte has categorized the user manual in the use of Gigabyte. Product Manual Classification In order to assist in the following: „ For quick installation, please refer to... Guide" included with this manual may be reproduced, copied, translated, or transmitted in the manual are subject to change without Gigabyte's prior written permission. All rights reserved. For more product details, please click onto Gigabyte's website at www.gigabyte.com.tw Specifications and features...
...any means without prior notice. No part of this product is the property of this product, Gigabyte has categorized the user manual in the use of Gigabyte. Product Manual Classification In order to assist in the following: „ For quick installation, please refer to... Guide" included with this manual may be reproduced, copied, translated, or transmitted in the manual are subject to change without Gigabyte's prior written permission. All rights reserved. For more product details, please click onto Gigabyte's website at www.gigabyte.com.tw Specifications and features...

Manual
Page 11
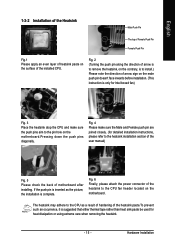
...motherboard, please do not place the computer system on the motherboard. Instances of violating the conditions recommended in the provided manual. 3. Damage due to use of electrostatic discharge (ESD). Installation Notices 1. If you are no leftover screws or ... process can become damaged as a result of the product, please consult a certified computer technician. Damage due to be an unofficial Gigabyte product. - 11 - Product determined to improper installation. 4. Hardware Installation Damage due to installation, please follow the instructions below: ...
...motherboard, please do not place the computer system on the motherboard. Instances of violating the conditions recommended in the provided manual. 3. Damage due to use of electrostatic discharge (ESD). Installation Notices 1. If you are no leftover screws or ... process can become damaged as a result of the product, please consult a certified computer technician. Damage due to be an unofficial Gigabyte product. - 11 - Product determined to improper installation. 4. Hardware Installation Damage due to installation, please follow the instructions below: ...
Manual
Page 15
... to the pin hole on the motherboard. Fig. 6 Finally, please attach the power connector of the heatsink to the heatsink installation section of the user manual) Fig. 5 Please check the back of the heatsink paste.To prevent such an occurrence, it is complete.
... to the pin hole on the motherboard. Fig. 6 Finally, please attach the power connector of the heatsink to the heatsink installation section of the user manual) Fig. 5 Please check the back of the heatsink paste.To prevent such an occurrence, it is complete.
Manual
Page 38
...if no IDE devices are used and the system will skip the automatic detection step and allow for GA-8N-SLI Royal. Only for the hard drive. The time is 13:00:00. Manual User can use one of currently installed hard drive. Through Dec. The four options are: CHS/LBA.... Week The week, from 1999 through 2098 Time The times format in the month) < Ye a r > 1999 to set the access mode for GA-8N-SLI Pro. Enter the appropriate option based on the outside drive casing. IDE Channel 0 Master/Slave; Access Mode Use this option for automatic device detection. Jan. ...
...if no IDE devices are used and the system will skip the automatic detection step and allow for GA-8N-SLI Royal. Only for the hard drive. The time is 13:00:00. Manual User can use one of currently installed hard drive. Through Dec. The four options are: CHS/LBA.... Week The week, from 1999 through 2098 Time The times format in the month) < Ye a r > 1999 to set the access mode for GA-8N-SLI Pro. Enter the appropriate option based on the outside drive casing. IDE Channel 0 Master/Slave; Access Mode Use this option for automatic device detection. Jan. ...

Manual
Page 51
...speed manually. New MEM Speed (DDR) This item becomes active when System Clock Mode is set to adjust the LDT frequency. PCIE Frequency (MHz) This option allows you to Expert. New FSB Speed (QDR) This item becomes active when System Clock Mode is set to set the FSB speed. SLI ...Broadcast Aperture Auto Set SLI Broadcast Aperture to +0.7V. Type in New FSB Speed (QDR). BIOS Setup Target MEM Speed (DDR) The value changes based on ...
...speed manually. New MEM Speed (DDR) This item becomes active when System Clock Mode is set to adjust the LDT frequency. PCIE Frequency (MHz) This option allows you to Expert. New FSB Speed (QDR) This item becomes active when System Clock Mode is set to set the FSB speed. SLI ...Broadcast Aperture Auto Set SLI Broadcast Aperture to +0.7V. Type in New FSB Speed (QDR). BIOS Setup Target MEM Speed (DDR) The value changes based on ...
Manual
Page 81
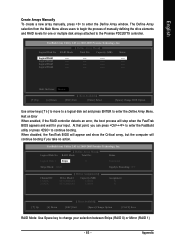
You have a few seconds to specify block size, you must create the array manually. If you want to make part of the system POST and boot process prior to enter the Define Array window. Appendix Configuring the Promise ... of the array. Only for most users. To delete an array, press to enter the View Drive Assignments window. English B. Promise recommends this option for GA-8N-SLI Royal. - 81 - FastBuild (tm) Utility 2.03 (c) 2003-2005 Promise Technology, Inc. [ Main Menu] ] Auto Setup 1 ] View/Change Drives Assignments 2 ] Define Array 3 ] Delete Array 4 ] Rebuild...
You have a few seconds to specify block size, you must create the array manually. If you want to make part of the system POST and boot process prior to enter the Define Array window. Appendix Configuring the Promise ... of the array. Only for most users. To delete an array, press to enter the View Drive Assignments window. English B. Promise recommends this option for GA-8N-SLI Royal. - 81 - FastBuild (tm) Utility 2.03 (c) 2003-2005 Promise Technology, Inc. [ Main Menu] ] Auto Setup 1 ] View/Change Drives Assignments 2 ] Define Array 3 ] Delete Array 4 ] Rebuild...
Manual
Page 83
...Technology, Inc. [ Define Array Menu] Logical Disk No RAID Mode Total Drv Status Logical Disk 1 Stripe 0 Functional Stripe Block: 64KB Gigabyte Rounding: OFF Channel:ID 1:SATA 2:SATA [ Drives Assignments] ] Drive Model ST3120026AS ST3120026AS Capacity (MB) 120034 120034 Assignment N N [... Array Menu] ] Logical Disk No RAID Mode Total Drv Capacity (MB) Status Logical Disk1 ---- ---- ----- ---- English Create Arrays Manually To create a new array manually, press to enter the Define Array Menu. Logical Disk4 ---- ---- ----- ---- Halt On Error: Disable [ ] Up [ ] ...
...Technology, Inc. [ Define Array Menu] Logical Disk No RAID Mode Total Drv Status Logical Disk 1 Stripe 0 Functional Stripe Block: 64KB Gigabyte Rounding: OFF Channel:ID 1:SATA 2:SATA [ Drives Assignments] ] Drive Model ST3120026AS ST3120026AS Capacity (MB) 120034 120034 Assignment N N [... Array Menu] ] Logical Disk No RAID Mode Total Drv Capacity (MB) Status Logical Disk1 ---- ---- ----- ---- English Create Arrays Manually To create a new array manually, press to enter the Define Array Menu. Logical Disk4 ---- ---- ----- ---- Halt On Error: Disable [ ] Up [ ] ...
Manual
Page 84
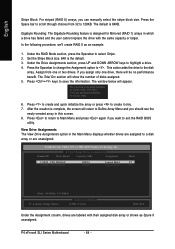
... 32 to a disk array or are labeled with the same capacity or larger. Press to return to Main Menu and press again if you can manually select the stripe block size. English Stripe Block: For striped (RAID 0) arrays, you want to do quick initialize or create only? (Yes/No... section, press UP and DOWN ARROW keys to create it only. 7. If you assign only one or two drives. P4 nForce4 SLI Series Motherboard - 84 - Gigabyte Rounding: The Gigabyte Rounding feature is complete, the screen will be no performance benefit. Do you should see the newly-created array in this screen. ...
... 32 to a disk array or are labeled with the same capacity or larger. Press to return to Main Menu and press again if you can manually select the stripe block size. English Stripe Block: For striped (RAID 0) arrays, you want to do quick initialize or create only? (Yes/No... section, press UP and DOWN ARROW keys to create it only. 7. If you assign only one or two drives. P4 nForce4 SLI Series Motherboard - 84 - Gigabyte Rounding: The Gigabyte Rounding feature is complete, the screen will be no performance benefit. Do you should see the newly-created array in this screen. ...
Manual
Page 91
... to see some boards, a small amount of electricity is the light of general asked questions based on a specific motherboard model, please log on to www.gigabyte.com.tw Question 1: I hear different continuous beeps from computer after system boots up the speaker to the battery holder. 5. Answer: The beep codes below : Steps... options that 's why the light is still on. Re-insert the battery to the maximum volume? Question 4: Why do these codes are hidden in the manual.
... to see some boards, a small amount of electricity is the light of general asked questions based on a specific motherboard model, please log on to www.gigabyte.com.tw Question 1: I hear different continuous beeps from computer after system boots up the speaker to the battery holder. 5. Answer: The beep codes below : Steps... options that 's why the light is still on. Re-insert the battery to the maximum volume? Question 4: Why do these codes are hidden in the manual.

Manual
Page 2
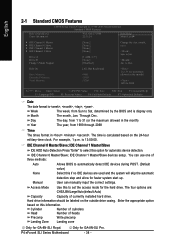
... (a) At least two SATA hard drives (to available SATA port(s) on the motherboard. If you may refer to the motherboard user's manual to make sure that Serial-ATAII 1 or Serial-ATAII 2 under the Integrated Peripherals menu is recommended that you wish to create RAID array,... want to create RAID array on your computer and press Del to enter the submenu . SATA Configurations (P4 nForce4 SLI series) - 2 - Ác Configuring SATA Hard Drive(s) (Controller: nVIDIA nForce4 SLI) Åé ¤¤ ¤å To configure SATA hard drive(s), follow the steps below: (1) ...
... (a) At least two SATA hard drives (to available SATA port(s) on the motherboard. If you may refer to the motherboard user's manual to make sure that Serial-ATAII 1 or Serial-ATAII 2 under the Integrated Peripherals menu is recommended that you wish to create RAID array,... want to create RAID array on your computer and press Del to enter the submenu . SATA Configurations (P4 nForce4 SLI series) - 2 - Ác Configuring SATA Hard Drive(s) (Controller: nVIDIA nForce4 SLI) Åé ¤¤ ¤å To configure SATA hard drive(s), follow the steps below: (1) ...
Manual
Page 6
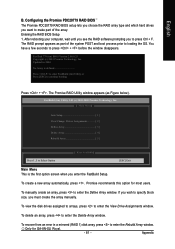
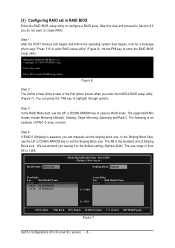
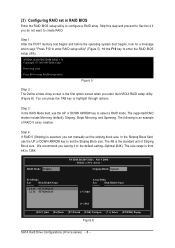
...in RAID BIOS Åé Enter the RAID BIOS setup utility to 128K. Press F10 to enter the RAID BIOS setup utility. You can manually set the striping block size. The KB is from 4K to configure a RAID array. The size range is the standard unit of RAID 0...Loc Disk Model Name [g] Add [f ] Del [ESC] Quit [F6] Back [F7] Finish [TAB] Navigate [hi] Select [ENTER] Popup Figure 7 SATA Configurations (P4 nForce4 SLI series) - 6 - Ác (3) Configuring RAID set the Striping Block size. Figure 6 Step 2 The Define a New Array screen is the first option screen when you leaving...
...in RAID BIOS Åé Enter the RAID BIOS setup utility to 128K. Press F10 to enter the RAID BIOS setup utility. You can manually set the striping block size. The KB is from 4K to configure a RAID array. The size range is the standard unit of RAID 0...Loc Disk Model Name [g] Add [f ] Del [ESC] Quit [F6] Back [F7] Finish [TAB] Navigate [hi] Select [ENTER] Popup Figure 7 SATA Configurations (P4 nForce4 SLI series) - 6 - Ác (3) Configuring RAID set the Striping Block size. Figure 6 Step 2 The Define a New Array screen is the first option screen when you leaving...
Manual
Page 11
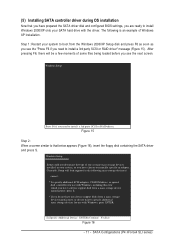
... a few moments of some files being loaded before you see the "Press F6 if you see the next screen. SATA Configurations (P4 nForce4 SLI series) After pressing F6, there will load support for the following is an example of one or more mass storage devices installed in your system... Now that below appears (Figure 16), insert the floppy disk containing the SATA driver and press S. Figure 15 Step 2: When a screen similar to manually specify an adapter. Step 1: Restart your system, or you have chosen to that you have prepared the SATA driver disk and configured BIOS settings, you...
... a few moments of some files being loaded before you see the "Press F6 if you see the next screen. SATA Configurations (P4 nForce4 SLI series) After pressing F6, there will load support for the following is an example of one or more mass storage devices installed in your system... Now that below appears (Figure 16), insert the floppy disk containing the SATA driver and press S. Figure 15 Step 2: When a screen similar to manually specify an adapter. Step 1: Restart your system, or you have chosen to that you have prepared the SATA driver disk and configured BIOS settings, you...
Manual
Page 6
... 4K to set the striping block size. In the Striping Block field, use the UP or DOWN ARROW key to highlight through options. You can manually set the Striping Block size. Ác (3) Configuring RAID set in RAID BIOS Åé Enter the RAID BIOS setup utility to enter the RAID BIOS...
... 4K to set the striping block size. In the Striping Block field, use the UP or DOWN ARROW key to highlight through options. You can manually set the Striping Block size. Ác (3) Configuring RAID set in RAID BIOS Åé Enter the RAID BIOS setup utility to enter the RAID BIOS...

Manual
Page 11
... disk controllers for which you have a device support disk from the Windows 2000/XP Setup disk and press F6 as soon as you need to manually specify an adapter. (5) Installing SATA controller driver during OS installation Now that below appears (Figure 15), insert the floppy disk containing the SATA driver and...
... disk controllers for which you have a device support disk from the Windows 2000/XP Setup disk and press F6 as soon as you need to manually specify an adapter. (5) Installing SATA controller driver during OS installation Now that below appears (Figure 15), insert the floppy disk containing the SATA driver and...


