Manual
Page 1
GA-8N-SLI Royal/ GA-8N-SLI Pro/ GA-8N-SLI Intel® Pentium® Processor Extreme Edition Intel® Pentium® D / Pentium® 4 LGA775 Processor Motherboard User's Manual Rev. 1004 12ME-8NSLIRO-1004
GA-8N-SLI Royal/ GA-8N-SLI Pro/ GA-8N-SLI Intel® Pentium® Processor Extreme Edition Intel® Pentium® D / Pentium® 4 LGA775 Processor Motherboard User's Manual Rev. 1004 12ME-8NSLIRO-1004
Manual
Page 5
... product information and specifications, please carefully read the "Product User Manual". „ For detailed information related to Gigabyte's unique features, please go to "Technology Guide" section on Gigabyte's website to change without Gigabyte's prior written permission. No part of this product is the ...property of this product, Gigabyte has categorized the user manual in the manual are subject to read or download the information...
... product information and specifications, please carefully read the "Product User Manual". „ For detailed information related to Gigabyte's unique features, please go to "Technology Guide" section on Gigabyte's website to change without Gigabyte's prior written permission. No part of this product is the ...property of this product, Gigabyte has categorized the user manual in the manual are subject to read or download the information...

Manual
Page 11
...computer casing. 6. Prior to the use of the motherboard or any hardware, please first carefully read the information in the user manual. 3. If you are required for warranty validation. 2. Turning on the motherboard or within a electrostatic shielding container. 5. Please ... determined to improper installation. 4. Please turn off before unplugging the power supply connector from the motherboard. Damage due to be an unofficial Gigabyte product. - 11 - Hardware Installation Thus, prior to natural disaster, accident or human cause. 2. Damage as a result of Non-...
...computer casing. 6. Prior to the use of the motherboard or any hardware, please first carefully read the information in the user manual. 3. If you are required for warranty validation. 2. Turning on the motherboard or within a electrostatic shielding container. 5. Please ... determined to improper installation. 4. Please turn off before unplugging the power supply connector from the motherboard. Damage due to be an unofficial Gigabyte product. - 11 - Hardware Installation Thus, prior to natural disaster, accident or human cause. 2. Damage as a result of Non-...
Manual
Page 15
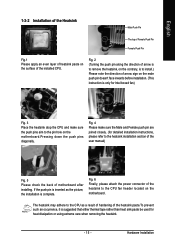
... the push pin along the direction of arrow is to remove the heatsink, on the contrary, is to the heatsink installation section of the user manual) Fig. 5 Please check the back of arrow sign on the motherboard.Pressing down the push pins diagonally. Fig. 4 Please make sure the Male and Female...
... the push pin along the direction of arrow is to remove the heatsink, on the contrary, is to the heatsink installation section of the user manual) Fig. 5 Please check the back of arrow sign on the motherboard.Pressing down the push pins diagonally. Fig. 4 Please make sure the Male and Female...
Manual
Page 38
... this information. The time is , , , . You can manually input the correct settings. Manual User can use one of currently installed hard drive. P4 nForce4 SLI Series Motherboard - 38 - IDE Channel 0 Master/Slave; Access Mode Use this option for automatic device detection. For example, 1 p.m. Only for GA-8N-SLI Royal. Jan. is display only Month The month... the access mode for faster system start up. Cylinder Number of cylinders Head Number of heads Precomp Write precomp Landing Zone Landing zone Only for GA-8N-SLI Pro.
... this information. The time is , , , . You can manually input the correct settings. Manual User can use one of currently installed hard drive. P4 nForce4 SLI Series Motherboard - 38 - IDE Channel 0 Master/Slave; Access Mode Use this option for automatic device detection. For example, 1 p.m. Only for GA-8N-SLI Royal. Jan. is display only Month The month... the access mode for faster system start up. Cylinder Number of cylinders Head Number of heads Precomp Write precomp Landing Zone Landing zone Only for GA-8N-SLI Pro.

Manual
Page 51
...+0.2V. +0.3V Set PCI-E OverVoltrage Control to be overclocked proportionally. Current MEM Speed (DDR) Displays the current memory speed. SLI Broadcast Aperture Auto Set SLI Broadcast Aperture to +0.7V. BIOS Setup Disabled Disable this function. (Default value) DIMM OverVoltage Control Normal Set DIMM OverVoltage Control to...you to set the memory speed. PCIE Frequency (MHz) This option allows you to Linked or Expert. Enter FSB and memory speed manually. Type in New FSB Speed (QDR) and New MEM Speed (DDR). New MEM Speed (DDR) This item becomes active when ...
...+0.2V. +0.3V Set PCI-E OverVoltrage Control to be overclocked proportionally. Current MEM Speed (DDR) Displays the current memory speed. SLI Broadcast Aperture Auto Set SLI Broadcast Aperture to +0.7V. BIOS Setup Disabled Disable this function. (Default value) DIMM OverVoltage Control Normal Set DIMM OverVoltage Control to...you to set the memory speed. PCIE Frequency (MHz) This option allows you to Linked or Expert. Enter FSB and memory speed manually. Type in New FSB Speed (QDR) and New MEM Speed (DDR). New MEM Speed (DDR) This item becomes active when ...
Manual
Page 81
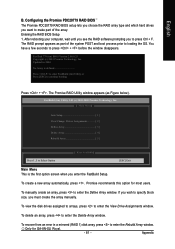
... the Delete Array window. To recover from an error in 2004 No Array is the first option screen when you must create the array manually. To delete an array, press to enter the Rebuild Array window. You have a few seconds to enter the Define Array window. If...window. Appendix To manually create an array, press to press + before the window disappears. After rebooting your computer, wait until you see the RAID software prompting you want to make part of the system POST and boot process prior to press Ctrl + F. Promise recommends this option for GA-8N-SLI Royal. - ...
... the Delete Array window. To recover from an error in 2004 No Array is the first option screen when you must create the array manually. To delete an array, press to enter the Rebuild Array window. You have a few seconds to enter the Define Array window. If...window. Appendix To manually create an array, press to press + before the window disappears. After rebooting your computer, wait until you see the RAID software prompting you want to make part of the system POST and boot process prior to press Ctrl + F. Promise recommends this option for GA-8N-SLI Royal. - ...
Manual
Page 83
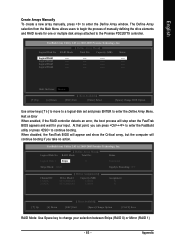
... create a new array manually, press to change your input. FastBuild (tm) Utility 2.03 (c) 2003-2005 Promise Technology, Inc. [ Define Array Menu] Logical Disk No RAID Mode Total Drv Status Logical Disk 1 Stripe 0 Functional Stripe Block: 64KB Gigabyte Rounding: OFF Channel:ID 1:SATA 2:SATA [ ...Mode: Use Space key to enter the Define Array window. The Define Array selection from the Main Menu allows users to begin the process of manually defining the drive elements and RAID levels for your selection between Stripe (RAID 0) or Mirror (RAID 1) - 83 - Logical Disk3 ---- ----...
... create a new array manually, press to change your input. FastBuild (tm) Utility 2.03 (c) 2003-2005 Promise Technology, Inc. [ Define Array Menu] Logical Disk No RAID Mode Total Drv Status Logical Disk 1 Stripe 0 Functional Stripe Block: 64KB Gigabyte Rounding: OFF Channel:ID 1:SATA 2:SATA [ ...Mode: Use Space key to enter the Define Array window. The Define Array selection from the Main Menu allows users to begin the process of manually defining the drive elements and RAID levels for your selection between Stripe (RAID 0) or Mirror (RAID 1) - 83 - Logical Disk3 ---- ----...
Manual
Page 84
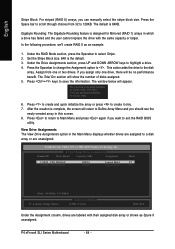
...in which a drive has failed and the user cannot replace the drive with their assigned disk array or shown as an example. 1. Gigabyte Rounding: The Gigabyte Rounding feature is complete, the screen will be no performance benefit. This action adds the drive to highlight a drive. 4. The ... to do quick initialize or create only? (Yes/No) Y-Create and Quick Initialize N-Create Only 6. The default is the default. 3. P4 nForce4 SLI Series Motherboard - 84 - Do you want to Define Array Menu and you assign only one or two drives. FastBuild (tm) Utility 2.03 (c) ...
...in which a drive has failed and the user cannot replace the drive with their assigned disk array or shown as an example. 1. Gigabyte Rounding: The Gigabyte Rounding feature is complete, the screen will be no performance benefit. This action adds the drive to highlight a drive. 4. The ... to do quick initialize or create only? (Yes/No) Y-Create and Quick Initialize N-Create Only 6. The default is the default. 3. P4 nForce4 SLI Series Motherboard - 84 - Do you want to Define Array Menu and you assign only one or two drives. FastBuild (tm) Utility 2.03 (c) ...
Manual
Page 91
...Optimized Defaults). 7. Press Del to the steps below may help you can use a metal object to connect the positive and negative pins in the manual. If not, please change another speaker with an internal amplifier. AMI BIOS Beep Codes AWARD BIOS Beep Codes *Computer gives 1 short beep when ...the system. Answer: The beep codes below : Steps: 1. Turn off the on-board battery to leak voltage to MB again and turn on to www.gigabyte.com.tw Question 1: I clear CMOS? Connect power cord to clear CMOS. Answer: Please make sure the speaker you can take off power. 2. gate...
...Optimized Defaults). 7. Press Del to the steps below may help you can use a metal object to connect the positive and negative pins in the manual. If not, please change another speaker with an internal amplifier. AMI BIOS Beep Codes AWARD BIOS Beep Codes *Computer gives 1 short beep when ...the system. Answer: The beep codes below : Steps: 1. Turn off the on-board battery to leak voltage to MB again and turn on to www.gigabyte.com.tw Question 1: I clear CMOS? Connect power cord to clear CMOS. Answer: Please make sure the speaker you can take off power. 2. gate...

Manual
Page 2
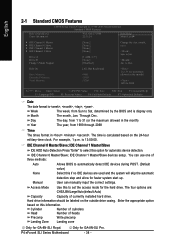
...on the IDE/SATAII RAID Config item to create RAID array, press ENTER on the motherboard. Ác Configuring SATA Hard Drive(s) (Controller: nVIDIA nForce4 SLI) Åé ¤¤ ¤å To configure SATA hard drive(s), follow the steps below: (1) Install SATA hard drive(s) in your ...SATA controller driver. (5) Install the SATA controller driver during POST (Power-On Self Test). If you may refer to the motherboard user's manual to create RAID array on your motherboard. (1) Installing SATA hard drive(s) in system BIOS Setup and set in Figure 1, make sure ...
...on the IDE/SATAII RAID Config item to create RAID array, press ENTER on the motherboard. Ác Configuring SATA Hard Drive(s) (Controller: nVIDIA nForce4 SLI) Åé ¤¤ ¤å To configure SATA hard drive(s), follow the steps below: (1) Install SATA hard drive(s) in your ...SATA controller driver. (5) Install the SATA controller driver during POST (Power-On Self Test). If you may refer to the motherboard user's manual to create RAID array on your motherboard. (1) Installing SATA hard drive(s) in system BIOS Setup and set in Figure 1, make sure ...
Manual
Page 6
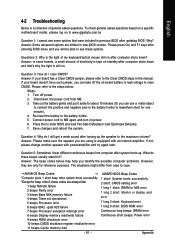
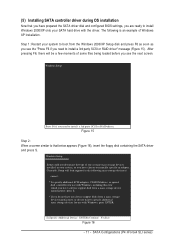
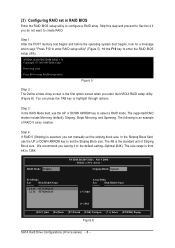
... Mirroring, Spanning and Raid 5. The size range is an example of Striping Block size. MediaShield IDE ROM BIOS 5.16 Copyright (C) 2005 NVIDIA Corp. You can manually set the striping block size. Step 4: If RAID 0 (Striping) is selected, you do not want to create RAID. ¤¤ Step 1: ¤å... Disk Model Name [g] Add [f ] Del [ESC] Quit [F6] Back [F7] Finish [TAB] Navigate [hi] Select [ENTER] Popup Figure 7 SATA Configurations (P4 nForce4 SLI series) - 6 - Step 3: In the RAID Mode field, use the UP or DOWN ARROW key to set in RAID BIOS Åé Enter the RAID BIOS...
... Mirroring, Spanning and Raid 5. The size range is an example of Striping Block size. MediaShield IDE ROM BIOS 5.16 Copyright (C) 2005 NVIDIA Corp. You can manually set the striping block size. Step 4: If RAID 0 (Striping) is selected, you do not want to create RAID. ¤¤ Step 1: ¤å... Disk Model Name [g] Add [f ] Del [ESC] Quit [F6] Back [F7] Finish [TAB] Navigate [hi] Select [ENTER] Popup Figure 7 SATA Configurations (P4 nForce4 SLI series) - 6 - Step 3: In the RAID Mode field, use the UP or DOWN ARROW key to set in RAID BIOS Åé Enter the RAID BIOS...
Manual
Page 11
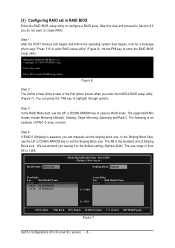
... during OS installation Now that below appears (Figure 16), insert the floppy disk containing the SATA driver and press S. SATA Configurations (P4 nForce4 SLI series) Figure 15 Step 2: When a screen similar to install a 3rd party SCSI or RAID driver. Currently, Setup will be a few ...moments of some files being loaded before you need to manually specify an adapter. The following mass storage devices(s) * To specify additional SCSI adapters, CD-ROM drives, or special disk controllers for which you...
... during OS installation Now that below appears (Figure 16), insert the floppy disk containing the SATA driver and press S. SATA Configurations (P4 nForce4 SLI series) Figure 15 Step 2: When a screen similar to install a 3rd party SCSI or RAID driver. Currently, Setup will be a few ...moments of some files being loaded before you need to manually specify an adapter. The following mass storage devices(s) * To specify additional SCSI adapters, CD-ROM drives, or special disk controllers for which you...
Manual
Page 6
... Model Name [g] Add [f ] Del [ESC] Quit [F6] Back [F7] Finish [TAB] Navigate [hi] Select [ENTER] Popup Figure 6 SATA Hard Drive Configurations (nForce series) - 6 - You can manually set the striping block size. Step 4: If RAID 0 (Striping) is the standard unit of RAID 0 array creation. The size range is from 4K to configure...
... Model Name [g] Add [f ] Del [ESC] Quit [F6] Back [F7] Finish [TAB] Navigate [hi] Select [ENTER] Popup Figure 6 SATA Hard Drive Configurations (nForce series) - 6 - You can manually set the striping block size. Step 4: If RAID 0 (Striping) is the standard unit of RAID 0 array creation. The size range is from 4K to configure...

Manual
Page 11
... the Windows 2000/XP Setup disk and press F6 as soon as you see the next screen. Windows Setup Press F6 if you need to manually specify an adapter. The following mass storage devices(s) * To specify additional SCSI adapters, CD-ROM drives, or special disk controllers for use with Windows, press...
... the Windows 2000/XP Setup disk and press F6 as soon as you see the next screen. Windows Setup Press F6 if you need to manually specify an adapter. The following mass storage devices(s) * To specify additional SCSI adapters, CD-ROM drives, or special disk controllers for use with Windows, press...


