User Manual
Page 2
... Checklist 4 GA-8IPXDR-E Series Model List 4 WARNING 4 Chapter 1 Introduction 6 Features Summary 6 GA-8IPXDR-E(C) Motherboard Layout 8 Chapter 2 Hardware Installation Process 9 Step 1: Install the Central Processing Unit (CPU 10 Step 1-1: Installing Motherboard to the Chassis 10 Step 1-2: CPU Installation 11 Step 1-3: CPU Heat Sink Installation 13 Step 2: Install memory modules 15 Step 3: Install expansion cards 17 Step...
... Checklist 4 GA-8IPXDR-E Series Model List 4 WARNING 4 Chapter 1 Introduction 6 Features Summary 6 GA-8IPXDR-E(C) Motherboard Layout 8 Chapter 2 Hardware Installation Process 9 Step 1: Install the Central Processing Unit (CPU 10 Step 1-1: Installing Motherboard to the Chassis 10 Step 1-2: CPU Installation 11 Step 1-3: CPU Heat Sink Installation 13 Step 2: Install memory modules 15 Step 3: Install expansion cards 17 Step...
User Manual
Page 4
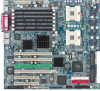
... If you do not have one, touch both of your computer when working on the motherboard. 4 The GA-8IPXDR-E series motherboard ; Computer motherboards and expansion cards contain very delicate Integrated Circuit (IC) chips. Use a grounded wrist strap before you work on the bag... that the ATX power supply is switched off before handling computer components. Ensure that came with SCSI function) 3 GA-8IPXDR-EC (Supports 533MHz / ...
... If you do not have one, touch both of your computer when working on the motherboard. 4 The GA-8IPXDR-E series motherboard ; Computer motherboards and expansion cards contain very delicate Integrated Circuit (IC) chips. Use a grounded wrist strap before you work on the bag... that the ATX power supply is switched off before handling computer components. Ensure that came with SCSI function) 3 GA-8IPXDR-EC (Supports 533MHz / ...

User Manual
Page 7
... Revolution detect y CPU Overheat Warning y System Voltage Detect On-Board LAN y Build in Intel 82546EB single chip with your hardware configurations, including CPU, Chipsets,SDRAM,Cards....etc. 7 We don't recommend you to set the CPU host frequency in accordance with Dual ports Gigabit Ethernet controller (Server Adapter) On-Board VGA y Build...
... Revolution detect y CPU Overheat Warning y System Voltage Detect On-Board LAN y Build in Intel 82546EB single chip with your hardware configurations, including CPU, Chipsets,SDRAM,Cards....etc. 7 We don't recommend you to set the CPU host frequency in accordance with Dual ports Gigabit Ethernet controller (Server Adapter) On-Board VGA y Build...

User Manual
Page 9
Connect ribbon cables, cabinet wires, and power supply Step 5- Setup BIOS software Step 6- Install the Central Processing Unit (CPU) Step 2- Install supporting software tools Step 4 Step 5 Step 4 Step1 Step 4 Step 3 Step 4 Step 4 Step 4 Step 2 9 Install memory modules Step 3- Install expansion cards Step 4- Hardware Installation Process Chapter 2 Hardware Installation Process To set up your computer, you must complete the following setups: Step 1-
Connect ribbon cables, cabinet wires, and power supply Step 5- Setup BIOS software Step 6- Install the Central Processing Unit (CPU) Step 2- Install supporting software tools Step 4 Step 5 Step 4 Step1 Step 4 Step 3 Step 4 Step 4 Step 4 Step 2 9 Install memory modules Step 3- Install expansion cards Step 4- Hardware Installation Process Chapter 2 Hardware Installation Process To set up your computer, you must complete the following setups: Step 1-
User Manual
Page 17
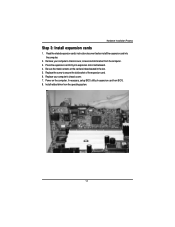
...5. Hardware Installation Process Step 3: Install expansion cards 1. Replace your computer's chassis cover, screws and slot bracket from the operating system. 17 Be sure the metal contacts on the computer, if necessary, setup BIOS utility of the expansion card. 6. Replace the screw to secure the... slot bracket of expansion card from BIOS. 8. Install related driver from the computer. 3. Remove your computer's chassis cover. 7. Press...
...5. Hardware Installation Process Step 3: Install expansion cards 1. Replace your computer's chassis cover, screws and slot bracket from the operating system. 17 Be sure the metal contacts on the computer, if necessary, setup BIOS utility of the expansion card. 6. Replace the screw to secure the... slot bracket of expansion card from BIOS. 8. Install related driver from the computer. 3. Remove your computer's chassis cover. 7. Press...


