Manual
Page 5
Chapter 3 Install Drivers 51 3-1 Install Chipset Drivers 51 3-2 Software Applications 52 3-3 Driver CD Information 52 3-4 Hardware Information 53 3-5 Contact Us ...53 Chapter 4 Appendix 55 4-1 Unique Software Utilities 55 4-1-1 Xpress Recovery Introduction 55 4-1-2 Flash BIOS Method Introduction 58 4-1-3 2 / 4 / 6 / 8 Channel Audio Function Introduction 67 4-1-4 Jack-Sensing and UAJ Introduction 73 4-2 Troubleshooting 75 - 5 -
Chapter 3 Install Drivers 51 3-1 Install Chipset Drivers 51 3-2 Software Applications 52 3-3 Driver CD Information 52 3-4 Hardware Information 53 3-5 Contact Us ...53 Chapter 4 Appendix 55 4-1 Unique Software Utilities 55 4-1-1 Xpress Recovery Introduction 55 4-1-2 Flash BIOS Method Introduction 58 4-1-3 2 / 4 / 6 / 8 Channel Audio Function Introduction 67 4-1-4 Jack-Sensing and UAJ Introduction 73 4-2 Troubleshooting 75 - 5 -
Manual
Page 16
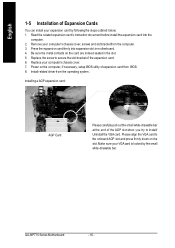
Please align the VGA card to install/ Uninstall the VGA card. Install related driver from the computer. 3. GA-8IP775 Series Motherboard - 16 - Press the expansion card firmly into the com puter. 2. English 1-5 Installation of Expansion Cards You can install your ... bracket from the operating system. Be sure the metal contacts on the computer, if necessary, setup BIOS utility of the expansion card. 6. Replace the screw to secure the slot bracket of expansion card from BIOS. 8. Remove your computer's chassis cover. 7. Power on the card are indeed seated in motherboard....
Please align the VGA card to install/ Uninstall the VGA card. Install related driver from the computer. 3. GA-8IP775 Series Motherboard - 16 - Press the expansion card firmly into the com puter. 2. English 1-5 Installation of Expansion Cards You can install your ... bracket from the operating system. Be sure the metal contacts on the computer, if necessary, setup BIOS utility of the expansion card. 6. Replace the screw to secure the slot bracket of expansion card from BIOS. 8. Remove your computer's chassis cover. 7. Power on the card are indeed seated in motherboard....
Manual
Page 21
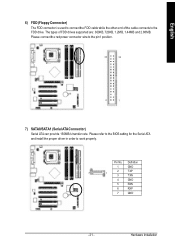
... 1 3 TXN 4 GND 5 RXN 6 RXP 7 GND - 21 - Please connect the red power connector wire to work properly. Please refer to the BIOS setting for the Serial ATA and install the proper driver in order to the pin1 position. 34 33 2 1 7) SATA0/SATA1 (Serial ATAConnector) Serial ATA can provide 150MB/s transfer rate. Pin No...
... 1 3 TXN 4 GND 5 RXN 6 RXP 7 GND - 21 - Please connect the red power connector wire to work properly. Please refer to the BIOS setting for the Serial ATA and install the proper driver in order to the pin1 position. 34 33 2 1 7) SATA0/SATA1 (Serial ATAConnector) Serial ATA can provide 150MB/s transfer rate. Pin No...
Manual
Page 55
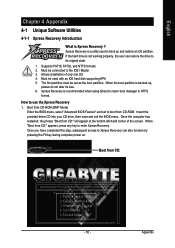
...to boot from CD:" appears, press any key to NTFS format. Boot from CD-ROM (BMP Mode) Enter the BIOS menu, select "Advanced BIOS Feature" and set as the boot partition. GIGABYTE Technology CO. , Ltd. 1. Execute Restore Utility 3. Exit and Restart Build 2011 - 55 - When "Boot from ...completed this step, subsequent access to Xpress Recovery can restore the drive to the IDE1 Master 3. Insert the provided driver CD into your CD drive, then save and exit the BIOS menu. Must be used to use the Xpress Recovery 1. Set Password 5. English Chapter 4 Appendix 4-1 Unique Software...
...to boot from CD:" appears, press any key to NTFS format. Boot from CD-ROM (BMP Mode) Enter the BIOS menu, select "Advanced BIOS Feature" and set as the boot partition. GIGABYTE Technology CO. , Ltd. 1. Execute Restore Utility 3. Exit and Restart Build 2011 - 55 - When "Boot from ...completed this step, subsequent access to Xpress Recovery can restore the drive to the IDE1 Master 3. Insert the provided driver CD into your CD drive, then save and exit the BIOS menu. Must be used to use the Xpress Recovery 1. Set Password 5. English Chapter 4 Appendix 4-1 Unique Software...
Manual
Page 56
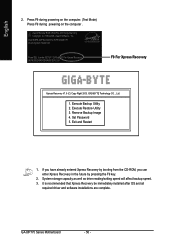
GIGABYTE Technology CO. , Ltd. 1. If you have already entered Xpress Recovery by booting from the CD-ROM, you can enter Xpress Recovery in the future by pressing the F9 key. 2. GA-8IP775 Series Motherboard - 56 - Award Modular BIOS v6.00PG, An Energy Star Al ly Copyright (C) 1984-2004,...Right 2003. Execute Backup Utility 2. Exit and Restart 1. It is recommended that Xpress Recovery be immediately installed after OS and all required driver and software installations are complete. Set Password 5. Press F9 during powering on the computer. (Text Mode) Press F9 during powering on the...
GIGABYTE Technology CO. , Ltd. 1. If you have already entered Xpress Recovery by booting from the CD-ROM, you can enter Xpress Recovery in the future by pressing the F9 key. 2. GA-8IP775 Series Motherboard - 56 - Award Modular BIOS v6.00PG, An Energy Star Al ly Copyright (C) 1984-2004,...Right 2003. Execute Backup Utility 2. Exit and Restart 1. It is recommended that Xpress Recovery be immediately installed after OS and all required driver and software installations are complete. Set Password 5. Press F9 during powering on the computer. (Text Mode) Press F9 during powering on the...


