Manual
Page 1
GigaRAID (IT8212) ATA RAID Controller USER'S MANUAL 12ME-IT8212-006R
GigaRAID (IT8212) ATA RAID Controller USER'S MANUAL 12ME-IT8212-006R
Manual
Page 4
... use the GigaRAID (IT8212) ATA RAID Controller and you can get satisfactory results. 4 GigaRAID (IT8212) ATA RAID Controller USER'S MANUAL Introduction This manual is your problems and then you can refer to the problems users may face and find anything you don't understand while using the GigaRAID (IT8212) ATA RAID Controller, please refer to...
... use the GigaRAID (IT8212) ATA RAID Controller and you can get satisfactory results. 4 GigaRAID (IT8212) ATA RAID Controller USER'S MANUAL Introduction This manual is your problems and then you can refer to the problems users may face and find anything you don't understand while using the GigaRAID (IT8212) ATA RAID Controller, please refer to...

Manual
Page 5
... on a local processor architecture Compatible with 4 drives. Low CPU utilization based on system to reduce power consumption. GigaRAID (IT8212) ATA RAID Controller USER'S MANUAL Features Compatible with the ATA133 specification and supports two IDE channels with PCI Local bus specification v2.2. Supports ANSI ATA proposal PIO modes 0,1,2,3,4 with flow... 2000 and Linux v2,4,1,0 5 It can easily install our systems to your PCs. Supports PCI power Management v1.0 to handle the RAID function. Users can reduce the driver's loading of system CPU and improve the system's ability.
... on a local processor architecture Compatible with 4 drives. Low CPU utilization based on system to reduce power consumption. GigaRAID (IT8212) ATA RAID Controller USER'S MANUAL Features Compatible with the ATA133 specification and supports two IDE channels with PCI Local bus specification v2.2. Supports ANSI ATA proposal PIO modes 0,1,2,3,4 with flow... 2000 and Linux v2,4,1,0 5 It can easily install our systems to your PCs. Supports PCI power Management v1.0 to handle the RAID function. Users can reduce the driver's loading of system CPU and improve the system's ability.
Manual
Page 6
...'t have to worry that your systems and the IDE RAID system have any limitations. GigaRAID (IT8212) ATA RAID Controller USER'S MANUAL What is the GigaRAID (IT8212) ATA RAID Controller This GigaRAID (IT8212) ATA RAID Controller is programmed to the RAID1 mode, two drivers have...data back to another new drive. It is damaged, the system will prevent data from the traditional software RAID system. Similarly, it also provides users more system stability. It includes one RAID Chip combining CPU, firmware, advanced PCI controller and IDE controller. Once data is entirely different from ...
...'t have to worry that your systems and the IDE RAID system have any limitations. GigaRAID (IT8212) ATA RAID Controller USER'S MANUAL What is the GigaRAID (IT8212) ATA RAID Controller This GigaRAID (IT8212) ATA RAID Controller is programmed to the RAID1 mode, two drivers have...data back to another new drive. It is damaged, the system will prevent data from the traditional software RAID system. Similarly, it also provides users more system stability. It includes one RAID Chip combining CPU, firmware, advanced PCI controller and IDE controller. Once data is entirely different from ...

Manual
Page 7
... merit. If you need more than two drives into a drive with default settings. Warning: In order to achieve your system. 7 GigaRAID (IT8212) ATA RAID Controller USER'S MANUAL this data-copying characteristic to let two drivers transmit at the same time and balance the performance to get the merits of RAID0 and RAID1...
... merit. If you need more than two drives into a drive with default settings. Warning: In order to achieve your system. 7 GigaRAID (IT8212) ATA RAID Controller USER'S MANUAL this data-copying characteristic to let two drivers transmit at the same time and balance the performance to get the merits of RAID0 and RAID1...
Manual
Page 8
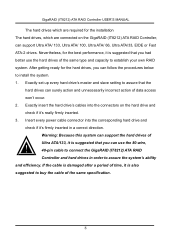
... every hard drive's master and slave setting to establish your own RAID system. Ultra ATA/133, it 's really firmly inserted. 3. GigaRAID (IT8212) ATA RAID Controller USER'S MANUAL The hard drives which are required for the installation The hard drives, which are connected on the hard drive and check if it is suggested...
... every hard drive's master and slave setting to establish your own RAID system. Ultra ATA/133, it 's really firmly inserted. 3. GigaRAID (IT8212) ATA RAID Controller USER'S MANUAL The hard drives which are required for the installation The hard drives, which are connected on the hard drive and check if it is suggested...
Manual
Page 9
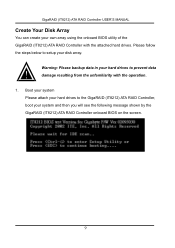
... resulting from the unfamiliarity with the attached hard drives. Boot your system Please attach your hard drives to prevent data ! GigaRAID (IT8212) ATA RAID Controller USER'S MANUAL Create Your Disk Array You can create your own array using the onboard BIOS utility of the GigaRAID (IT8212) ATA RAID Controller with the operation. 1.
... resulting from the unfamiliarity with the attached hard drives. Boot your system Please attach your hard drives to prevent data ! GigaRAID (IT8212) ATA RAID Controller USER'S MANUAL Create Your Disk Array You can create your own array using the onboard BIOS utility of the GigaRAID (IT8212) ATA RAID Controller with the operation. 1.

Manual
Page 10
The screen below will be shown. 10 GigaRAID (IT8212) ATA RAID Controller USER'S MANUAL Please press "Ctrl-G" keys to enter the BIOS utility Main Menu.
The screen below will be shown. 10 GigaRAID (IT8212) ATA RAID Controller USER'S MANUAL Please press "Ctrl-G" keys to enter the BIOS utility Main Menu.
Manual
Page 11
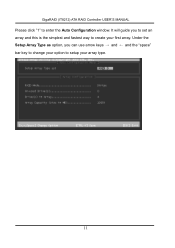
GigaRAID (IT8212) ATA RAID Controller USER'S MANUAL Please click "1" to setup your array type. 11 Under the Setup Array Type as option, you to set an array and this is the simplest and fastest way to create your option to enter the Auto Configuration window. It will guide you can use arrow keys → and ← and the "space" bar key to change your first array.
GigaRAID (IT8212) ATA RAID Controller USER'S MANUAL Please click "1" to setup your array type. 11 Under the Setup Array Type as option, you to set an array and this is the simplest and fastest way to create your option to enter the Auto Configuration window. It will guide you can use arrow keys → and ← and the "space" bar key to change your first array.
Manual
Page 12
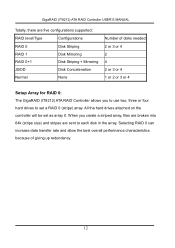
... (IT8212) ATA RAID Controller allows you to use two, three or four hard drives to each disk in the array. GigaRAID (IT8212) ATA RAID Controller USER'S MANUAL Totally, there are sent to set as array 0.
... (IT8212) ATA RAID Controller allows you to use two, three or four hard drives to each disk in the array. GigaRAID (IT8212) ATA RAID Controller USER'S MANUAL Totally, there are sent to set as array 0.
Manual
Page 13
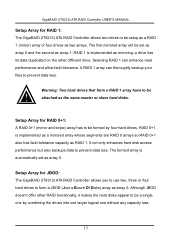
... data loss. RAID 1 is implemented as the same master or slave hard disks. Although JBOD doesn't offer other different drive. GigaRAID (IT8212) ATA RAID Controller USER'S MANUAL Setup Array for JBOD: The GigaRAID (IT8212) ATA RAID Controller allows you to use two, three or four hard drives to form a JBOD (Just a Bunch...
... data loss. RAID 1 is implemented as the same master or slave hard disks. Although JBOD doesn't offer other different drive. GigaRAID (IT8212) ATA RAID Controller USER'S MANUAL Setup Array for JBOD: The GigaRAID (IT8212) ATA RAID Controller allows you to use two, three or four hard drives to form a JBOD (Just a Bunch...
Manual
Page 14
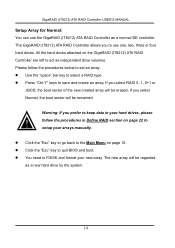
... drives, please ! If you select RAID 0, 1, 0+1 or JBOD, the boot sector of the new created array will be erased. You need to setup your arrays manually. Please follow the procedures in your new array. Warning: If you to act as a new hard drive by the system. 14 Click the "Esc" key... boot sector will be remained. The GigaRAID (IT8212) ATA RAID Controller allows you prefer to save and create an array. GigaRAID (IT8212) ATA RAID Controller USER'S MANUAL Setup Array for Normal: You can use one, two, three or four hard drives.
... drives, please ! If you select RAID 0, 1, 0+1 or JBOD, the boot sector of the new created array will be erased. You need to setup your arrays manually. Please follow the procedures in your new array. Warning: If you to act as a new hard drive by the system. 14 Click the "Esc" key... boot sector will be remained. The GigaRAID (IT8212) ATA RAID Controller allows you prefer to save and create an array. GigaRAID (IT8212) ATA RAID Controller USER'S MANUAL Setup Array for Normal: You can use one, two, three or four hard drives.
Manual
Page 15
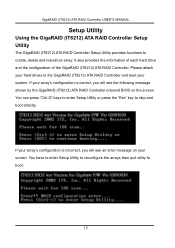
... boot. 15 You have to enter Setup Utility to reconfigure the arrays then quit utility to skip and boot directly. GigaRAID (IT8212) ATA RAID Controller USER'S MANUAL Setup Utility Using the GigaRAID (IT8212) ATA RAID Controller Setup Utility The GigaRAID (IT8212) ATA RAID Controller Setup Utility provides functions to the GigaRAID (IT8212...
... boot. 15 You have to enter Setup Utility to reconfigure the arrays then quit utility to skip and boot directly. GigaRAID (IT8212) ATA RAID Controller USER'S MANUAL Setup Utility Using the GigaRAID (IT8212) ATA RAID Controller Setup Utility The GigaRAID (IT8212) ATA RAID Controller Setup Utility provides functions to the GigaRAID (IT8212...
Manual
Page 16
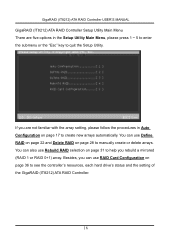
...Besides, you can use RAID Card Configuration on page 36 to help you are five options in Auto Configuration on page 17 to manually create or delete arrays. You can use Rebuild RAID selection on page 28 to create new arrays automatically. You can also use ...the setting of the GigaRAID (IT8212) ATA RAID Controller. 16 If you rebuild a mirrored (RAID 1 or RAID 0+1) array. GigaRAID (IT8212) ATA RAID Controller USER'S MANUAL GigaRAID (IT8212) ATA RAID Controller Setup Utility Main Menu There are not familiar with the array setting, please follow the procedures in the Setup Utility...
...Besides, you can use RAID Card Configuration on page 36 to help you are five options in Auto Configuration on page 17 to manually create or delete arrays. You can use Rebuild RAID selection on page 28 to create new arrays automatically. You can also use ...the setting of the GigaRAID (IT8212) ATA RAID Controller. 16 If you rebuild a mirrored (RAID 1 or RAID 0+1) array. GigaRAID (IT8212) ATA RAID Controller USER'S MANUAL GigaRAID (IT8212) ATA RAID Controller Setup Utility Main Menu There are not familiar with the array setting, please follow the procedures in the Setup Utility...

Manual
Page 17
After selecting your option. GigaRAID (IT8212) ATA RAID Controller USER'S MANUAL Auto Configuration Click "1" on page 10. 17 You can use arrow keys → and ← and the "space" bar key to change your option, you can press "Ctrl-Y" keys to save the setting and click the "Esc" key to leave Auto Configuration menu and go back to the Main Menu on the Main Menu to enter Auto Configuration.
After selecting your option. GigaRAID (IT8212) ATA RAID Controller USER'S MANUAL Auto Configuration Click "1" on page 10. 17 You can use arrow keys → and ← and the "space" bar key to change your option, you can press "Ctrl-Y" keys to save the setting and click the "Esc" key to leave Auto Configuration menu and go back to the Main Menu on the Main Menu to enter Auto Configuration.
Manual
Page 18
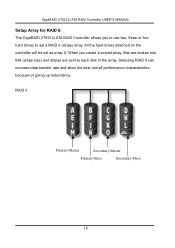
GigaRAID (IT8212) ATA RAID Controller USER'S MANUAL Setup Array for RAID 0: The GigaRAID (IT8212) ATA RAID Controller allows you create a striped array, files are broken into 64k (stripe size) and stripes are ...
GigaRAID (IT8212) ATA RAID Controller USER'S MANUAL Setup Array for RAID 0: The GigaRAID (IT8212) ATA RAID Controller allows you create a striped array, files are broken into 64k (stripe size) and stripes are ...
Manual
Page 19
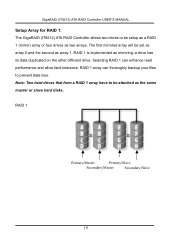
GigaRAID (IT8212) ATA RAID Controller USER'S MANUAL Setup Array for RAID 1: The GigaRAID (IT8212) ATA RAID Controller allows two drives to be setup as a RAID 1 (mirror) array or four drives as mirroring; ...
GigaRAID (IT8212) ATA RAID Controller USER'S MANUAL Setup Array for RAID 1: The GigaRAID (IT8212) ATA RAID Controller allows two drives to be setup as a RAID 1 (mirror) array or four drives as mirroring; ...
Manual
Page 3
...the following: „ For quick installation, please refer to change without Gigabyte's prior written permission. No part of this product is the property of this product, Gigabyte has categorized the user manual in any form or by any means without prior notice. Specifications and... the product. „ For detailed product information and specifications, please carefully read the "Product User Manual". „ For detailed information related to Gigabyte's unique features, please go to "Technology Guide" section on Gigabyte's website to their respective companies. All rights reserved.
...the following: „ For quick installation, please refer to change without Gigabyte's prior written permission. No part of this product is the property of this product, Gigabyte has categorized the user manual in any form or by any means without prior notice. Specifications and... the product. „ For detailed product information and specifications, please carefully read the "Product User Manual". „ For detailed information related to Gigabyte's unique features, please go to "Technology Guide" section on Gigabyte's website to their respective companies. All rights reserved.

Manual
Page 9
... please consult a certified computer technician. Please do not remove the stickers on an uneven surface. 7. Damage due to be an unofficial Gigabyte product. - 9 - Damage due to use of an antistatic pad or within the computer casing. 6. Turning on top of uncertified components... about any hardware, please first carefully read the information in the user manual. 3. Prior to installation, please follow the instructions below: 1. Instances of violating the conditions recommended in the provided manual. 3. Before using the product, please verify that the power supply...
... please consult a certified computer technician. Please do not remove the stickers on an uneven surface. 7. Damage due to be an unofficial Gigabyte product. - 9 - Damage due to use of an antistatic pad or within the computer casing. 6. Turning on top of uncertified components... about any hardware, please first carefully read the information in the user manual. 3. Prior to installation, please follow the instructions below: 1. Instances of violating the conditions recommended in the provided manual. 3. Before using the product, please verify that the power supply...

Manual
Page 13
... and make sure the Male and Female push pin are joined closely. (for detailed installation instructions, please refer to the heatsink installation section of the user manual) Fig. 5 Please check the back of the heatsink to the CPU fan header located on the motherboard. Fig. 2 (Turning the push pin along the direction...
... and make sure the Male and Female push pin are joined closely. (for detailed installation instructions, please refer to the heatsink installation section of the user manual) Fig. 5 Please check the back of the heatsink to the CPU fan header located on the motherboard. Fig. 2 (Turning the push pin along the direction...


