Manual
Page 2
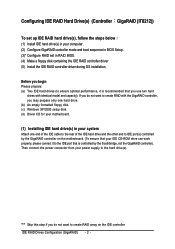
.... (2) Configure GigaRAID controller mode and boot sequence in BIOS Setup. (3)* Configure RAID set in your system Attach one hard drive. (b) An empty formatted floppy disk. (c) Windows XP/2000 setup disk. (d) Driver CD for your motherboard. (1) Installing IDE hard drive(s) in RAID BIOS. (4) Make a floppy disk containing the IDE RAID controller driver...
.... (2) Configure GigaRAID controller mode and boot sequence in BIOS Setup. (3)* Configure RAID set in your system Attach one hard drive. (b) An empty formatted floppy disk. (c) Windows XP/2000 setup disk. (d) Driver CD for your motherboard. (1) Installing IDE hard drive(s) in RAID BIOS. (4) Make a floppy disk containing the IDE RAID controller driver...
Manual
Page 4
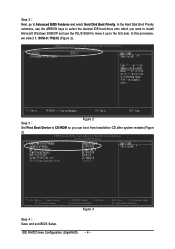
... (C) 1984-2004 Award Software Hard Disk Boot Priority Step 3 Figure 2 Set First Boot Device to CD-ROM so you want to install ¤¤ Microsoft Windows 2000/XP and use the ARROW keys to select the desired IDE hard drive onto which you can boot from Installation CD after system restarts...
... (C) 1984-2004 Award Software Hard Disk Boot Priority Step 3 Figure 2 Set First Boot Device to CD-ROM so you want to install ¤¤ Microsoft Windows 2000/XP and use the ARROW keys to select the desired IDE hard drive onto which you can boot from Installation CD after system restarts...
Manual
Page 12
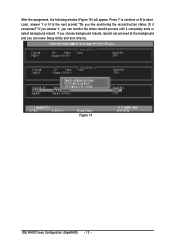
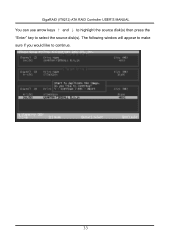
If you choose background rebuild, rebuild can proceed at the background and you can leave Setup Utility and boot directly. ¤å Figure 14 IDE RAID Drives Configuration (GigaRAID) - 12 - Press Y to continue or N to the next prompt "Do you like monitoring the reconstruction status till it completely ends or ¤¤ select background rebuild. Later, answer Y or N to abort. If you answer Y, you can monitor the whole rebuild process until it Åé completes?" Ác After the assignment, the following window (Figure 14) will appear.
If you choose background rebuild, rebuild can proceed at the background and you can leave Setup Utility and boot directly. ¤å Figure 14 IDE RAID Drives Configuration (GigaRAID) - 12 - Press Y to continue or N to the next prompt "Do you like monitoring the reconstruction status till it completely ends or ¤¤ select background rebuild. Later, answer Y or N to abort. If you answer Y, you can monitor the whole rebuild process until it Åé completes?" Ác After the assignment, the following window (Figure 14) will appear.
Manual
Page 14
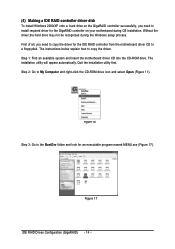
... utility will appear automatically. Quit the installation utility first. Ác (4) Making a IDE RAID controller driver disk Åé To install Windows 2000/XP onto a hard drive on your motherboard during the Windows setup process. ¤å First of all, you need to copy the driver for an executable program named MENU.exe...
... utility will appear automatically. Quit the installation utility first. Ác (4) Making a IDE RAID controller driver disk Åé To install Windows 2000/XP onto a hard drive on your motherboard during the Windows setup process. ¤å First of all, you need to copy the driver for an executable program named MENU.exe...
Manual
Page 16
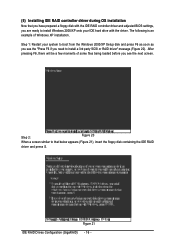
... you have prepared a floppy disk with the IDE RAID controller driver and adjusted BIOS settings, you are ready to install Windows 2000/XP onto your system to boot from the Windows 2000/XP Setup disk and press F6 as soon as you need to install a 3rd party SCSI or RAID driver" message... some files being loaded before you see the "Press F6 if you see the next screen. After pressing F6, there will be a few moments of Windows XP installation. ¤å Step 1: Restart your IDE hard drive with the driver.
... you have prepared a floppy disk with the IDE RAID controller driver and adjusted BIOS settings, you are ready to install Windows 2000/XP onto your system to boot from the Windows 2000/XP Setup disk and press F6 as soon as you need to install a 3rd party SCSI or RAID driver" message... some files being loaded before you see the "Press F6 if you see the next screen. After pressing F6, there will be a few moments of Windows XP installation. ¤å Step 1: Restart your IDE hard drive with the driver.
Manual
Page 17
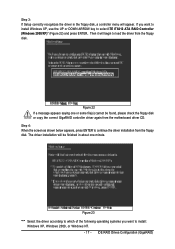
.../XP)* (Figure 22) and press ENTER. The driver installation will appear. If you want to install Windows XP, use the UP or DOWN ARROW key to install: Windows XP, Windows 2000, or Windows NT. - 17 - Step 3: If Setup correctly recognizes the driver in the floppy disk, a controller menu will be finished in about one...
.../XP)* (Figure 22) and press ENTER. The driver installation will appear. If you want to install Windows XP, use the UP or DOWN ARROW key to install: Windows XP, Windows 2000, or Windows NT. - 17 - Step 3: If Setup correctly recognizes the driver in the floppy disk, a controller menu will be finished in about one...
Manual
Page 18
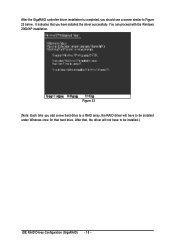
Ác After the GigaRAID controller driver installation is completed, you should see a screen similar to be installed under Windows once for that hard drive. It indicates that , the driver will have to be installed.) IDE RAID Drives Configuration (GigaRAID) - 18 - You can proceed with the Windows Åé 2000/XP installation. ¤¤ ¤å Figure 23 (Note: Each time you have to Figure 23 below. After that you add a new hard drive to a RAID array, the RAID driver will not have installed the driver successfully.
Ác After the GigaRAID controller driver installation is completed, you should see a screen similar to be installed under Windows once for that hard drive. It indicates that , the driver will have to be installed.) IDE RAID Drives Configuration (GigaRAID) - 18 - You can proceed with the Windows Åé 2000/XP installation. ¤¤ ¤å Figure 23 (Note: Each time you have to Figure 23 below. After that you add a new hard drive to a RAID array, the RAID driver will not have installed the driver successfully.

Manual
Page 3
Contents Introduction ...4 Features ...5 What is the GigaRAID (IT8212) ATA RAID Controller 6 Quick Start ...7 Create Your Disk Array 9 Setup Utility...15 Using the GigaRAID (IT8212) ATA RAID Controller Setup Utility 15 Auto Configuration 17 Define RAID...22 Delete RAID...28 Rebuild RAID 31 RAID Card Configuration 36 Driver Installation ...38 Windows XP 39 Windows 2000 45 Windows SE/ME 53 Windows NT 61 Linux ...69 Install the GigaRAID (IT8212) ATA RAID Controller on Red Hat 7.3 69 Application ...72 Installation ...72 Functions Description 75 How to...86 Q&A ...88
Contents Introduction ...4 Features ...5 What is the GigaRAID (IT8212) ATA RAID Controller 6 Quick Start ...7 Create Your Disk Array 9 Setup Utility...15 Using the GigaRAID (IT8212) ATA RAID Controller Setup Utility 15 Auto Configuration 17 Define RAID...22 Delete RAID...28 Rebuild RAID 31 RAID Card Configuration 36 Driver Installation ...38 Windows XP 39 Windows 2000 45 Windows SE/ME 53 Windows NT 61 Linux ...69 Install the GigaRAID (IT8212) ATA RAID Controller on Red Hat 7.3 69 Application ...72 Installation ...72 Functions Description 75 How to...86 Q&A ...88

Manual
Page 5
... auto transfer per IDE channel to get a high performance Supports the RAID 0/1/0+1 function Supports the JBOD function Supports the Scatter/Gather function for windows 98SE/Me/XP, Windows NT 4.0, Windows 2000 and Linux v2,4,1,0 5 GigaRAID (IT8212) ATA RAID Controller USER'S MANUAL Features Compatible with the ATA133 specification and supports two IDE channels with...
... auto transfer per IDE channel to get a high performance Supports the RAID 0/1/0+1 function Supports the JBOD function Supports the Scatter/Gather function for windows 98SE/Me/XP, Windows NT 4.0, Windows 2000 and Linux v2,4,1,0 5 GigaRAID (IT8212) ATA RAID Controller USER'S MANUAL Features Compatible with the ATA133 specification and supports two IDE channels with...
Manual
Page 11
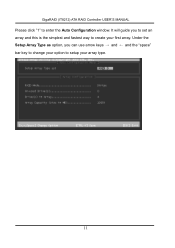
It will guide you can use arrow keys → and ← and the "space" bar key to change your option to setup your first array. GigaRAID (IT8212) ATA RAID Controller USER'S MANUAL Please click "1" to create your array type. 11 Under the Setup Array Type as option, you to set an array and this is the simplest and fastest way to enter the Auto Configuration window.
It will guide you can use arrow keys → and ← and the "space" bar key to change your option to setup your first array. GigaRAID (IT8212) ATA RAID Controller USER'S MANUAL Please click "1" to create your array type. 11 Under the Setup Array Type as option, you to set an array and this is the simplest and fastest way to enter the Auto Configuration window.

Manual
Page 25
... array (Column "Assignment" in the View Drive Assignment is shown "Free"), this array setting is regarded as a mirrored array whose segments are correct, the following window will appear. When you press "Ctrl-Y" keys to save your change and your RAID Mode is neither Mirror nor Stripe + Mirror, this hard drive is...
... array (Column "Assignment" in the View Drive Assignment is shown "Free"), this array setting is regarded as a mirrored array whose segments are correct, the following window will appear. When you press "Ctrl-Y" keys to save your change and your RAID Mode is neither Mirror nor Stripe + Mirror, this hard drive is...
Manual
Page 26
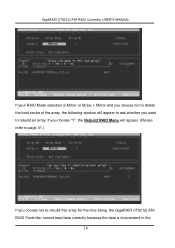
GigaRAID (IT8212) ATA RAID Controller USER'S MANUAL If your RAID Mode selection is Mirror or Stripe + Mirror and you choose not to delete the boot sector of the array, the following window will appear. (Please refer to page 31.) If you want to rebuild this array for the time being, the GigaRAID (IT8212) ATA RAID Controller cannot read data correctly because the data is inconsistent in the 26 If you choose "Y", the Rebuild RAID Menu will appear to ask whether you choose not to rebuild an array.
GigaRAID (IT8212) ATA RAID Controller USER'S MANUAL If your RAID Mode selection is Mirror or Stripe + Mirror and you choose not to delete the boot sector of the array, the following window will appear. (Please refer to page 31.) If you want to rebuild this array for the time being, the GigaRAID (IT8212) ATA RAID Controller cannot read data correctly because the data is inconsistent in the 26 If you choose "Y", the Rebuild RAID Menu will appear to ask whether you choose not to rebuild an array.
Manual
Page 27
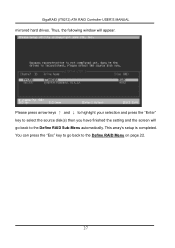
This array's setup is completed. You can press the "Esc" key to go back to the Define RAID Sub-Menu automatically. Please press arrow keys ↑ and ↓ to highlight your selection and press the "Enter" key to the Define RAID Menu on page 22. 27 Thus, the following window will go back to select the source disk(s) then you have finished the setting and the screen will appear. GigaRAID (IT8212) ATA RAID Controller USER'S MANUAL mirrored hard drives.
This array's setup is completed. You can press the "Esc" key to go back to the Define RAID Sub-Menu automatically. Please press arrow keys ↑ and ↓ to highlight your selection and press the "Enter" key to the Define RAID Menu on page 22. 27 Thus, the following window will go back to select the source disk(s) then you have finished the setting and the screen will appear. GigaRAID (IT8212) ATA RAID Controller USER'S MANUAL mirrored hard drives.
Manual
Page 30
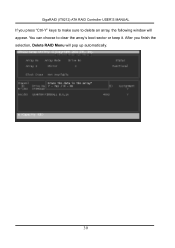
After you press "Ctrl-Y" keys to make sure to clear the array's boot sector or keep it. GigaRAID (IT8212) ATA RAID Controller USER'S MANUAL If you finish the selection, Delete RAID Menu will appear. You can choose to delete an array, the following window will pop up automatically. 30
After you press "Ctrl-Y" keys to make sure to clear the array's boot sector or keep it. GigaRAID (IT8212) ATA RAID Controller USER'S MANUAL If you finish the selection, Delete RAID Menu will appear. You can choose to delete an array, the following window will pop up automatically. 30
Manual
Page 33
The following window will appear to make sure if you would like to select the source disk(s). GigaRAID (IT8212) ATA RAID Controller USER'S MANUAL You can use arrow keys ↑ and ↓ to highlight the source disk(s) then press the "Enter" key to continue. 33
The following window will appear to make sure if you would like to select the source disk(s). GigaRAID (IT8212) ATA RAID Controller USER'S MANUAL You can use arrow keys ↑ and ↓ to highlight the source disk(s) then press the "Enter" key to continue. 33
Manual
Page 34
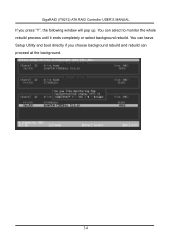
You can leave Setup Utility and boot directly if you press "Y", the following window will pop up. You can select to monitor the whole rebuild process until it ends completely or select background rebuild. GigaRAID (IT8212) ATA RAID Controller USER'S MANUAL If you choose background rebuild and rebuild can proceed at the background. 34
You can leave Setup Utility and boot directly if you press "Y", the following window will pop up. You can select to monitor the whole rebuild process until it ends completely or select background rebuild. GigaRAID (IT8212) ATA RAID Controller USER'S MANUAL If you choose background rebuild and rebuild can proceed at the background. 34
Manual
Page 38
...hard drive to a RAID array, the RAID driver will not have to install the RAID drivers. After that hard drive. Windows XP Windows 2000 Windows 98/ME Windows NT 4.0 For the Windows operating system (Win NT, WinXP, Win2000 ), for that , the driver will have to be transferred to install this floppy... to install the GigaRAID (IT8212) ATA RAID Controller driver under Windows once for IDE RAID/SCSI/Serial ATA functioning, the driver must first be installed.) 38 When install Windows 2000 or Windows XP from the Windows CD to be listed on all chipsets should be installed under ...
...hard drive to a RAID array, the RAID driver will not have to install the RAID drivers. After that hard drive. Windows XP Windows 2000 Windows 98/ME Windows NT 4.0 For the Windows operating system (Win NT, WinXP, Win2000 ), for that , the driver will have to be transferred to install this floppy... to install the GigaRAID (IT8212) ATA RAID Controller driver under Windows once for IDE RAID/SCSI/Serial ATA functioning, the driver must first be installed.) 38 When install Windows 2000 or Windows XP from the Windows CD to be listed on all chipsets should be installed under ...

Manual
Page 39
Boot from the device list shown on the bottom of the ! Select GigaRAID (IT8212) ATA RAID Controller (Windows 2000/XP) from CD-ROM with Windows installation diskette. following installation methods, the time when step2 starts will continue. If you need to continue. 5. When the ...the device you want to continue. 6. After designating all the devices, please proceed to be installed will be contained on the next window. Press the key to continue the installation of the installation program to insert the GigaRAID (IT8212) ATA RAID Controller Driver diskette into ...
Boot from the device list shown on the bottom of the ! Select GigaRAID (IT8212) ATA RAID Controller (Windows 2000/XP) from CD-ROM with Windows installation diskette. following installation methods, the time when step2 starts will continue. If you need to continue. 5. When the ...the device you want to continue. 6. After designating all the devices, please proceed to be installed will be contained on the next window. Press the key to continue the installation of the installation program to insert the GigaRAID (IT8212) ATA RAID Controller Driver diskette into ...

Manual
Page 40
Select the Install from a list or specific location (Advanced) option then click "Next" to continue to setup. 40 GigaRAID (IT8212) ATA RAID Controller USER'S MANUAL Install the driver under existing Windows XP 1. Start Windows. 2. When Windows detects GigaRAID (IT8212) ATA RAID Controller in the system, a dialog box named Found New Hardware Wizard will show on the screen.
Select the Install from a list or specific location (Advanced) option then click "Next" to continue to setup. 40 GigaRAID (IT8212) ATA RAID Controller USER'S MANUAL Install the driver under existing Windows XP 1. Start Windows. 2. When Windows detects GigaRAID (IT8212) ATA RAID Controller in the system, a dialog box named Found New Hardware Wizard will show on the screen.
Manual
Page 43
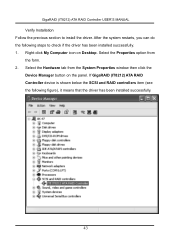
Select the Hardware tab from the form. 2. Right-click My Computer icon on the panel. Select the Properties option from the System Properties window then click the Device Manager button on Desktop. If GigaRAID (IT8212) ATA RAID Controller device is shown below the SCSI and RAID controllers item (see ...
Select the Hardware tab from the form. 2. Right-click My Computer icon on the panel. Select the Properties option from the System Properties window then click the Device Manager button on Desktop. If GigaRAID (IT8212) ATA RAID Controller device is shown below the SCSI and RAID controllers item (see ...


