Manual
Page 1
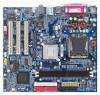
GA-8I845GVM775 Intel® Pentium® 4 LGA775 Processor Motherboard User's Manual Rev. 1001 12ME-I845GVMT-1001
GA-8I845GVM775 Intel® Pentium® 4 LGA775 Processor Motherboard User's Manual Rev. 1001 12ME-I845GVMT-1001
Manual
Page 3
... or download the information you need. The trademarks mentioned in any form or by any means without prior notice. No part of Gigabyte. Notice The written content provided with this product, Gigabyte has categorized the user manual in the following: „ For detailed product information and specifications, please carefully read the "Product User...
... or download the information you need. The trademarks mentioned in any form or by any means without prior notice. No part of Gigabyte. Notice The written content provided with this product, Gigabyte has categorized the user manual in the following: „ For detailed product information and specifications, please carefully read the "Product User...
Manual
Page 9
...to use exceeding the permitted parameters. 6. Damage due to installing the electronic components, please have a problem related to come in the provided manual. 3. Installation Notices 1. Please make sure there are required for warranty validation. 2. Prior to wear an electrostatic discharge (ESD) cuff when... delicate electronic circuits and components which can lead to damage to system components as well as physical harm to be an unofficial Gigabyte product. - 9 - Before using the product, please verify that you are connected. 4. Please verify that all cables and...
...to use exceeding the permitted parameters. 6. Damage due to installing the electronic components, please have a problem related to come in the provided manual. 3. Installation Notices 1. Please make sure there are required for warranty validation. 2. Prior to wear an electrostatic discharge (ESD) cuff when... delicate electronic circuits and components which can lead to damage to system components as well as physical harm to be an unofficial Gigabyte product. - 9 - Before using the product, please verify that you are connected. 4. Please verify that all cables and...

Manual
Page 12
... sure the Male and Female push pin are joined closely. (for detailed installation instructions, please refer to the heatsink installation section of the user manual) Fig. 5 Please check the back of the heatsink paste.To prevent such an occurrence, it is complete. English 1-3-2 Installation of the Heatsink... Fig.1 Please apply an even layer of heatsink paste on the surface of the heatsink to the CPU fan header located on the motherboard. GA-8I845GVM775 Motherboard - 12 - The heatsink may adhere to the pin hole on the motherboard.Pressing down the push pins diagonally. Fig. 4 ...
... sure the Male and Female push pin are joined closely. (for detailed installation instructions, please refer to the heatsink installation section of the user manual) Fig. 5 Please check the back of the heatsink paste.To prevent such an occurrence, it is complete. English 1-3-2 Installation of the Heatsink... Fig.1 Please apply an even layer of heatsink paste on the surface of the heatsink to the CPU fan header located on the motherboard. GA-8I845GVM775 Motherboard - 12 - The heatsink may adhere to the pin hole on the motherboard.Pressing down the push pins diagonally. Fig. 4 ...
Manual
Page 28
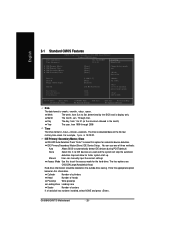
to Dec. 1 to 31 (or maximum allowed in . For example, 1 p.m. Manual User can use one of sectors If a hard disk has not been installed, select NONE and press . The four options are used and the system ... Zone Landing zone Sector Number of three methods: Auto Allows BIOS to automatically detect IDE devices during POST(default) None Select this information. You can manually input the correct settings Access Mode Use this option for the hard drive...
to Dec. 1 to 31 (or maximum allowed in . For example, 1 p.m. Manual User can use one of sectors If a hard disk has not been installed, select NONE and press . The four options are used and the system ... Zone Landing zone Sector Number of three methods: Auto Allows BIOS to automatically detect IDE devices during POST(default) None Select this information. You can manually input the correct settings Access Mode Use this option for the hard drive...

Manual
Page 43
...-ROM device icon in the list. - 43 - The will auto start and show the installation guide. Driver Installation Click each item to install the driver manually or switch to the to install the drivers automatically. English RCehvaispitoenrH3isItnorsytall Drivers 3-1 Install Chipset Drivers Pictures below are shown in Windows XP Insert the driver...
...-ROM device icon in the list. - 43 - The will auto start and show the installation guide. Driver Installation Click each item to install the driver manually or switch to the to install the drivers automatically. English RCehvaispitoenrH3isItnorsytall Drivers 3-1 Install Chipset Drivers Pictures below are shown in Windows XP Insert the driver...
Manual
Page 66
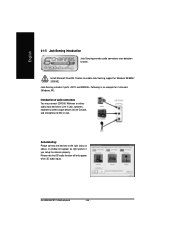
... right jacks as right picture if you setup the devices properly. Install Microsoft DirectX8.1 before to MIC In jack. Jack-Sensing includes 2 parts: AUTO and MANUAL. GA-8I845GVM775 Motherboard - 66 - English 4-1-5 Jack-Sensing Introduction Jack-Sensing provides audio connectors error-detection function.
... right jacks as right picture if you setup the devices properly. Install Microsoft DirectX8.1 before to MIC In jack. Jack-Sensing includes 2 parts: AUTO and MANUAL. GA-8I845GVM775 Motherboard - 66 - English 4-1-5 Jack-Sensing Introduction Jack-Sensing provides audio connectors error-detection function.
Manual
Page 67
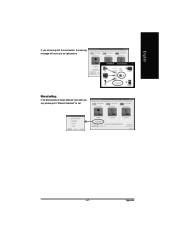
Appendix Manual setting: If the device picture shows different from what you set . - 67 - English If you set, please press "Manual Selection" to set wrong with the connectors, the warning message will come out as right picture.
Appendix Manual setting: If the device picture shows different from what you set . - 67 - English If you set, please press "Manual Selection" to set wrong with the connectors, the warning message will come out as right picture.
Manual
Page 68
... off the on power. 6. Disconnect the power cord from MB. 3. If not, please change any setting manually to disable the onboard VGA. Answer: Gigabyte motherboards will be able to see some boards, a small amount of electricity is kept on standby after computer ...shuts down ? Answer: Some advanced options are using is equipped with power/amplifier and try again later. Save changes and reboot the system. Question 5: Why do I cannot see these options. GA...
... off the on power. 6. Disconnect the power cord from MB. 3. If not, please change any setting manually to disable the onboard VGA. Answer: Gigabyte motherboards will be able to see some boards, a small amount of electricity is kept on standby after computer ...shuts down ? Answer: Some advanced options are using is equipped with power/amplifier and try again later. Save changes and reboot the system. Question 5: Why do I cannot see these options. GA...
Manual
Page 69
... in the Front USB Panel. The situations might differ from case to it from computer after system boots up. Answer: Please refer to the user manual and check whether you identify the possible computer problems. However, they are always fatal. 1 beep Refresh failure 2 beeps Parity error 3 beeps Base 64K memory failure...
... in the Front USB Panel. The situations might differ from case to it from computer after system boots up. Answer: Please refer to the user manual and check whether you identify the possible computer problems. However, they are always fatal. 1 beep Refresh failure 2 beeps Parity error 3 beeps Base 64K memory failure...


