
Manual
Page 8
Channel Audio Function Introduction 89 4-2 Troubleshooting 94 - 8 - Chapter 3 Drivers Installation 55 3-1 Install Chipset Drivers 55 3-2 SoftwareApplications 56 3-3 Driver CD Information 56 3-4 Hardware Information 57 3-5 Contact Us ...57 Chapter 4 Appendix 59 4-1 Unique Software Utilities 59 4-1-1 EasyTune 5 Introduction 60 4-1-2 Xpress Recovery Introduction 61 4-1-3 Flash BIOS Method Introduction 64 4-1-4 Serial ATA BIOS Setting Utility Introduction 75 4-1-5 Configuring the Onboard Wireless LAN 87 4-1-6 2- / 4- / 6- / 8-
Channel Audio Function Introduction 89 4-2 Troubleshooting 94 - 8 - Chapter 3 Drivers Installation 55 3-1 Install Chipset Drivers 55 3-2 SoftwareApplications 56 3-3 Driver CD Information 56 3-4 Hardware Information 57 3-5 Contact Us ...57 Chapter 4 Appendix 59 4-1 Unique Software Utilities 59 4-1-1 EasyTune 5 Introduction 60 4-1-2 Xpress Recovery Introduction 61 4-1-3 Flash BIOS Method Introduction 64 4-1-4 Serial ATA BIOS Setting Utility Introduction 75 4-1-5 Configuring the Onboard Wireless LAN 87 4-1-6 2- / 4- / 6- / 8-

Manual
Page 20
... on the computer, if necessary, setup BIOS utility of the expansion card. 6. GA-8AENXP-DW Motherboard - 20 - Remove your computer's chassis cover, screws and slot bracket from the operating system. Be sure the metal contacts on the slot. Install related driver from the computer. 3. Make sure your VGA card is locked by following the...
... on the computer, if necessary, setup BIOS utility of the expansion card. 6. GA-8AENXP-DW Motherboard - 20 - Remove your computer's chassis cover, screws and slot bracket from the operating system. Be sure the metal contacts on the slot. Install related driver from the computer. 3. Make sure your VGA card is locked by following the...

Manual
Page 22
...compressed AC3 data to this connector. Line In Devices like CD-ROM, walkman etc. Rear Speaker Out Connect the rear surround speakers to this connector. GA-8AENXP-DW Motherboard - 22 - have a standard USB interface. For more information please contact your device has digital output function. Side Speaker Out Connect the side... allows connection of 10/100/1000Mbps. If your OS does not support USB controller, please contact OS vendor for possible patch or driver upgrade. Center/Subwoofer Speaker Out Connect the Center/Subwoofer speakers to the right port (purple).
...compressed AC3 data to this connector. Line In Devices like CD-ROM, walkman etc. Rear Speaker Out Connect the rear surround speakers to this connector. GA-8AENXP-DW Motherboard - 22 - have a standard USB interface. For more information please contact your device has digital output function. Side Speaker Out Connect the side... allows connection of 10/100/1000Mbps. If your OS does not support USB controller, please contact OS vendor for possible patch or driver upgrade. Center/Subwoofer Speaker Out Connect the Center/Subwoofer speakers to the right port (purple).

Manual
Page 27
Please refer to the BIOS setting for the Serial ATA II and install the proper driver in order to work properly. 1 7 SATA_SB (Controlled by ICH6R) 1 7 Pin No. 1 2 3 4 5 6 7 Definition GND TXP TXN GND RXN RXP GND SATA_SII (Controlled by SiI3114) 11) SATA0_PR/..., Controlled by PDC20779) Serial ATA II can provide 150MB/s transfer rate. Please refer to the BIOS setting for the Serial ATA and install the proper driver in order to work properly. 7 1 SATA_PR (Controlled by PDC20779) Pin No. 1 2 3 4 5 6 7 Definition GND TXP TXN GND RXN RXP GND - 27 - Hardware Installation...
Please refer to the BIOS setting for the Serial ATA II and install the proper driver in order to work properly. 1 7 SATA_SB (Controlled by ICH6R) 1 7 Pin No. 1 2 3 4 5 6 7 Definition GND TXP TXN GND RXN RXP GND SATA_SII (Controlled by SiI3114) 11) SATA0_PR/..., Controlled by PDC20779) Serial ATA II can provide 150MB/s transfer rate. Please refer to the BIOS setting for the Serial ATA and install the proper driver in order to work properly. 7 1 SATA_PR (Controlled by PDC20779) Pin No. 1 2 3 4 5 6 7 Definition GND TXP TXN GND RXN RXP GND - 27 - Hardware Installation...

Manual
Page 55
...can press "Xpress Install" to install all the drivers that came with your motherboard into your CD-ROM drive, the driver CD-title will show the installation guide. Insert the driver CD-title that recommended to install other drivers. If not, please double click the CD-ROM...system and then list all items defaulted. English Chapter 3 Drivers Installation Pictures below are shown in "My computer", and execute the Run.exe. 3-1 Install Chipset Drivers After insert the driver CD, "Xpress Install" will auto-detect the right USB2.0 driver). - 55 - After install Windows Service Pack, it ...
...can press "Xpress Install" to install all the drivers that came with your motherboard into your CD-ROM drive, the driver CD-title will show the installation guide. Insert the driver CD-title that recommended to install other drivers. If not, please double click the CD-ROM...system and then list all items defaulted. English Chapter 3 Drivers Installation Pictures below are shown in "My computer", and execute the Run.exe. 3-1 Install Chipset Drivers After insert the driver CD, "Xpress Install" will auto-detect the right USB2.0 driver). - 55 - After install Windows Service Pack, it ...

Manual
Page 56
GA-8AENXP-DW Motherboard - 56 - English 3-2 Software Applications This page displays all the tools that Gigabyte developed and some free software, you can choose anyone you want and press "install" to install them. 3-3 Driver CD Information This page lists the contents of software and drivers in this CD-title.
GA-8AENXP-DW Motherboard - 56 - English 3-2 Software Applications This page displays all the tools that Gigabyte developed and some free software, you can choose anyone you want and press "install" to install them. 3-3 Driver CD Information This page lists the contents of software and drivers in this CD-title.

Manual
Page 57
Drivers Installation English 3-4 Hardware Information This page lists all device you have for this motherboard. 3-5 Contact Us Please see the last page for details. - 57 -
Drivers Installation English 3-4 Hardware Information This page lists all device you have for this motherboard. 3-5 Contact Us Please see the last page for details. - 57 -

Manual
Page 59
... Booster 2 (M.I .B. 2 features. M.I.T. (Motherboard Intelligent Tweaker) Motherboard Intelligent Tweaker (M.I .A. 2) is returned to maximize system performance. C.I.A.2 (CPU Intelligent Accelerator 2) GIGABYTE CPU Intelligent Accelerator 2(C.I .T.) allows user to access and change system settings such as the latest drivers for a faster and smoother execution of all model support these Unique Software Utilities, please check your MB features...
... Booster 2 (M.I .B. 2 features. M.I.T. (Motherboard Intelligent Tweaker) Motherboard Intelligent Tweaker (M.I .A. 2) is returned to maximize system performance. C.I.A.2 (CPU Intelligent Accelerator 2) GIGABYTE CPU Intelligent Accelerator 2(C.I .T.) allows user to access and change system settings such as the latest drivers for a faster and smoother execution of all model support these Unique Software Utilities, please check your MB features...

Manual
Page 61
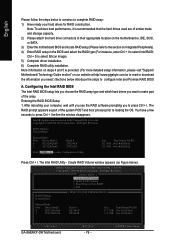
... is backed up and restore an OS partition. Allows installation of the screen. Must be set to the IDE1 Master 3. How to its size. 6. GIGABYTE Technology CO. , Ltd. 1. If the hard drive is not working properly, the user can also function by pressing the F9 key during computer power ...on. . . When the boot partition is Xpress Recovery ? Insert the provided driver CD into your CD drive, then save and exit the BIOS menu. Once you have completed this step, subsequent access to back up , please do...
... is backed up and restore an OS partition. Allows installation of the screen. Must be set to the IDE1 Master 3. How to its size. 6. GIGABYTE Technology CO. , Ltd. 1. If the hard drive is not working properly, the user can also function by pressing the F9 key during computer power ...on. . . When the boot partition is Xpress Recovery ? Insert the provided driver CD into your CD drive, then save and exit the BIOS menu. Once you have completed this step, subsequent access to back up , please do...

Manual
Page 62
...-6A69YG01C-00 F9 For Xpress Recovery Xpress Recovery V1.0 (C) Copy Right 2003. Execute Restore Utility 3. GA-8AENXP-DW Motherboard - 62 - GIGABYTE Technology CO. , Ltd. 1. It is recommended that Xpress Recovery be immediately installed after OS and all required driver and software installations are complete. If you have already entered Xpress Recovery by booting from the...
...-6A69YG01C-00 F9 For Xpress Recovery Xpress Recovery V1.0 (C) Copy Right 2003. Execute Restore Utility 3. GA-8AENXP-DW Motherboard - 62 - GIGABYTE Technology CO. , Ltd. 1. It is recommended that Xpress Recovery be immediately installed after OS and all required driver and software installations are complete. If you have already entered Xpress Recovery by booting from the...
Manual
Page 76
...RAID Volumes : None Defined. [ DISK/VOLUME INFORMATION ] Physical Disks : Port Driver Model 0 ST3120026AS 1 ST3120026AS Serial # 3JT354CP 3JT329JX Size Type/Status(Vol ID) 111.7GB Non-RAID Disk 111.7GB Non-RAID Disk [ ]-Select GA-8AENXP-DW Motherboard [ESC]-Exit - 76 - [ENTER]-Select Menu More information on steps 4..., or SATA. 3) Enter the motherboard BIOS and locate RAID setup (Please refer to the section on our website at http:\\www.gigabyte.com.tw to read or download the information you want to make and storage capacity. 2) Please attach the hard drive connectors to press...
...RAID Volumes : None Defined. [ DISK/VOLUME INFORMATION ] Physical Disks : Port Driver Model 0 ST3120026AS 1 ST3120026AS Serial # 3JT354CP 3JT329JX Size Type/Status(Vol ID) 111.7GB Non-RAID Disk 111.7GB Non-RAID Disk [ ]-Select GA-8AENXP-DW Motherboard [ESC]-Exit - 76 - [ENTER]-Select Menu More information on steps 4..., or SATA. 3) Enter the motherboard BIOS and locate RAID setup (Please refer to the section on our website at http:\\www.gigabyte.com.tw to read or download the information you want to make and storage capacity. 2) Please attach the hard drive connectors to press...

Manual
Page 80
...Normal Bootable Yes Physical Disks : Port Driver Model 0 ST3120026AS 1 ST3120026AS Serial # 3JT354CP 3JT329JX Size Type/Status(Vol ID) 111.7GB Member Disk(0) 111.7GB Member Disk(0) [ ]-Select [ESC]-Exit [ENTER]-Select Menu GA-8AENXP-DW Motherboard - 80 - Intel(R) Application ... 0 RAID_Volume0 [ DISK/VOLUME INFORMATION ] Level RAID(Stripe) Strip 128KB Size Status 223.5GB Normal Bootable Yes Physical Disks : Port Driver Model 0 ST3120026AS 1 ST3120026AS Serial # 3JT354CP 3JT329JX Size Type/Status(Vol ID) 111.7GB Member Disk(0) 111.7GB Member Disk(0) ...
...Normal Bootable Yes Physical Disks : Port Driver Model 0 ST3120026AS 1 ST3120026AS Serial # 3JT354CP 3JT329JX Size Type/Status(Vol ID) 111.7GB Member Disk(0) 111.7GB Member Disk(0) [ ]-Select [ESC]-Exit [ENTER]-Select Menu GA-8AENXP-DW Motherboard - 80 - Intel(R) Application ... 0 RAID_Volume0 [ DISK/VOLUME INFORMATION ] Level RAID(Stripe) Strip 128KB Size Status 223.5GB Normal Bootable Yes Physical Disks : Port Driver Model 0 ST3120026AS 1 ST3120026AS Serial # 3JT354CP 3JT329JX Size Type/Status(Vol ID) 111.7GB Member Disk(0) 111.7GB Member Disk(0) ...

Manual
Page 86
... the SATA controller on your motherboard during the Windows setup process. When install Windows 2000 or Windows XP from the motherboard driver CD to a floppy disk. GA-8AENXP-DW Motherboard - 86 - See the instructions below about how to My Computer and right-click the CD-ROM icon (This procedure ...assumes Drive D) and select Open. Step 1: Find an available Operation System and insert the motherboard driver CD into the floppy disk drive. ...
... the SATA controller on your motherboard during the Windows setup process. When install Windows 2000 or Windows XP from the motherboard driver CD to a floppy disk. GA-8AENXP-DW Motherboard - 86 - See the instructions below about how to My Computer and right-click the CD-ROM icon (This procedure ...assumes Drive D) and select Open. Step 1: Find an available Operation System and insert the motherboard driver CD into the floppy disk drive. ...

Manual
Page 87
...not, browse to the /Utility folder on your Desktop PC's CD-ROM Drive. C. The Welcome Screen will open . Click Install Wireless Driver and Utility. Confirm the message below by clicking OK, and if you see a screen which says "This Hardware has not Passed Windows Logo... Anyway. - 87 - D. Before we suggest you disable them now. Install Shield will automati cally open . Setup proceeds with Wireless LAN driver installation. English 4-1-5 Configuring the Onboard Wireless LAN This section has been designed to proceed with Wireless Adapter installation. Insert your Setup CD into ...
...not, browse to the /Utility folder on your Desktop PC's CD-ROM Drive. C. The Welcome Screen will open . Click Install Wireless Driver and Utility. Confirm the message below by clicking OK, and if you see a screen which says "This Hardware has not Passed Windows Logo... Anyway. - 87 - D. Before we suggest you disable them now. Install Shield will automati cally open . Setup proceeds with Wireless LAN driver installation. English 4-1-5 Configuring the Onboard Wireless LAN This section has been designed to proceed with Wireless Adapter installation. Insert your Setup CD into ...

Manual
Page 88
English E. The installation of your system tray. Congratulations. GA-8AENXP-DW Motherboard - 88 - After fully installing the Adapter Driver and Utility, the Wireless LAN bubble and the Wireless Utility quick start icon (represented by 4 green bars) appear in your Wireless LAN feature is complete!... Manual in the Wireless Utility, please refer to your onboard Wireless LAN and the Wireless Utility, please download the Wireless LAN user manual for the GA-8AENXP-DW motherboard from www.gigabyte.com.tw. For more information on how to use the advanced features found in PDF format at...
English E. The installation of your system tray. Congratulations. GA-8AENXP-DW Motherboard - 88 - After fully installing the Adapter Driver and Utility, the Wireless LAN bubble and the Wireless Utility quick start icon (represented by 4 green bars) appear in your Wireless LAN feature is complete!... Manual in the Wireless Utility, please refer to your onboard Wireless LAN and the Wireless Utility, please download the Wireless LAN user manual for the GA-8AENXP-DW motherboard from www.gigabyte.com.tw. For more information on how to use the advanced features found in PDF format at...

Manual
Page 89
... steps to install the function.(Following pictures are able to use the speaker with amplifier to Line Out (Front Speaker Out). Introduction of the audio driver, you find a Sound Effect icon on the lower right hand taskbar. Stereo Speakers Connection and Settings: We recommend that you 'll not be connected to...
... steps to install the function.(Following pictures are able to use the speaker with amplifier to Line Out (Front Speaker Out). Introduction of the audio driver, you find a Sound Effect icon on the lower right hand taskbar. Stereo Speakers Connection and Settings: We recommend that you 'll not be connected to...
Manual
Page 90
... driver, you find a Sound Effect icon on the lower right hand taskbar. STEP 3: Click "Speaker Configuration" then click on the left selection bar and select "2CH Speaker" to complete 2 channel audio configuration. 4 Channel Audio Setup STEP 1 : Connect the front channels to "Front Speaker Out", the rear channels to "Rear Speaker Out". GA-8AENXP-DW...
... driver, you find a Sound Effect icon on the lower right hand taskbar. STEP 3: Click "Speaker Configuration" then click on the left selection bar and select "2CH Speaker" to complete 2 channel audio configuration. 4 Channel Audio Setup STEP 1 : Connect the front channels to "Front Speaker Out", the rear channels to "Rear Speaker Out". GA-8AENXP-DW...
Manual
Page 91
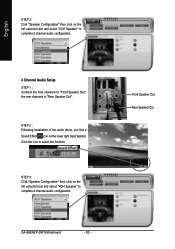
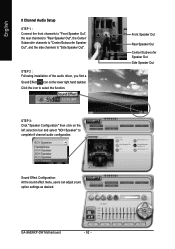
STEP 3: Click "Speaker Configuration" then click on the lower right hand taskbar. Front Speaker Out Rear Speaker Out Center/Subwoofer Speaker Out - 91 - English 6 Channel Audio Setup STEP 1 : Connect the front channels to "Front Speaker Out", the rear channels to "Rear Speaker Out", and the Center/Subwoofer channels to complete 6 channel audio configuration. Appendix Click the icon to select the function. STEP 2 : Following installation of the audio driver, you find a Sound Effect icon on the left selection bar and select "6CH Speaker" to "Center/Subwoofer Speaker Out".
STEP 3: Click "Speaker Configuration" then click on the lower right hand taskbar. Front Speaker Out Rear Speaker Out Center/Subwoofer Speaker Out - 91 - English 6 Channel Audio Setup STEP 1 : Connect the front channels to "Front Speaker Out", the rear channels to "Rear Speaker Out", and the Center/Subwoofer channels to complete 6 channel audio configuration. Appendix Click the icon to select the function. STEP 2 : Following installation of the audio driver, you find a Sound Effect icon on the left selection bar and select "6CH Speaker" to "Center/Subwoofer Speaker Out".
Manual
Page 92
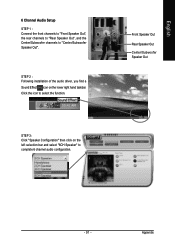
... right hand taskbar. STEP 2 : Following installation of the audio driver, you find a Sound Effect icon on the left selection bar and select "8CH Speaker" to complete 8 channel audio configuration. Front Speaker Out Rear Speaker Out Center/Subwoofer Speaker Out Side Speaker Out GA-8AENXP-DW Motherboard - 92 - Sound Effect Configuration: At the sound effect...
... right hand taskbar. STEP 2 : Following installation of the audio driver, you find a Sound Effect icon on the left selection bar and select "8CH Speaker" to complete 8 channel audio configuration. Front Speaker Out Rear Speaker Out Center/Subwoofer Speaker Out Side Speaker Out GA-8AENXP-DW Motherboard - 92 - Sound Effect Configuration: At the sound effect...


