
Manual
Page 3
For product-related information, check on our website at: http://www.gigabyte.com Identifying Your Motherboard Revision The revision number on your motherboard revision before updating motherboard BIOS, drivers, or when looking for technical information. No part of the product, read the Quick Installation Guide included with the product. For detailed product...
For product-related information, check on our website at: http://www.gigabyte.com Identifying Your Motherboard Revision The revision number on your motherboard revision before updating motherboard BIOS, drivers, or when looking for technical information. No part of the product, read the Quick Installation Guide included with the product. For detailed product...

Manual
Page 5
... 55 3-1 Installing Chipset Drivers 55 3-2 Application Software 56 3-3 Technical Manuals 56 3-4 Contact...57 3-5 System...57 3-6 Download Center 58 3-7 New Utilities...58 Chapter 4 Unique Features 59 4-1 Xpress ...4-7 Auto Green...71 4-8 Cloud OC...72 Chapter 5 Appendix...73 5-1 Configuring SATA Hard Drive(s 73 5-1-1 Configuring SATA Controllers 73 5-1-2 Installing the SATA RAID/AHCI Driver and Operating System 79 5-2 Configuring Audio Input and Output 83 5-2-1 Configuring 2/4/5.1/7.1-Channel Audio 83 5-2-2 Configuring S/PDIF In/Out 85 5-2-3 Configuring Microphone Recording 87 5-2-4 ...
... 55 3-1 Installing Chipset Drivers 55 3-2 Application Software 56 3-3 Technical Manuals 56 3-4 Contact...57 3-5 System...57 3-6 Download Center 58 3-7 New Utilities...58 Chapter 4 Unique Features 59 4-1 Xpress ...4-7 Auto Green...71 4-8 Cloud OC...72 Chapter 5 Appendix...73 5-1 Configuring SATA Hard Drive(s 73 5-1-1 Configuring SATA Controllers 73 5-1-2 Installing the SATA RAID/AHCI Driver and Operating System 79 5-2 Configuring Audio Input and Output 83 5-2-1 Configuring 2/4/5.1/7.1-Channel Audio 83 5-2-2 Configuring S/PDIF In/Out 85 5-2-3 Configuring Microphone Recording 87 5-2-4 ...
Manual
Page 6
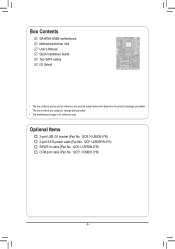
Optional Items 2-port USB 2.0 bracket (Part No. 12CR1-1UB030-5*R) 2-port SATA power cable (Part No. 12CF1-2SERPW-0*R) S/PDIF In cable (Part No. 12CR1-1SPDIN-0*R) COM port cable (Part No. 12CF1-1CM001-3*R) - 6 - The box contents are for reference only. Box Contents GA-870A-USB3 motherboard Motherboard driver disk User's Manual Quick Installation Guide Two SATA cables I/O Shield • The box contents above are subject to change without notice. • The motherboard image is for reference only and the actual items shall depend on the product package you obtain.
Optional Items 2-port USB 2.0 bracket (Part No. 12CR1-1UB030-5*R) 2-port SATA power cable (Part No. 12CF1-2SERPW-0*R) S/PDIF In cable (Part No. 12CR1-1SPDIN-0*R) COM port cable (Part No. 12CF1-1CM001-3*R) - 6 - The box contents are for reference only. Box Contents GA-870A-USB3 motherboard Motherboard driver disk User's Manual Quick Installation Guide Two SATA cables I/O Shield • The box contents above are subject to change without notice. • The motherboard image is for reference only and the actual items shall depend on the product package you obtain.

Manual
Page 18
... an expansion slot that came with a screw. 5. Make sure the metal contacts on the card until it is fully inserted into the slot. 4. Install the driver provided with the slot, and press down on your card. Align the card with the expansion card in the slot. 3. Secure the card's metal bracket...
... an expansion slot that came with a screw. 5. Make sure the metal contacts on the card until it is fully inserted into the slot. 4. Install the driver provided with the slot, and press down on your card. Align the card with the expansion card in the slot. 3. Secure the card's metal bracket...

Manual
Page 32
The LOGO Screen (Default) Function Keys B. AMD 870 BIOS for GA-870A-USB3 D2 . . . . : BIOS Setup : XpressRecovery2 : Boot Menu : Qflash 12/20/2010-RX870-SB850-7A66CG0FC-00 Function Keys Function Keys: : POST SCREEN Press the key to show ... effective for subsequent access to access the Q-Flash utility directly without entering BIOS Setup. In Boot Menu, use the up hard drive data using the driver disk, the key can access Boot Menu again to change the first boot device setting as needed. : Q-FLASH Press the key to Xpress Recovery2 during...
The LOGO Screen (Default) Function Keys B. AMD 870 BIOS for GA-870A-USB3 D2 . . . . : BIOS Setup : XpressRecovery2 : Boot Menu : Qflash 12/20/2010-RX870-SB850-7A66CG0FC-00 Function Keys Function Keys: : POST SCREEN Press the key to show ... effective for subsequent access to access the Q-Flash utility directly without entering BIOS Setup. In Boot Menu, use the up hard drive data using the driver disk, the key can access Boot Menu again to change the first boot device setting as needed. : Q-FLASH Press the key to Xpress Recovery2 during...
Manual
Page 41
... fixed. With virtualization, one computer system can function as multiple virtual systems. (Default: Disabled) AMD K8 Cool&Quiet control Auto Lets the AMD Cool'n'Quiet driver dynamically adjust the CPU clock and VID to enable all CPU cores (number of cores available depends on the CPU being used). CPU core 0 This...
... fixed. With virtualization, one computer system can function as multiple virtual systems. (Default: Disabled) AMD K8 Cool&Quiet control Auto Lets the AMD Cool'n'Quiet driver dynamically adjust the CPU clock and VID to enable all CPU cores (number of cores available depends on the CPU being used). CPU core 0 This...
Manual
Page 43
...will operate in Native IDE mode. (Default) Enable Native IDE mode if you wish to install operating systems that allows the storage driver to RAID or AHCI. BIOS Setup Native IDE Allows the SATA controller to operate in SATA 3Gb/s mode. (Default: Enabled)...set to enable advanced Serial ATA features such as ESP Onboard LAN Function Onboard LAN Boot ROM } SMART LAN Onboard Audio Function Onboard USB3.0 Controller USB Controllers USB Legacy Function USB Storage Function Onboard Serial Port 1 [Enabled] [Native IDE] IDE Enabled [Enabled] Press Enter...
...will operate in Native IDE mode. (Default) Enable Native IDE mode if you wish to install operating systems that allows the storage driver to RAID or AHCI. BIOS Setup Native IDE Allows the SATA controller to operate in SATA 3Gb/s mode. (Default: Enabled)...set to enable advanced Serial ATA features such as ESP Onboard LAN Function Onboard LAN Boot ROM } SMART LAN Onboard Audio Function Onboard USB3.0 Controller USB Controllers USB Legacy Function USB Storage Function Onboard Serial Port 1 [Enabled] [Native IDE] IDE Enabled [Enabled] Press Enter...

Manual
Page 55
...(es) (e.g. After the system restart, "Xpress Install" will continue to install on the Application Software page later. • For USB 2.0 driver support under the Windows XP operating system, please install the Windows XP Service Pack 1 or later. Or click Install Single Items to manually select... then list all the drivers that shown in Device Manager, please remove the question mark (by right-clicking your mouse and select Uninstall) and restart the system. (The system will restart your optical drive. Click Yes to install new GIGABYTE utilities. The driver Autorun screen is installing ...
...(es) (e.g. After the system restart, "Xpress Install" will continue to install on the Application Software page later. • For USB 2.0 driver support under the Windows XP operating system, please install the Windows XP Service Pack 1 or later. Or click Install Single Items to manually select... then list all the drivers that shown in Device Manager, please remove the question mark (by right-clicking your mouse and select Uninstall) and restart the system. (The system will restart your optical drive. Click Yes to install new GIGABYTE utilities. The driver Autorun screen is installing ...

Manual
Page 56
Drivers Installation - 56 - 3-2 Application Software This page displays all the utilities and applications that GIGABYTE develops and some free software. You can click the Install button on the right of an item to install it. 3-3 Technical Manuals This page provides GIGABYTE's application guides, content descriptions for this driver disk, and the motherboard manuals.
Drivers Installation - 56 - 3-2 Application Software This page displays all the utilities and applications that GIGABYTE develops and some free software. You can click the Install button on the right of an item to install it. 3-3 Technical Manuals This page provides GIGABYTE's application guides, content descriptions for this driver disk, and the motherboard manuals.

Manual
Page 57
3-4 Contact For the detailed contact information of the GIGABYTE Taiwan headquarter or worldwide branch offices, click the URL on this page to link to the GIGABYTE website. 3-5 System This page provides the basic system information. - 57 - Drivers Installation
3-4 Contact For the detailed contact information of the GIGABYTE Taiwan headquarter or worldwide branch offices, click the URL on this page to link to the GIGABYTE website. 3-5 System This page provides the basic system information. - 57 - Drivers Installation

Manual
Page 58
The latest version of an item to install it. Drivers Installation - 58 - You can click the Install button on the right of the BIOS, drivers, or applications will be displayed. 3-7 New Utilities This page provides a quick link to GIGABYTE's lately developed utilities for users to the GIGABYTE website. 3-6 Download Center To update the BIOS, drivers, or applications, click the Download Center button to link to install.
The latest version of an item to install it. Drivers Installation - 58 - You can click the Install button on the right of the BIOS, drivers, or applications will be displayed. 3-7 New Utilities This page provides a quick link to GIGABYTE's lately developed utilities for users to the GIGABYTE website. 3-6 Download Center To update the BIOS, drivers, or applications, click the Download Center button to link to install.

Manual
Page 59
... hard drives are not supported. • Hard drives in RAID/AHCI mode are attached to back up your system soon after the operating system and drivers are different utilities. actual size requirements vary, depending on your system to back up data on the first SATA connector is the first physical drive...
... hard drives are not supported. • Hard drives in RAID/AHCI mode are attached to back up your system soon after the operating system and drivers are different utilities. actual size requirements vary, depending on your system to back up data on the first SATA connector is the first physical drive...

Manual
Page 60
.... C. Unique Features - 60 - actual size requirements vary, depending on the amount of data) and begin the installation of the operating system. Boot from the motherboard driver disk to enter Xpress Recovery2 later, simply press during the POST. After you use the backup function in your hard drive.
.... C. Unique Features - 60 - actual size requirements vary, depending on the amount of data) and begin the installation of the operating system. Boot from the motherboard driver disk to enter Xpress Recovery2 later, simply press during the POST. After you use the backup function in your hard drive.

Manual
Page 69
... Description Displays the computers with computers on this icon Figure 1. Directions for using Q-Share After installing Q-Share from the motherboard driver disk, go to configure the data sharing settings. After configuring your LAN connection settings and Q-Share, you are able to ..., making full use of Internet resources. Enable Incoming Folder ... Unique Features Find the Q-Share icon to Start>All Programs>GIGABYTE>Q-Share. Disable Incoming Folder ... exe to be shared (Note) Updates Q-Share online Displays the current Q-Share version Exits ...
... Description Displays the computers with computers on this icon Figure 1. Directions for using Q-Share After installing Q-Share from the motherboard driver disk, go to configure the data sharing settings. After configuring your LAN connection settings and Q-Share, you are able to ..., making full use of Internet resources. Enable Incoming Folder ... Unique Features Find the Q-Share icon to Start>All Programs>GIGABYTE>Q-Share. Disable Incoming Folder ... exe to be shared (Note) Updates Q-Share online Displays the current Q-Share version Exits ...

Manual
Page 73
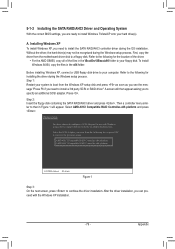
Install the SATA RAID/AHCI driver (Note 2) and operating system. Appendix C. Before you begin Please prepare: • At least two SATA hard drives (to ensure optimal performance, it is set to ... create RAID array on the motherboard. Install SATA hard drive(s) in your computer Attach one hard drive. • Windows 7/Vista/XP setup disk. • Motherboard driver disk. 5-1-1 Configuring SATA Controllers A. B. Then connect the power connector from your computer. Configure a RAID array in BIOS Setup. Chapter 5 Appendix 5-1 Configuring SATA Hard Drive(s) To...
Install the SATA RAID/AHCI driver (Note 2) and operating system. Appendix C. Before you begin Please prepare: • At least two SATA hard drives (to ensure optimal performance, it is set to ... create RAID array on the motherboard. Install SATA hard drive(s) in your computer Attach one hard drive. • Windows 7/Vista/XP setup disk. • Motherboard driver disk. 5-1-1 Configuring SATA Controllers A. B. Then connect the power connector from your computer. Configure a RAID array in BIOS Setup. Chapter 5 Appendix 5-1 Configuring SATA Hard Drive(s) To...
Manual
Page 79
...be recognized during the Windows setup process. Select the SCSI Adapter you need to the following for installing the driver during the Windows setup process. After the driver installation, you are ready to install Windows 7/Vista/XP onto your system to boot from the Windows XP setup...System With the correct BIOS settings, you can proceed with Windows, using a device support disk provided by an adapter manufacturer. First, copy the driver from the following list, or press ESC to return to a floppy disk. Step 1: Restart your hard drive(s). A screen will appear. AMD ...
...be recognized during the Windows setup process. Select the SCSI Adapter you need to the following for installing the driver during the Windows setup process. After the driver installation, you are ready to install Windows 7/Vista/XP onto your system to boot from the Windows XP setup...System With the correct BIOS settings, you can proceed with Windows, using a device support disk provided by an adapter manufacturer. First, copy the driver from the following list, or press ESC to return to a floppy disk. Step 1: Restart your hard drive(s). A screen will appear. AMD ...

Manual
Page 80
... appears (RAID hard drive will not be sure to that below assumes that contains the SATA RAID/AHCI driver (Method B), then specify the location of the driver (Figure 3). Method A: Insert the motherboard driver disk into your system and browse to the following directory: \BootDrv\SBxxxW7\RAID\W7 For Windows 7 64...Method A) or the removable storage device such as USB flash drive that only one RAID array exists in your system to boot from the motherboard driver disk to a USB flash drive before installing Windows 7 (go to the BootDrv folder and save the whole SBxxxW7 folder to the W7 (for ...
... appears (RAID hard drive will not be sure to that below assumes that contains the SATA RAID/AHCI driver (Method B), then specify the location of the driver (Figure 3). Method A: Insert the motherboard driver disk into your system and browse to the following directory: \BootDrv\SBxxxW7\RAID\W7 For Windows 7 64...Method A) or the removable storage device such as USB flash drive that only one RAID array exists in your system to boot from the motherboard driver disk to a USB flash drive before installing Windows 7 (go to the BootDrv folder and save the whole SBxxxW7 folder to the W7 (for ...

Manual
Page 81
Figure 5 - 81 - Figure 4 Step 4: After the driver is loaded, the RAID drive will appear. Select the RAID drive and then click Next to continue the OS installation (Figure 5). Appendix Step 3: When a screen as shown in Figure 4 appears, select AMD AHCI Compatible RAID Controller and click Next.
Figure 5 - 81 - Figure 4 Step 4: After the driver is loaded, the RAID drive will appear. Select the RAID drive and then click Next to continue the OS installation (Figure 5). Appendix Step 3: When a screen as shown in Figure 4 appears, select AMD AHCI Compatible RAID Controller and click Next.

Manual
Page 82
... Start Menu. Step 1: Enter the login ID and password (default: "admin"), and then click Sign in to a hard drive from the motherboard driver disk. Appendix Step 5: When done, the array's status on the screen and you can select Pause/Resume/Abort during the rebuilding process. To replace... the old drive, make sure the chipset drivers have been installed from other drives in the Logical Drive Information pane. Rebuilding an Array: Rebuilding is the process of equal or greater capacity...
... Start Menu. Step 1: Enter the login ID and password (default: "admin"), and then click Sign in to a hard drive from the motherboard driver disk. Appendix Step 5: When done, the array's status on the screen and you can select Pause/Resume/Abort during the rebuilding process. To replace... the old drive, make sure the chipset drivers have been installed from other drives in the Logical Drive Information pane. Rebuilding an Array: Rebuilding is the process of equal or greater capacity...

Manual
Page 83
...For example, in and out) to the following instructions use Windows 7 as the example operating system.) Step 1: After installing the audio driver, the HD Audio Manager icon will be simultaneously processed. If you can listen to instructions on the back panel which support 2/4/5.1/7.1-channel (...Note) audio. Configuring Speakers (The following for each jack through the audio driver. Appendix woofer speaker out jack, you want to mute the back panel audio (only supported when using an HD front panel audio...
...For example, in and out) to the following instructions use Windows 7 as the example operating system.) Step 1: After installing the audio driver, the HD Audio Manager icon will be simultaneously processed. If you can listen to instructions on the back panel which support 2/4/5.1/7.1-channel (...Note) audio. Configuring Speakers (The following for each jack through the audio driver. Appendix woofer speaker out jack, you want to mute the back panel audio (only supported when using an HD front panel audio...


