Gigabyte GA-7NNXPV Support and Manuals
Get Help and Manuals for this Gigabyte item
View All Support Options Below
Free Gigabyte GA-7NNXPV manuals!
Problems with Gigabyte GA-7NNXPV?
Ask a Question
Free Gigabyte GA-7NNXPV manuals!
Problems with Gigabyte GA-7NNXPV?
Ask a Question
Popular Gigabyte GA-7NNXPV Manual Pages
Manual - Page 2
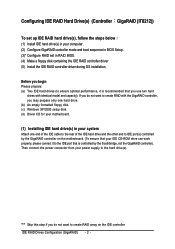
... hard drive(s), follow the steps below
¤å
(1) Install IDE hard drive(s) in your computer.
(2) Configure GigaRAID controller mode and boot sequence in BIOS Setup.
(3)* Configure RAID set in your system
Attach one hard drive. (b) An empty formatted floppy disk. (c) Windows XP/2000 setup disk. (d) Driver CD for your IDE CD-ROM drive can work...
Manual - Page 4
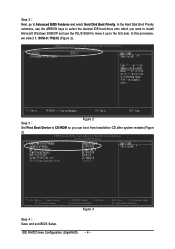
SCSI-0: IT8212 (Figure 2).
¤å
CMOS Setup Utility-Copyright (C) 1984-2004 Award Software
Hard Disk Boot Priority
Step 3
Figure 2
Set First Boot Device to CD-ROM so you want to install
¤¤
Microsoft Windows 2000/XP and use the ARROW keys to Advanced BIOS Features and select Hard Disk Boot Priority.
Ác
Step...
Manual - Page 14
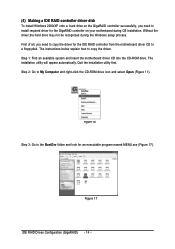
... Drives Configuration (GigaRAID) - 14 -
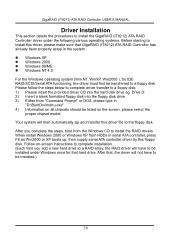
Quit the installation utility first. The instructions below explain how to the BootDrv folder and look for an executable program named MENU.exe (Figure 17). The installation utility will appear automatically. Figure 16 Step 3: Go to copy the driver. Without the
¤¤
driver,the hard drive may not be recognized...
Manual - Page 12
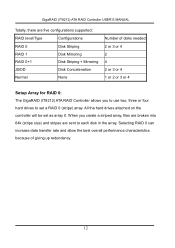
... 0 (stripe) array. GigaRAID (IT8212) ATA RAID Controller USER'S MANUAL
Totally, there are sent to set as array 0. Selecting RAID 0 can increase data transfer rate and allow the best overall performance characteristics because of disks needed 2 or 3 or 4 2 4 2 or 3 or 4 1 or 2 or 3 or 4
Setup Array for RAID 0: The GigaRAID (IT8212) ATA RAID Controller allows...
Manual - Page 38
... the hard disk drive eg. When install Windows 2000 or Windows XP from the Windows CD to be listed on -screen instructions to complete installation. (Each time you complete the steps...please select the proper chipset model. Your system will have to install the RAID drivers. After that GigaRAID (IT8212) ATA RAID Controller has already been properly setup in serial ATA controller, press...
Manual - Page 52

User should remove the device and reinstall.
52 If there is a marking ! or ? under SCSI and ATA RAID Controller device, it
indicates that the driver has not been correctly installed. GigaRAID (IT8212) ATA RAID Controller USER'S MANUAL 3.
Sil3112 SATARAID O.S. Installation Manual - Page 1

Table of Contents
Configuring SATA Hard Drive(s) (Controller: Silicon Image Sil3112 2 (1) Installing SATA hard drive(s) in your system 2 (2) Configuring SATA controller mode and boot sequence in BIOS Setup 3 (3) Configuring RAID set in RAID BIOS 5 (4) Making a SATA controller driver disk 8 (5) Installing SATA controller driver during OS installation 10
Sil3112 SATARAID O.S. Installation Manual - Page 8

... an executable program named MENU.exe (Figure 11). Quit the installation utility first. Figure 11
SATA Hard Drive Configurations (Sil3112)
- 8 - Step 1: Find an available system and insert the motherboard driver CD into the CD-ROM drive.
Step 2: Go to copy the driver.
The instructions below explain how to My Computer and right-click the...
Sil3112 SATARAID O.S. Installation Manual - Page 10

... containing the SATA driver and press S. After pressing F6, there will be a few moments of Windows XP installation.
¤å
Step 1: Restart your SATA hard drive with the driver.
Ác
(5) Installing SATA controller driver during OS installation
Åé
Now that you have prepared a floppy disk with the SATA controller driver and configured BIOS settings, you see
the...
User Manual - Page 1

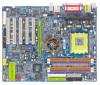
...with AGP 4X(1.5V) specification. The GA-7NNXPV / GA-7NNXP / GA-7N400V Pro / GA-7N400 Pro / GA-7N400L1 (or any AGP Pro 4X/8X only) motherboards might not function properly, If you install this card is fully ...they support 2X(3.3V) only. Please insert an AGP Pro 4X/8X card. The factory default for this card without switching the jumper to boot up normally. Note : Although Gigabyte's ...
User Manual - Page 30

... are able to "MIC Out ".
English
\ Audio Connectors
Line In (Rear Speaker) Line Out (Front Speaker) MIC In (Center and Subwoofer)
After install onboard audio driver, you want to enable 6-channel function, you have 2 choose for 2-/4-/6-channel audio setup installation, please refer to page 86. Method2: You can be connected to Line-In jack.
User Manual - Page 36

...and install the correct driver to have proper operation.
If you high speed transfer rates (150MB/sec). a For GA-7N400V Pro only. @ For GA-7N400 Pro only. 5 For GA-7N400... manual.
1
7
SATA0
1
7
SATA1
Pin No. 1 2 3 4 5 6 7
Definition GND TXP TXN GND RXN RXP GND
Silicon Image Sil3112 chip supports Serial ATA connectors hot plug function.
‹ For GA-7NNXPV only. ™ For GA-...
User Manual - Page 65

..." state. (Default Value)
Full-On Memory
When AC-power back to the Last state before AC-power off.
- 61 - BIOS Setup
KB Power ON Password
When "Power On by Keyboard" set at Password, you can press the key to power on the system. When AC-power back to the system, the system will be...
User Manual - Page 73

... ` PC Health Status
` Frequency/Voltage Control Load Fail-Safe Defaults Load Optimized Defaults Set Supervisor Password Set User Password Save & Exit Setup Exit Without Saving
ESC: Quit
KLJI: Select Item
F8: Dual BIOS / Q-Flash
F10: Save & Exit Setup
Change/Set/Disable Password
Figure 12: Password Setting
When you select this function, the following message will appear to confirm the...
User Manual - Page 87

... the exact model name on your motherboard e.
Select @BIOS™ sever d.
System will automatically download and update the BIOS.
- 83 - English
Method 2 : @BIOS™ Utility
If you don't have DOS boot disk, we recommend that you used Gigabyte @BIOS™program to flash BIOS. Click Start/ Programs/ GIGABYTE/ @BIOS.
(1)
(2)
3.Click "3". Click "Update New BIOS" icon...
Gigabyte GA-7NNXPV Reviews
We have not received any reviews for Gigabyte yet.