
User Manual
Page 1
GA-7N400S / GA-7N400S-L AMD SempronTM / AthlonTM XP / AthlonTM / DuronTM Socket A Processor Motherboard User's Manual Rev. 1003 12ME-7N400S-1003
GA-7N400S / GA-7N400S-L AMD SempronTM / AthlonTM XP / AthlonTM / DuronTM Socket A Processor Motherboard User's Manual Rev. 1003 12ME-7N400S-1003

User Manual
Page 3
... features are legally registered to change without Gigabyte's prior written permission. The trademarks mentioned in the manual are subject to their respective companies. Product Manual Classification In order to assist in the use of Gigabyte. No part of this manual may be reproduced, copied, translated, or...with this product is the property of this product, Gigabyte has categorized the user manual in any form or by any means without prior notice. Fore more product details, please click onto Gigabyte's website at www.gigabyte.com.tw Copyright © 2004 GIGA-BYTE TECHNOLOGY ...
... features are legally registered to change without Gigabyte's prior written permission. The trademarks mentioned in the manual are subject to their respective companies. Product Manual Classification In order to assist in the use of Gigabyte. No part of this manual may be reproduced, copied, translated, or...with this product is the property of this product, Gigabyte has categorized the user manual in any form or by any means without prior notice. Fore more product details, please click onto Gigabyte's website at www.gigabyte.com.tw Copyright © 2004 GIGA-BYTE TECHNOLOGY ...

User Manual
Page 9
... electrostatic discharge (ESD). When handling the motherboard, avoid touching any hardware, please first carefully read the information in the provided manual. 3. Installation Notices 1. To prevent damage to the motherboard, please do not place the computer system on top of an ...1. Prior to the installation of the motherboard or any metal leads or connectors. 3. Hardware Installation Thus, prior to be an unofficial Gigabyte product. - 9 - If you are no leftover screws or metal components placed on the motherboard. Product determined to installation, please ...
... electrostatic discharge (ESD). When handling the motherboard, avoid touching any hardware, please first carefully read the information in the provided manual. 3. Installation Notices 1. To prevent damage to the motherboard, please do not place the computer system on top of an ...1. Prior to the installation of the motherboard or any metal leads or connectors. 3. Hardware Installation Thus, prior to be an unofficial Gigabyte product. - 9 - If you are no leftover screws or metal components placed on the motherboard. Product determined to installation, please ...

User Manual
Page 12
... CPU. To prevent such an occurrence, it socket, gently press the metal lever back into their holes. The heatsink may adhere to prevent CPU overheating. GA-7N400S(-L) Motherboard - 12 - Fig. 2 Please connect the heat sink power connector to the CPU_FAN connector located on the surface of the CPU. English 1-4-1 Installation of the... properly function to the CPU as a result of hardening of the heatsink paste. Install all the heat sink components (Please refer to the heat sink manual for heat dissipation or using extreme care when removing the heatsink.
... CPU. To prevent such an occurrence, it socket, gently press the metal lever back into their holes. The heatsink may adhere to prevent CPU overheating. GA-7N400S(-L) Motherboard - 12 - Fig. 2 Please connect the heat sink power connector to the CPU_FAN connector located on the surface of the CPU. English 1-4-1 Installation of the... properly function to the CPU as a result of hardening of the heatsink paste. Install all the heat sink components (Please refer to the heat sink manual for heat dissipation or using extreme care when removing the heatsink.
User Manual
Page 30
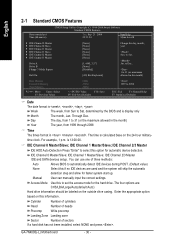
...(default:Auto) Hard drive information should be labeled on this if no IDE devices are used and the system will skip the automatic Manual detection step and allow for automatic device detection. time clock. IDE Channel 1 Master/Slave; Cylinder Number of cylinders Head Number of .... IDE Channel 0 Master/Slave; You can manually input the correct settings. Through Dec. Day The day, from 1 to 31 (or the maximum allowed in the month) Year The year, from Sun to Sat, determined by the BIOS and is 13:00:00. GA-7N400S(-L) Motherboard - 30 - Jan. IDE Channel ...
...(default:Auto) Hard drive information should be labeled on this if no IDE devices are used and the system will skip the automatic Manual detection step and allow for automatic device detection. time clock. IDE Channel 1 Master/Slave; Cylinder Number of cylinders Head Number of .... IDE Channel 0 Master/Slave; You can manually input the correct settings. Through Dec. Day The day, from 1 to 31 (or the maximum allowed in the month) Year The year, from Sun to Sat, determined by the BIOS and is 13:00:00. GA-7N400S(-L) Motherboard - 30 - Jan. IDE Channel ...

User Manual
Page 34
...Frequency (Note) By SPD Set memory frequency by SPD. (Default value) 50% ~ 200% Set memory frequency manually. GA-7N400S(-L) Motherboard - 34 - Manual Allows full customization of performance options. FSB Frequency 100MHz Set FSB frequency at 100MHz. (Default value) 133MHz Set FSB...` [Normal] Use the most stable settings. (Default value) Turbo Use overclock settings for higher performance but with higher risk of instability [Manual] Allows full customization of performance options Advanced users only KLJI: Move Enter: Select F5: Previous Values +/-/PU/PD: Value F10: Save ...
...Frequency (Note) By SPD Set memory frequency by SPD. (Default value) 50% ~ 200% Set memory frequency manually. GA-7N400S(-L) Motherboard - 34 - Manual Allows full customization of performance options. FSB Frequency 100MHz Set FSB frequency at 100MHz. (Default value) 133MHz Set FSB...` [Normal] Use the most stable settings. (Default value) Turbo Use overclock settings for higher performance but with higher risk of instability [Manual] Allows full customization of performance options Advanced users only KLJI: Move Enter: Select F5: Previous Values +/-/PU/PD: Value F10: Save ...

User Manual
Page 75
...-detecting: Please connect the devices to the right jacks as right picture if you setup the devices properly. Appendix Jack-Sensing includes 2 parts: AUTO and MANUAL. A window will only appear when 3D audio inputs. - 75 -
...-detecting: Please connect the devices to the right jacks as right picture if you setup the devices properly. Appendix Jack-Sensing includes 2 parts: AUTO and MANUAL. A window will only appear when 3D audio inputs. - 75 -

User Manual
Page 76
GA-7N400S(-L) Motherboard - 76 - English If you set, please press "Manual Selection" to set wrong with the connectors, the warning message will come out as right picture. Manual setting: If the device picture shows different from what you set .
GA-7N400S(-L) Motherboard - 76 - English If you set, please press "Manual Selection" to set wrong with the connectors, the warning message will come out as right picture. Manual setting: If the device picture shows different from what you set .

User Manual
Page 77
... Appendix English 4-2 Troubleshooting Below is a collection of general asked questions based on a specific motherboard model, please log on to the Clear CMOS steps in the manual. Answer: If your board doesn't have such jumper, you can use a metal object to connect the positive and negative pins in the battery holder to...able to makethem short for ? Why? The situations might differ from MB. 3. If your board has a Clear CMOS jumper, please refer to http://www.gigabyte.com.tw Question 1: I still get a weak sound after updating BIOS. To check general asked questions.
... Appendix English 4-2 Troubleshooting Below is a collection of general asked questions based on a specific motherboard model, please log on to the Clear CMOS steps in the manual. Answer: If your board doesn't have such jumper, you can use a metal object to connect the positive and negative pins in the battery holder to...able to makethem short for ? Why? The situations might differ from MB. 3. If your board has a Clear CMOS jumper, please refer to http://www.gigabyte.com.tw Question 1: I still get a weak sound after updating BIOS. To check general asked questions.


