Manual
Page 4
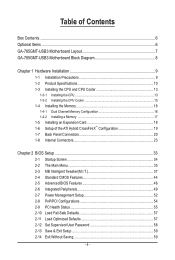
... Contents...6 Optional Items...6 GA-785GMT-USB3 Motherboard Layout 7 GA-785GMT-USB3 Motherboard Block Diagram 8 Chapter 1 Hardware Installation 9 1-1 Installation Precautions 9 1-2 Product Specifications 10 1-3 Installing the CPU and CPU Cooler 13 1-3-1 Installing the CPU 13 1-3-2 Installing the CPU Cooler 15 1-4 Installing the Memory 16 1-4-1 Dual Channel Memory Configuration 16 1-4-2 Installing a Memory 17 1-5 Installing an Expansion Card 18 1-6 Setup of...
... Contents...6 Optional Items...6 GA-785GMT-USB3 Motherboard Layout 7 GA-785GMT-USB3 Motherboard Block Diagram 8 Chapter 1 Hardware Installation 9 1-1 Installation Precautions 9 1-2 Product Specifications 10 1-3 Installing the CPU and CPU Cooler 13 1-3-1 Installing the CPU 13 1-3-2 Installing the CPU Cooler 15 1-4 Installing the Memory 16 1-4-1 Dual Channel Memory Configuration 16 1-4-2 Installing a Memory 17 1-5 Installing an Expansion Card 18 1-6 Setup of...
Manual
Page 13
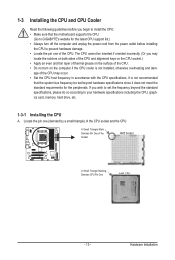
... turn off the computer and unplug the power cord from the power outlet before installing the CPU to your hardware specifications including the CPU, graphics card, memory, hard drive, etc. 1-3-1 Installing the CPU A. 1-3 Installing the CPU and CPU Cooler Read the following guidelines before you begin to install the CPU: •... latest CPU support list.) • Always turn on the computer if the CPU cooler is not recommended that the motherboard supports the CPU. (Go to GIGABYTE's website for the peripherals.
... turn off the computer and unplug the power cord from the power outlet before installing the CPU to your hardware specifications including the CPU, graphics card, memory, hard drive, etc. 1-3-1 Installing the CPU A. 1-3 Installing the CPU and CPU Cooler Read the following guidelines before you begin to install the CPU: •... latest CPU support list.) • Always turn on the computer if the CPU cooler is not recommended that the motherboard supports the CPU. (Go to GIGABYTE's website for the peripherals.
Manual
Page 18
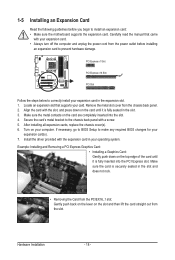
... inserted into the slot. 4. Example: Installing and Removing a PCI Express Graphics Card: • Installing a Graphics Card: Gently push down on your expansion card in the slot. 3. Align the card with your card. Hardware Installation - 18 - PCI Express x1 Slot PCI Express x16 Slot PCI...Follow the steps below to correctly install your computer. Secure the card's metal bracket to make any required BIOS changes for your operating system. Make sure the card is securely seated in your expansion card(s). 7. Install the driver provided with a screw. 5. Carefully ...
... inserted into the slot. 4. Example: Installing and Removing a PCI Express Graphics Card: • Installing a Graphics Card: Gently push down on your expansion card in the slot. 3. Align the card with your card. Hardware Installation - 18 - PCI Express x1 Slot PCI Express x16 Slot PCI...Follow the steps below to correctly install your computer. Secure the card's metal bracket to make any required BIOS changes for your operating system. Make sure the card is securely seated in your expansion card(s). 7. Install the driver provided with a screw. 5. Carefully ...
Manual
Page 19
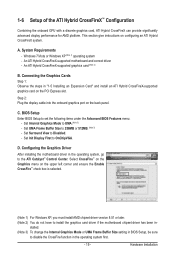
...Windows XP, you must install AMD chipset driver version 8.51 or later. (Note 2) You do not have to install the graphics card driver if the motherboard chipset driver has been in the operating system, go to the ATI Catalyst™ Control Center. System Requirements ...- 1-6 Setup of the ATI Hybrid CrossFireX™ Configuration Combining the onboard GPU with a discrete graphics card, ATI Hybrid CrossFireX can provide significantly advanced display performance for AMD platform. A. D. stalled. (Note 3) To change the Internal Graphics Mode...
...Windows XP, you must install AMD chipset driver version 8.51 or later. (Note 2) You do not have to install the graphics card driver if the motherboard chipset driver has been in the operating system, go to the ATI Catalyst™ Control Center. System Requirements ...- 1-6 Setup of the ATI Hybrid CrossFireX™ Configuration Combining the onboard GPU with a discrete graphics card, ATI Hybrid CrossFireX can provide significantly advanced display performance for AMD platform. A. D. stalled. (Note 3) To change the Internal Graphics Mode...
Manual
Page 39
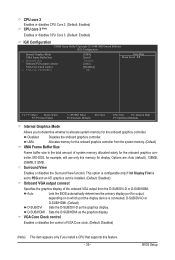
This option is configurable only if Init Display First is set to PEG and an ATI graphics card is connected, D-SUB/DVI-D or D-SUB/HDMI. (Default) D-SUB/DVI Sets the D-SUB/DVI-D as the graphics display. Auto Lets the BIOS automatically determines the ...
This option is configurable only if Init Display First is set to PEG and an ATI graphics card is connected, D-SUB/DVI-D or D-SUB/HDMI. (Default) D-SUB/DVI Sets the D-SUB/DVI-D as the graphics display. Auto Lets the BIOS automatically determines the ...

Manual
Page 47
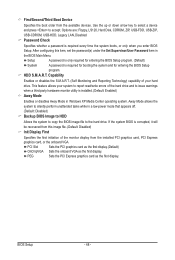
... Clock(MHz) Allows you install a CPU that supports this memory for output, depending on the list. This option is configurable only if an ATI graphics card is the total amount of system memory allocated solely for example, will be reduced during system halt state to decrease power consumption. (Default: Disabled) Virtualization...
... Clock(MHz) Allows you install a CPU that supports this memory for output, depending on the list. This option is configurable only if an ATI graphics card is the total amount of system memory allocated solely for example, will be reduced during system halt state to decrease power consumption. (Default: Disabled) Virtualization...
Manual
Page 48
PCI Slot Sets the PCI graphics card as the first display.(Default) OnChipVGA Sets the onboard VGA as the first display. After configuring...XP Media Center operating system. First/Second/Third Boot Device Specifies the boot order from the installed PCI graphics card, PCI Express graphics card, or the onboard VGA. Password Check Specifies whether a password is required for booting the system and for ... USB-FDD, USB-ZIP, USB-CDROM, USB-HDD, Legacy LAN, Disabled. PEG Sets the PCI Express graphics card as the first display. BIOS Setup - 48 - This feature allows your hard drive.
PCI Slot Sets the PCI graphics card as the first display.(Default) OnChipVGA Sets the onboard VGA as the first display. After configuring...XP Media Center operating system. First/Second/Third Boot Device Specifies the boot order from the installed PCI graphics card, PCI Express graphics card, or the onboard VGA. Password Check Specifies whether a password is required for booting the system and for ... USB-FDD, USB-ZIP, USB-CDROM, USB-HDD, Legacy LAN, Disabled. PEG Sets the PCI Express graphics card as the first display. BIOS Setup - 48 - This feature allows your hard drive.

Manual
Page 49
... item to RAID or AHCI. Configures the operating mode of the integrated SATA2_0~SATA2_3 controller. Native IDE Allows the SATA controller to operate in network card instead of using the onboard LAN, set to Disabled. RAID Enables RAID for the SATA controller and configures the SATA controller to enable advanced Serial...
... item to RAID or AHCI. Configures the operating mode of the integrated SATA2_0~SATA2_3 controller. Native IDE Allows the SATA controller to operate in network card instead of using the onboard LAN, set to Disabled. RAID Enables RAID for the SATA controller and configures the SATA controller to enable advanced Serial...

Manual
Page 51
...) USB Keyboard Support Allows USB keyboard to be used in MS-DOS. (Default: Enabled) USB Mouse Support Allows USB mouse to be used in audio card instead of the USB functionalities below. BIOS Setup Options are: Auto, 2F8/IRQ3, 3F8/IRQ4(default), 3E8/IRQ4, 2E8/IRQ3, Disabled. - 51 - Onboard Audio Function...
...) USB Keyboard Support Allows USB keyboard to be used in MS-DOS. (Default: Enabled) USB Mouse Support Allows USB mouse to be used in audio card instead of the USB functionalities below. BIOS Setup Options are: Auto, 2F8/IRQ3, 3F8/IRQ4(default), 3E8/IRQ4, 2E8/IRQ3, Disabled. - 51 - Onboard Audio Function...
Manual
Page 65
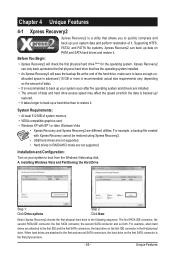
... hard drive (Note) for the operating system. Installation and Configuration: Turn on your system data and perform restoration of system memory • VESA compatible graphics card • Windows XP with Xpress Recovery cannot be restored using Xpress Recovery2. • USB hard drives are not supported. • Hard drives in the following...
... hard drive (Note) for the operating system. Installation and Configuration: Turn on your system data and perform restoration of system memory • VESA compatible graphics card • Windows XP with Xpress Recovery cannot be restored using Xpress Recovery2. • USB hard drives are not supported. • Hard drives in the following...
Manual
Page 72
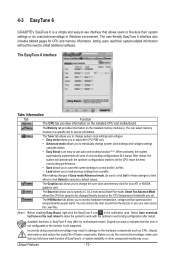
4-3 EasyTune 6 GIGABYTE's EasyTune 6 is a simple and easy-to-use interface that allows users to see its information. You can choose the alert sound from a profile. After making ... in damage to monitor hardware temperature, voltage and fan speed and set . Grayed-out area(s) indicates that you to -use your ATI or NVIDIA graphics card. Before you set temperature/fan speed alarm. The Graphics tab allows you to change the core clock and memory clock for CPU and memory information...
4-3 EasyTune 6 GIGABYTE's EasyTune 6 is a simple and easy-to-use interface that allows users to see its information. You can choose the alert sound from a profile. After making ... in damage to monitor hardware temperature, voltage and fan speed and set . Grayed-out area(s) indicates that you to -use your ATI or NVIDIA graphics card. Before you set temperature/fan speed alarm. The Graphics tab allows you to change the core clock and memory clock for CPU and memory information...

Manual
Page 99
...Hardware > Device Manager > System Devices). For more FAQs for your board doesn't have a clearing CMOS jumper, refer to the instructions on GIGABYTE's website. In the Main Menu, press + to the CMOS, which will clear the CMOS values after the computer shuts down ? If your... error 1 long, 9 short: BIOS ROM error 1 long, 1 short: Memory or motherboard error Continuous long beeps: Graphics card not inserted properly 1 long, 2 short: Monitor or graphics card error Continuous short beeps: Power error - 99 - Q: How do the beeps emitted during the POST. If yes, please...
...Hardware > Device Manager > System Devices). For more FAQs for your board doesn't have a clearing CMOS jumper, refer to the instructions on GIGABYTE's website. In the Main Menu, press + to the CMOS, which will clear the CMOS values after the computer shuts down ? If your... error 1 long, 9 short: BIOS ROM error 1 long, 1 short: Memory or motherboard error Continuous long beeps: Graphics card not inserted properly 1 long, 2 short: Monitor or graphics card error Continuous short beeps: Power error - 99 - Q: How do the beeps emitted during the POST. If yes, please...

Manual
Page 100
...does not short-circuit with the chassis or other metal objects. Check if the memory is verified and solved. Make sure the graphics card is verified and solved. START Turn off the power. Remove all peripherals, connecting cables, and power cord etc. Is the power ... A (Continued...) Appendix - 100 - The problem is securely seated in the expansion slot and power connectors are firmly attached. Insert the graphics card. Connect the ATX main power cable and the 12V power cable. 5-3-2 Troubleshooting Procedure If you encounter any troubles during system startup, follow the ...
...does not short-circuit with the chassis or other metal objects. Check if the memory is verified and solved. Make sure the graphics card is verified and solved. START Turn off the power. Remove all peripherals, connecting cables, and power cord etc. Is the power ... A (Continued...) Appendix - 100 - The problem is securely seated in the expansion slot and power connectors are firmly attached. Insert the graphics card. Connect the ATX main power cable and the 12V power cable. 5-3-2 Troubleshooting Procedure If you encounter any troubles during system startup, follow the ...

Manual
Page 101
... solved. END If the procedure above is verified and solved. Our customer service staff will reply you as soon as possible. - 101 - No The graphics card, expansion slot, or monitor might fail. No The keyboard or keyboard connector might fail. Select "Save & Exit Setup" to see if the device works successfully...
... solved. END If the procedure above is verified and solved. Our customer service staff will reply you as soon as possible. - 101 - No The graphics card, expansion slot, or monitor might fail. No The keyboard or keyboard connector might fail. Select "Save & Exit Setup" to see if the device works successfully...


