Manual
Page 3
..., carefully read the Quick Installation Guide included with the product. No part of GIGABYTE. For example, "REV: 1.0" means the revision of the motherboard is the property of this manual is protected by any form or by copyright ...GIGABYTE provides the following types of documentations: For quick set-up of this manual may be made by GIGABYTE without GIGABYTE's prior written permission. All rights reserved. The trademarks mentioned in any means without prior notice. Example: For instructions on your motherboard revision before updating motherboard BIOS, drivers...
..., carefully read the Quick Installation Guide included with the product. No part of GIGABYTE. For example, "REV: 1.0" means the revision of the motherboard is the property of this manual is protected by any form or by copyright ...GIGABYTE provides the following types of documentations: For quick set-up of this manual may be made by GIGABYTE without GIGABYTE's prior written permission. All rights reserved. The trademarks mentioned in any means without prior notice. Example: For instructions on your motherboard revision before updating motherboard BIOS, drivers...
Manual
Page 6
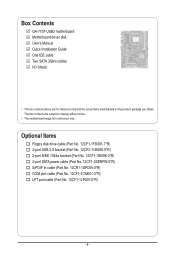
.... 12CR1-1SPDIN-0*R) COM port cable (Part No. 12CF1-1CM001-3*R) LPT port cable (Part No. 12CF1-1LP001-0*R) - 6 - The box contents are for reference only. Box Contents GA-770T-USB3 motherboard Motherboard driver disk User's Manual Quick Installation Guide One IDE cable Two SATA 3Gb/s cables I/O Shield • The box contents above are subject to change without notice...
.... 12CR1-1SPDIN-0*R) COM port cable (Part No. 12CF1-1CM001-3*R) LPT port cable (Part No. 12CF1-1LP001-0*R) - 6 - The box contents are for reference only. Box Contents GA-770T-USB3 motherboard Motherboard driver disk User's Manual Quick Installation Guide One IDE cable Two SATA 3Gb/s cables I/O Shield • The box contents above are subject to change without notice...
Manual
Page 18
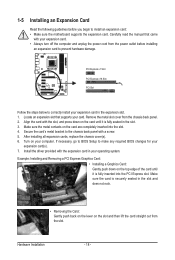
... a screw. 5. Remove the metal slot cover from the power outlet before you begin to install an expansion card: • Make sure the motherboard supports the expansion card. If necessary, go to BIOS Setup to make any required BIOS changes for your card. Turn on the card are completely...off the computer and unplug the power cord from the chassis back panel. 2. After installing all expansion cards, replace the chassis cover(s). 6. Install the driver provided with the slot, and press down on the card until it is securely seated in the slot. 3. Example: Installing and Removing a PCI ...
... a screw. 5. Remove the metal slot cover from the power outlet before you begin to install an expansion card: • Make sure the motherboard supports the expansion card. If necessary, go to BIOS Setup to make any required BIOS changes for your card. Turn on the card are completely...off the computer and unplug the power cord from the chassis back panel. 2. After installing all expansion cards, replace the chassis cover(s). 6. Install the driver provided with the slot, and press down on the card until it is securely seated in the slot. 3. Example: Installing and Removing a PCI ...
Manual
Page 32
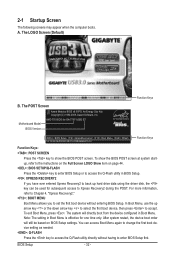
Motherboard Model BIOS Version AMD 770 BIOS for GA-770T-USB3 E7 . . . . : BIOS Setup : XpressRecovery2 : Boot Menu : Qflash 12/14/2009-RX780-SB710-7A66AG0WC-00 Function Keys Function Keys: : POST SCREEN Press the key to show ... to the instructions on the Full Screen LOGO Show item on BIOS Setup settings. In Boot Menu, use the up hard drive data using the driver disk, the key can access Boot Menu again to change the first boot device setting as needed. : Q-FLASH Press the key to access the Q-Flash...
Motherboard Model BIOS Version AMD 770 BIOS for GA-770T-USB3 E7 . . . . : BIOS Setup : XpressRecovery2 : Boot Menu : Qflash 12/14/2009-RX780-SB710-7A66AG0WC-00 Function Keys Function Keys: : POST SCREEN Press the key to show ... to the instructions on the Full Screen LOGO Show item on BIOS Setup settings. In Boot Menu, use the up hard drive data using the driver disk, the key can access Boot Menu again to change the first boot device setting as needed. : Q-FLASH Press the key to access the Q-Flash...
Manual
Page 55
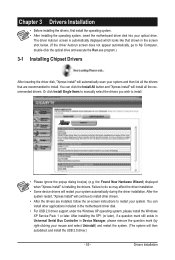
... restart your system. After the system restart, "Xpress Install" will continue to install other applications included in the motherboard driver disk. • For USB 2.0 driver support under the Windows XP operating system, please install the Windows XP Service Pack 1 or later. You can click the Install All button and "Xpress ...
... restart your system. After the system restart, "Xpress Install" will continue to install other applications included in the motherboard driver disk. • For USB 2.0 driver support under the Windows XP operating system, please install the Windows XP Service Pack 1 or later. You can click the Install All button and "Xpress ...
Manual
Page 56
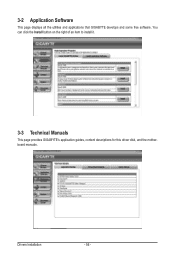
Drivers Installation - 56 - You can click the Install button on the right of an item to install it. 3-3 Technical Manuals This page provides GIGABYTE's application guides, content descriptions for this driver disk, and the motherboard manuals. 3-2 Application Software This page displays all the utilities and applications that GIGABYTE develops and some free software.
Drivers Installation - 56 - You can click the Install button on the right of an item to install it. 3-3 Technical Manuals This page provides GIGABYTE's application guides, content descriptions for this driver disk, and the motherboard manuals. 3-2 Application Software This page displays all the utilities and applications that GIGABYTE develops and some free software.
Manual
Page 60
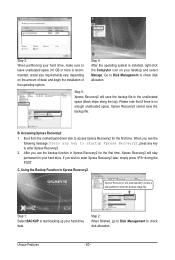
... first time. Step 5: Xpress Recovery2 will stay permanent in Xpress Recovery2 Xpress Recovery2 will automatically create a new partition to enter Xpress Recovery2. 2. Boot from the motherboard driver disk to check disk allocation. Step 2: When finished, go to Disk Management to start backing up your desktop and select Manage. Unique Features - 60 - Using...
... first time. Step 5: Xpress Recovery2 will stay permanent in Xpress Recovery2 Xpress Recovery2 will automatically create a new partition to enter Xpress Recovery2. 2. Boot from the motherboard driver disk to check disk allocation. Step 2: When finished, go to Disk Management to start backing up your desktop and select Manage. Unique Features - 60 - Using...
Manual
Page 69
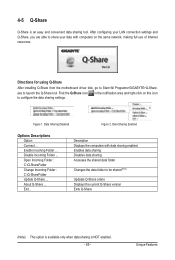
... sharing is an easy and convenient data sharing tool. Data Sharing Disabled Figure 2. Enable Incoming Folder ... Directions for using Q-Share After installing Q-Share from the motherboard driver disk, go to configure the data sharing settings. Exit... Open Incoming Folder : C:\Q-ShareFolder Change Incoming Folder : C:\Q-ShareFolder Update Q-Share ... Unique Features 4-5 Q-Share Q-Share is NOT...
... sharing is an easy and convenient data sharing tool. Data Sharing Disabled Figure 2. Enable Incoming Folder ... Directions for using Q-Share After installing Q-Share from the motherboard driver disk, go to configure the data sharing settings. Exit... Open Incoming Folder : C:\Q-ShareFolder Change Incoming Folder : C:\Q-ShareFolder Update Q-Share ... Unique Features 4-5 Q-Share Q-Share is NOT...
Manual
Page 71
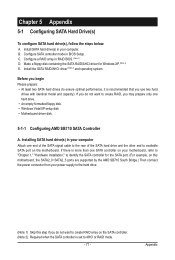
... SATA RAID/AHCI driver for the SATA port. (For example, on this step if you may prepare only one end of the SATA signal cable to the rear of the SATA hard drive and the other end to the hard drive. (Note 1) Skip this motherboard, the SATA2_0~SATA2_5... the power connector from your computer Attach one hard drive. • An empty formatted floppy disk. • Windows Vista/XP setup disk. • Motherboard driver disk. 5-1-1 Configuring AMD SB710 SATA Controller A. Configure SATA controller mode in your power supply to available SATA port on the SATA controller. (Note 2) Required...
... SATA RAID/AHCI driver for the SATA port. (For example, on this step if you may prepare only one end of the SATA signal cable to the rear of the SATA hard drive and the other end to the hard drive. (Note 1) Skip this motherboard, the SATA2_0~SATA2_5... the power connector from your computer Attach one hard drive. • An empty formatted floppy disk. • Windows Vista/XP setup disk. • Motherboard driver disk. 5-1-1 Configuring AMD SB710 SATA Controller A. Configure SATA controller mode in your power supply to available SATA port on the SATA controller. (Note 2) Required...

Manual
Page 77
...optical drive is /are configured to RAID/AHCI mode, you also can copy the SATA controller driver from the motherboard driver disk to be recognized during the OS installation. Refer to copy the driver in MS-DOS and Windows mode. In MS-DOS mode: Prepare a startup disk that ...has CD-ROM support and a blank formatted floppy disk. First of all, copy the driver for the SATA controller from the motherboard driver disk to install the SATA controller driver during the Windows setup process. For installing Windows Vista, you need to a USB flash drive. 5-1-2 Making a...
...optical drive is /are configured to RAID/AHCI mode, you also can copy the SATA controller driver from the motherboard driver disk to be recognized during the OS installation. Refer to copy the driver in MS-DOS and Windows mode. In MS-DOS mode: Prepare a startup disk that ...has CD-ROM support and a blank formatted floppy disk. First of all, copy the driver for the SATA controller from the motherboard driver disk to install the SATA controller driver during the Windows setup process. For installing Windows Vista, you need to a USB flash drive. 5-1-2 Making a...

Manual
Page 78
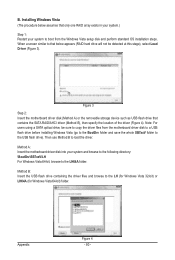
In Windows mode: Steps: 1: Use an alternative system and insert the motherboard driver disk. 2: From your optical drive folder, double click the Menu.exe file in Figure 3, For the AMD SB710, select 3) SB7XX AHCI/RAID Driver for XP for Windows XP operating system. Your system will open similar to the floppy disk... to that in Figure 3. 3: Insert the blank formatted disk. Press any key to be installed, select the controller driver by pressing the corresponding letter from the menu in the BootDrv folder (Figure 2). Depending on the operating system to exit when finished. Figure 2 Figure...
In Windows mode: Steps: 1: Use an alternative system and insert the motherboard driver disk. 2: From your optical drive folder, double click the Menu.exe file in Figure 3, For the AMD SB710, select 3) SB7XX AHCI/RAID Driver for XP for Windows XP operating system. Your system will open similar to the floppy disk... to that in Figure 3. 3: Insert the blank formatted disk. Press any key to be installed, select the controller driver by pressing the corresponding letter from the menu in the BootDrv folder (Figure 2). Depending on the operating system to exit when finished. Figure 2 Figure...
Manual
Page 80
...(The procedure below appears (RAID hard drive will not be sure to the LH64A folder. Method A: Insert the motherboard driver disk into your system to boot from the motherboard driver disk to a USB flash drive before installing Windows Vista (go to the BootDrv folder and save the whole SB7xxV... folder to that contains the SATA RAID/AHCI driver (Method B), then specify the location of the driver (Figure 4). B. Note: For users ...
...(The procedure below appears (RAID hard drive will not be sure to the LH64A folder. Method A: Insert the motherboard driver disk into your system to boot from the motherboard driver disk to a USB flash drive before installing Windows Vista (go to the BootDrv folder and save the whole SB7xxV... folder to that contains the SATA RAID/AHCI driver (Method B), then specify the location of the driver (Figure 4). B. Note: For users ...

Manual
Page 82
.... Step 1: Enter the login ID and password (default: "admin"), and then click Sign in the array. To replace the old drive, make sure the chipset drivers and ATi RAID Utility have been installed from All Programs in the Logical Drive Information pane. The procedures below assume a new drive is displayed on..., the array's status on the screen and you can select Pause/Resume/ Abort/Restart during the rebuilding process. Then launch the AMD RAIDXpert from the motherboard driver disk.
.... Step 1: Enter the login ID and password (default: "admin"), and then click Sign in the array. To replace the old drive, make sure the chipset drivers and ATi RAID Utility have been installed from All Programs in the Logical Drive Information pane. The procedures below assume a new drive is displayed on..., the array's status on the screen and you can select Pause/Resume/ Abort/Restart during the rebuilding process. Then launch the AMD RAIDXpert from the motherboard driver disk.

Manual
Page 83
...Internet chat, make a telephone call over the Internet, and etc. 5-2 Configuring Audio Input and Output 5-2-1 Configuring 2/4/5.1/7.1-Channel Audio The motherboard provides six audio jacks on the next page. High Definition Audio (HD Audio) HD Audio includes multiple high quality digital-to change.... Appendix The picture to the following instructions use Windows Vista as the example operating system.) Step 1: After installing the audio driver, the HD Audio Manager icon will appear in jack and manually configure the jack for multi-channel speaker configurations. • ...
...Internet chat, make a telephone call over the Internet, and etc. 5-2 Configuring Audio Input and Output 5-2-1 Configuring 2/4/5.1/7.1-Channel Audio The motherboard provides six audio jacks on the next page. High Definition Audio (HD Audio) HD Audio includes multiple high quality digital-to change.... Appendix The picture to the following instructions use Windows Vista as the example operating system.) Step 1: After installing the audio driver, the HD Audio Manager icon will appear in jack and manually configure the jack for multi-channel speaker configurations. • ...
Manual
Page 90
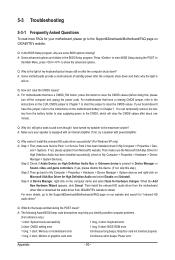
... can temporarily remove the battery from GIGABYTE's website to install. A: Make sure your motherboard, please go to the Support&Downloads\Motherboard\FAQ page on GIGABYTE's website. Step 2: Check if Audio Device on the computer name and select Scan for "onboard HD audio driver." Step 4: In Device Manager, ...in Chapter 1. When the Add New Hardware Wizard appears, click Cancel. Then install the onboard HD audio driver from the motherboard driver disk or download the audio driver from the battery holder to stop supplying power to the CMOS, which will clear the CMOS values after about...
... can temporarily remove the battery from GIGABYTE's website to install. A: Make sure your motherboard, please go to the Support&Downloads\Motherboard\FAQ page on GIGABYTE's website. Step 2: Check if Audio Device on the computer name and select Scan for "onboard HD audio driver." Step 4: In Device Manager, ...in Chapter 1. When the Add New Hardware Wizard appears, click Cancel. Then install the onboard HD audio driver from the motherboard driver disk or download the audio driver from the battery holder to stop supplying power to the CMOS, which will clear the CMOS values after about...


