Manual
Page 1
GA-73PVM-S2H LGA775 socket motherboard for Intel® Core TM processor family/ Intel® Pentium® processor family/Intel® Celeron® processor family User's Manual Rev. 1004 12ME-73PVMS2H-1004R
GA-73PVM-S2H LGA775 socket motherboard for Intel® Core TM processor family/ Intel® Pentium® processor family/Intel® Celeron® processor family User's Manual Rev. 1004 12ME-73PVMS2H-1004R
Manual
Page 3
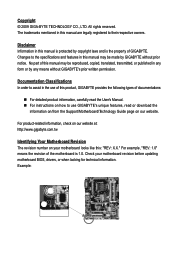
... information, check on our website at: http://www.gigabyte.com.tw Identifying Your Motherboard Revision The revision number on our website. The trademarks mentioned in this manual are legally registered to use of the motherboard is protected by GIGABYTE without GIGABYTE's prior written permission. Disclaimer Information in this manual is 1.0. All rights reserved. For example, "REV: 1.0" means...
... information, check on our website at: http://www.gigabyte.com.tw Identifying Your Motherboard Revision The revision number on our website. The trademarks mentioned in this manual are legally registered to use of the motherboard is protected by GIGABYTE without GIGABYTE's prior written permission. Disclaimer Information in this manual is 1.0. All rights reserved. For example, "REV: 1.0" means...
Manual
Page 6
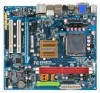
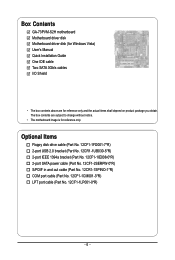
The box contents are for reference only. Box Contents GA-73PVM-S2H motherboard Motherboard driver disk Motherboard driver disk (for Windows Vista) User's Manual Quick Installation Guide One IDE cable Two SATA 3Gb/s cables I/O Shield • The box contents above are subject to change without notice. • The motherboard image is for reference only and the actual items shall...
The box contents are for reference only. Box Contents GA-73PVM-S2H motherboard Motherboard driver disk Motherboard driver disk (for Windows Vista) User's Manual Quick Installation Guide One IDE cable Two SATA 3Gb/s cables I/O Shield • The box contents above are subject to change without notice. • The motherboard image is for reference only and the actual items shall...
Manual
Page 9
... static electricity. • Prior to installing the motherboard, please have a problem related to the use of the product, please consult a certified computer technician. - 9 - Prior to installation, carefully read the user's manual and follow these procedures: • Prior to installation..., do not remove or break motherboard S/N (Serial Number) sticker or warranty sticker provided by unplugging the power cord from the motherboard, make sure the power supply has been turned...
... static electricity. • Prior to installing the motherboard, please have a problem related to the use of the product, please consult a certified computer technician. - 9 - Prior to installation, carefully read the user's manual and follow these procedures: • Prior to installation..., do not remove or break motherboard S/N (Serial Number) sticker or warranty sticker provided by unplugging the power cord from the motherboard, make sure the power supply has been turned...

Manual
Page 15
...CPU cooler may adhere to the CPU. Step 6: Finally, attach the power connector of the motherboard. Check that the Male and Female push pins are joined closely. (Refer to your CPU cooler installation manual for instructions on the surface of arrow is to remove the cooler, on the contrary, ... and CPU may damage the CPU. - 15 - 1-3-2 Installing the CPU Cooler Follow the steps below to correctly install the CPU cooler on the motherboard. (The following procedure uses Intel® boxed cooler as the picture above, the installation is to install.) Step 3: Place the cooler atop the CPU...
...CPU cooler may adhere to the CPU. Step 6: Finally, attach the power connector of the motherboard. Check that the Male and Female push pins are joined closely. (Refer to your CPU cooler installation manual for instructions on the surface of arrow is to remove the cooler, on the contrary, ... and CPU may damage the CPU. - 15 - 1-3-2 Installing the CPU Cooler Follow the steps below to correctly install the CPU cooler on the motherboard. (The following procedure uses Intel® boxed cooler as the picture above, the installation is to install.) Step 3: Place the cooler atop the CPU...
Manual
Page 17
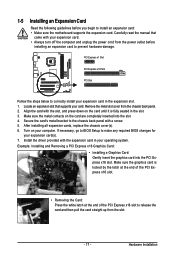
... to make any required BIOS changes for your expansion card(s). 7. If necessary, go to BIOS Setup to install an expansion card: • Make sure the motherboard supports the expansion card. Hardware Installation Make sure the metal contacts on your computer. Example: Installing and Removing a PCI Express x16 Graphics Card: • Installing... an Expansion Card Read the following guidelines before installing an expansion card to correctly install your expansion card in your operating system. Carefully read the manual that supports your card.
... to make any required BIOS changes for your expansion card(s). 7. If necessary, go to BIOS Setup to install an expansion card: • Make sure the motherboard supports the expansion card. Hardware Installation Make sure the metal contacts on your computer. Example: Installing and Removing a PCI Express x16 Graphics Card: • Installing... an Expansion Card Read the following guidelines before installing an expansion card to correctly install your expansion card in your operating system. Carefully read the manual that supports your card.
Manual
Page 33
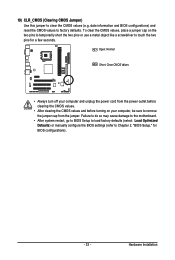
... on your computer, be sure to factory defaults. Failure to do so may cause damage to the motherboard. • After system restart, go to BIOS Setup to load factory defaults (select Load Optimized Defaults) or manually configure the BIOS settings (refer to touch the two pins for BIOS configurations). - 33 - Open: Normal...
... on your computer, be sure to factory defaults. Failure to do so may cause damage to the motherboard. • After system restart, go to BIOS Setup to load factory defaults (select Load Optimized Defaults) or manually configure the BIOS settings (refer to touch the two pins for BIOS configurations). - 33 - Open: Normal...

Manual
Page 40
... precompensation cylinder. Base Memory Also called conventional memory. Head Number of the currently installed hard drive. Halt on the hard drive. GA-73PVM-S2H Motherboard - 40 - Allows you wish to enter the parameters manually, refer to None. If you do not install a floppy disk drive, set this item to the information on Allows you to...
... precompensation cylinder. Base Memory Also called conventional memory. Head Number of the currently installed hard drive. Halt on the hard drive. GA-73PVM-S2H Motherboard - 40 - Allows you wish to enter the parameters manually, refer to None. If you do not install a floppy disk drive, set this item to the information on Allows you to...
Manual
Page 59
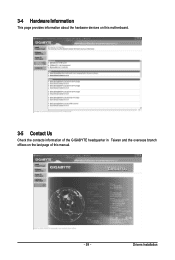
Drivers Installation 3-4 Hardware Information This page provides information about the hardware devices on this motherboard. 3-5 Contact Us Check the contacts information of the GIGABYTE headquarter in Taiwan and the overseas branch offices on the last page of this manual. - 59 -
Drivers Installation 3-4 Hardware Information This page provides information about the hardware devices on this motherboard. 3-5 Contact Us Check the contacts information of the GIGABYTE headquarter in Taiwan and the overseas branch offices on the last page of this manual. - 59 -
Manual
Page 70
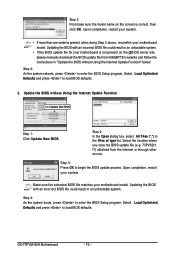
...without Using the Internet Update Function" below. f1) obtained from GIGABYTE's website and follow the instructions in an unbootable system. • If the BIOS update file for your motherboard model. Upon completion, restart your motherboard model. Make sure the extracted BIOS file matches your system. Select... the BIOS with an incorrect BIOS file could result in the Files of type list. GA-73PVM-S2H Motherboard - 70 - Step 3: First make sure the model name on the @BIOS server site, please manually download the BIOS update file from the Internet or through other source. Step 4: As ...
...without Using the Internet Update Function" below. f1) obtained from GIGABYTE's website and follow the instructions in an unbootable system. • If the BIOS update file for your motherboard model. Upon completion, restart your motherboard model. Make sure the extracted BIOS file matches your system. Select... the BIOS with an incorrect BIOS file could result in the Files of type list. GA-73PVM-S2H Motherboard - 70 - Step 3: First make sure the model name on the @BIOS server site, please manually download the BIOS update file from the Internet or through other source. Step 4: As ...
Manual
Page 84
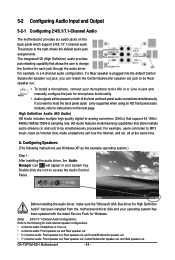
... UAA Bus driver for High Definition Audio" has been installed from the motherboard driver disk and your system tray. GA-73PVM-S2H Motherboard - 84 - A. 5-2 Configuring Audio Input and Output 5-2-1 Configuring 2/4/5.1/7.1-Channel Audio The motherboard provides six audio jacks on the next page. Double-click the icon ...jack assignments. For example, users can retask the Center/Subwoofer speaker out jack to the Mic in or Line in jack and manually configure the jack for multi-channel speaker configurations. • 2-channel audio: Headphone or Line out. • 4-channel audio:...
... UAA Bus driver for High Definition Audio" has been installed from the motherboard driver disk and your system tray. GA-73PVM-S2H Motherboard - 84 - A. 5-2 Configuring Audio Input and Output 5-2-1 Configuring 2/4/5.1/7.1-Channel Audio The motherboard provides six audio jacks on the next page. Double-click the icon ...jack assignments. For example, users can retask the Center/Subwoofer speaker out jack to the Mic in or Line in jack and manually configure the jack for multi-channel speaker configurations. • 2-channel audio: Headphone or Line out. • 4-channel audio:...

Manual
Page 94
... can drop off your waste equipment for RoHS (Restriction of Certain Hazardous Substances in your product's user's manual and we at GIGABYTE are continuing our efforts to meet RoHS requirement. Under the Directive, used for details of environmentally safe recycling.... We believe that this text. GA-73PVM-S2H Motherboard - 94 - To prevent releases of harmful substances into the environment and to maximize the use internationally banned toxic chemicals. Restriction of Hazardous Substances (RoHS) Directive Statement GIGABYTE products have been carefully selected to ...
... can drop off your waste equipment for RoHS (Restriction of Certain Hazardous Substances in your product's user's manual and we at GIGABYTE are continuing our efforts to meet RoHS requirement. Under the Directive, used for details of environmentally safe recycling.... We believe that this text. GA-73PVM-S2H Motherboard - 94 - To prevent releases of harmful substances into the environment and to maximize the use internationally banned toxic chemicals. Restriction of Hazardous Substances (RoHS) Directive Statement GIGABYTE products have been carefully selected to ...


