Manual
Page 1
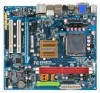
GA-73PVM-S2H LGA775 socket motherboard for Intel® Core TM processor family/ Intel® Pentium® processor family/Intel® Celeron® processor family User's Manual Rev. 1004 12ME-73PVMS2H-1004R
GA-73PVM-S2H LGA775 socket motherboard for Intel® Core TM processor family/ Intel® Pentium® processor family/Intel® Celeron® processor family User's Manual Rev. 1004 12ME-73PVMS2H-1004R
Manual
Page 3
... features in this : "REV: X.X." No part of GIGABYTE. Example: Disclaimer Information in this manual may be made by GIGABYTE without GIGABYTE's prior written permission. For product-related information, check on our website at: http://www.gigabyte.com.tw Identifying Your Motherboard Revision The revision number on...LTD. All rights reserved. Changes to assist in this product, GIGABYTE provides the following types of the motherboard is protected by any form or by copyright laws and is the property of this manual may be reproduced, copied, translated, transmitted, or published in ...
... features in this : "REV: X.X." No part of GIGABYTE. Example: Disclaimer Information in this manual may be made by GIGABYTE without GIGABYTE's prior written permission. For product-related information, check on our website at: http://www.gigabyte.com.tw Identifying Your Motherboard Revision The revision number on...LTD. All rights reserved. Changes to assist in this product, GIGABYTE provides the following types of the motherboard is protected by any form or by copyright laws and is the property of this manual may be reproduced, copied, translated, transmitted, or published in ...
Manual
Page 6
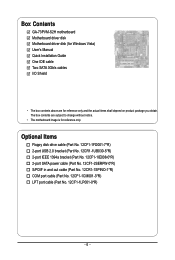
Box Contents GA-73PVM-S2H motherboard Motherboard driver disk Motherboard driver disk (for Windows Vista) User's Manual Quick Installation Guide One IDE cable Two SATA 3Gb/s cables I/O Shield • The box contents above are subject to change without notice. • The motherboard ...
Box Contents GA-73PVM-S2H motherboard Motherboard driver disk Motherboard driver disk (for Windows Vista) User's Manual Quick Installation Guide One IDE cable Two SATA 3Gb/s cables I/O Shield • The box contents above are subject to change without notice. • The motherboard ...
Manual
Page 9
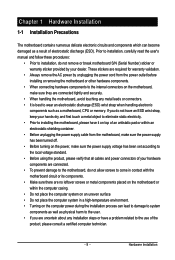
Prior to installation, carefully read the user's manual and follow these procedures: • Prior to installation, do not have an ESD wrist strap, keep your hands dry and first touch a metal object to ...
Prior to installation, carefully read the user's manual and follow these procedures: • Prior to installation, do not have an ESD wrist strap, keep your hands dry and first touch a metal object to ...

Manual
Page 15
... - Inadequately removing the CPU cooler may adhere to the CPU. Step 6: Finally, attach the power connector of the CPU cooler to your CPU cooler installation manual for instructions on installing the cooler.) Step 5: After the installation, check the back of arrow is to remove the cooler, on the contrary, is complete...
... - Inadequately removing the CPU cooler may adhere to the CPU. Step 6: Finally, attach the power connector of the CPU cooler to your CPU cooler installation manual for instructions on installing the cooler.) Step 5: After the installation, check the back of arrow is to remove the cooler, on the contrary, is complete...
Manual
Page 17
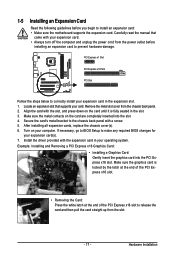
Carefully read the manual that supports your operating system. Align the card with the expansion card in the slot. 3. Example: Installing and Removing a PCI Express x16 Graphics Card: • ...
Carefully read the manual that supports your operating system. Align the card with the expansion card in the slot. 3. Example: Installing and Removing a PCI Express x16 Graphics Card: • ...
Manual
Page 33
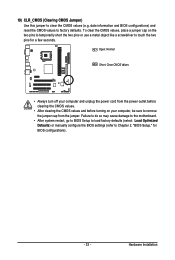
... do so may cause damage to the motherboard. • After system restart, go to BIOS Setup to load factory defaults (select Load Optimized Defaults) or manually configure the BIOS settings (refer to factory defaults. 19) CLR_CMOS (Clearing CMOS Jumper) Use this jumper to remove the jumper cap from the jumper. date...
... do so may cause damage to the motherboard. • After system restart, go to BIOS Setup to load factory defaults (select Load Optimized Defaults) or manually configure the BIOS settings (refer to factory defaults. 19) CLR_CMOS (Clearing CMOS Jumper) Use this jumper to remove the jumper cap from the jumper. date...
Manual
Page 39
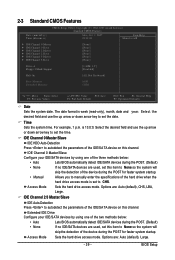
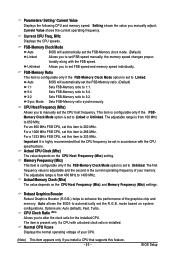
..., 1 p.m. IDE Channel 0 Master/Slave Configure your IDE/SATA devices by using one of the device during the POST for faster system startup. • Manual Allows you to manually enter the specifications of the hard drive when the hard drive access mode is set to None so the system will skip the detection...
..., 1 p.m. IDE Channel 0 Master/Slave Configure your IDE/SATA devices by using one of the device during the POST for faster system startup. • Manual Allows you to manually enter the specifications of the hard drive when the hard drive access mode is set to None so the system will skip the detection...

Manual
Page 40
... stop for a keyboard or a floppy disk drive error but stop for all other errors. Base Memory Also called conventional memory. GA-73PVM-S2H Motherboard - 40 - Head Number of sectors. Allows you to specify whether the installed floppy disk drive is 3-mode floppy disk drive... floppy disk drive. Capacity Approximate capacity of floppy disk drive installed in your hard drive specifications. If you wish to enter the parameters manually, refer to None. Options are determined by the BIOS POST. Options are: None, 360K/5.25", 1.2M/5.25", 720K/3.5", 1.44M/3.5",...
... stop for a keyboard or a floppy disk drive error but stop for all other errors. Base Memory Also called conventional memory. GA-73PVM-S2H Motherboard - 40 - Head Number of sectors. Allows you to specify whether the installed floppy disk drive is 3-mode floppy disk drive... floppy disk drive. Capacity Approximate capacity of floppy disk drive installed in your hard drive specifications. If you wish to enter the parameters manually, refer to None. Options are determined by the BIOS POST. Options are: None, 360K/5.25", 1.2M/5.25", 720K/3.5", 1.44M/3.5",...
Manual
Page 53
... to Linked or Unlinked. For an 800 MHz FSB CPU, set to 200 MHz. For a 1333 MHz FSB CPU, set FSB speed manually; Robust Graphics Booster Robust Graphics Booster (R.G.B.) helps to 333 MHz. BIOS Setup FSB-Memory Clock Mode Auto BIOS will automatically set in accordance ...5:4. 3:2 Sets FSB-Memory ratio to Unlinked. Actual CPU Clock (Mhz) The value depends on system configurations. CPU Clock Ratio (Note) Allows you manually adjust; Memory Frequency (Mhz) This item is configurable only if the FSB-Memory Clock Mode option is present only if a CPU with the FSB ...
... to Linked or Unlinked. For an 800 MHz FSB CPU, set to 200 MHz. For a 1333 MHz FSB CPU, set FSB speed manually; Robust Graphics Booster Robust Graphics Booster (R.G.B.) helps to 333 MHz. BIOS Setup FSB-Memory Clock Mode Auto BIOS will automatically set in accordance ...5:4. 3:2 Sets FSB-Memory ratio to Unlinked. Actual CPU Clock (Mhz) The value depends on system configurations. CPU Clock Ratio (Note) Allows you manually adjust; Memory Frequency (Mhz) This item is configurable only if the FSB-Memory Clock Mode option is present only if a CPU with the FSB ...
Manual
Page 59
3-4 Hardware Information This page provides information about the hardware devices on this motherboard. 3-5 Contact Us Check the contacts information of the GIGABYTE headquarter in Taiwan and the overseas branch offices on the last page of this manual. - 59 - Drivers Installation
3-4 Hardware Information This page provides information about the hardware devices on this motherboard. 3-5 Contact Us Check the contacts information of the GIGABYTE headquarter in Taiwan and the overseas branch offices on the last page of this manual. - 59 - Drivers Installation
Manual
Page 70
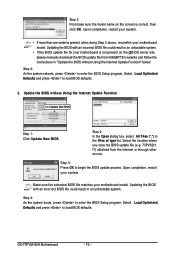
...the BIOS update file for your motherboard model. Updating the BIOS with an incorrect BIOS file could result in the Files of type list. GA-73PVM-S2H Motherboard - 70 - Step 4: As the system reboots, press to enter the BIOS Setup program. Select the location where you save the... your system. Upon completion, restart your motherboard model. Select Load Optimized Defaults and press to load BIOS defaults. f1) obtained from GIGABYTE's website and follow the instructions in "Update the BIOS without Using the Internet Update Function Click Update New BIOS Step 1: Click Update...
...the BIOS update file for your motherboard model. Updating the BIOS with an incorrect BIOS file could result in the Files of type list. GA-73PVM-S2H Motherboard - 70 - Step 4: As the system reboots, press to enter the BIOS Setup program. Select the location where you save the... your system. Upon completion, restart your motherboard model. Select Load Optimized Defaults and press to load BIOS defaults. f1) obtained from GIGABYTE's website and follow the instructions in "Update the BIOS without Using the Internet Update Function Click Update New BIOS Step 1: Click Update...
Manual
Page 75
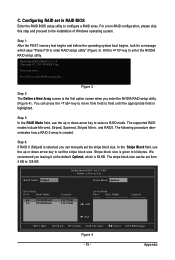
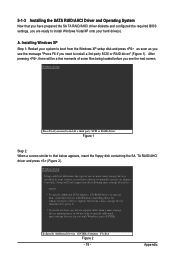
... utility" (Figure 3). We recommend you enter the NVIDIA RAID setup utility. (Figure 4). The stripe block size can be set the stripe block size. C. You can manually set from field to configure a RAID array. The following procedure dem- Step 4: If RAID 0 (Striped) is highlighted. Detecting array ... Stripe Block: Optimal Free Disks Port...
... utility" (Figure 3). We recommend you enter the NVIDIA RAID setup utility. (Figure 4). The stripe block size can be set the stripe block size. C. You can manually set from field to configure a RAID array. The following procedure dem- Step 4: If RAID 0 (Striped) is highlighted. Detecting array ... Stripe Block: Optimal Free Disks Port...
Manual
Page 79
..., or special disk controllers for which you have a device support disk from the Windows XP setup disk and press as soon as you need to manually specify an adapter. Windows Setup Setup could not determine the type of some files being loaded before you see the message "Press F6 if you...
..., or special disk controllers for which you have a device support disk from the Windows XP setup disk and press as soon as you need to manually specify an adapter. Windows Setup Setup could not determine the type of some files being loaded before you see the message "Press F6 if you...
Manual
Page 84
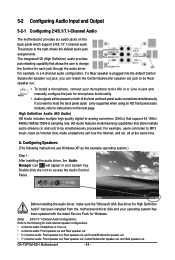
...out) to be Rear speaker out. • To install a microphone, connect your microphone to the Mic in or Line in jack and manually configure the jack for microphone functionality. • Audio signals will appear in a 4-channel audio configuration, if a Rear speaker is plugged ...quality digital-to MP3 music, have an Internet chat, make sure the "Microsoft UAA Bus driver for each jack through the audio driver. GA-73PVM-S2H Motherboard - 84 - 5-2 Configuring Audio Input and Output 5-2-1 Configuring 2/4/5.1/7.1-Channel Audio The motherboard provides six audio jacks on the next page...
...out) to be Rear speaker out. • To install a microphone, connect your microphone to the Mic in or Line in jack and manually configure the jack for microphone functionality. • Audio signals will appear in a 4-channel audio configuration, if a Rear speaker is plugged ...quality digital-to MP3 music, have an Internet chat, make sure the "Microsoft UAA Bus driver for each jack through the audio driver. GA-73PVM-S2H Motherboard - 84 - 5-2 Configuring Audio Input and Output 5-2-1 Configuring 2/4/5.1/7.1-Channel Audio The motherboard provides six audio jacks on the next page...

Manual
Page 94
...for any responsibility for RoHS (Restriction of Certain Hazardous Substances in your product's user's manual and we will fulfill the national laws as a commitment by GIGABYTE. Instead, the device should not be construed as interpreted from hazardous substances (Cd, ...no longer useful to you can responsibly recycle or reuse most major worldwide safety requirements. GA-73PVM-S2H Motherboard - 94 - Restriction of Hazardous Substances (RoHS) Directive Statement GIGABYTE products have been carefully selected to meet RoHS requirement. Waste Electrical & Electronic Equipment (...
...for any responsibility for RoHS (Restriction of Certain Hazardous Substances in your product's user's manual and we will fulfill the national laws as a commitment by GIGABYTE. Instead, the device should not be construed as interpreted from hazardous substances (Cd, ...no longer useful to you can responsibly recycle or reuse most major worldwide safety requirements. GA-73PVM-S2H Motherboard - 94 - Restriction of Hazardous Substances (RoHS) Directive Statement GIGABYTE products have been carefully selected to meet RoHS requirement. Waste Electrical & Electronic Equipment (...


