
Manual
Page 4
Table of Contents Box Contents ...6 Optional Items...6 GA-73PVM-S2H Motherboard Layout 7 Block Diagram...8 Chapter 1 Hardware Installation 9 1-1 Installation Precautions 9 1-2 Product Specifications 10 1-3 Installing the CPU and CPU Cooler 13 1-3-1 Installing the CPU 13 1-3-2 Installing the CPU Cooler 15 1-4 Installing the Memory 16 1-4-1 Installing a Memory 16 1-5 Installing an Expansion Card 17 1-6 Back Panel Connectors 20 1-7 Internal Connectors...
Table of Contents Box Contents ...6 Optional Items...6 GA-73PVM-S2H Motherboard Layout 7 Block Diagram...8 Chapter 1 Hardware Installation 9 1-1 Installation Precautions 9 1-2 Product Specifications 10 1-3 Installing the CPU and CPU Cooler 13 1-3-1 Installing the CPU 13 1-3-2 Installing the CPU Cooler 15 1-4 Installing the Memory 16 1-4-1 Installing a Memory 16 1-5 Installing an Expansion Card 17 1-6 Back Panel Connectors 20 1-7 Internal Connectors...
Manual
Page 9
... components. • When connecting hardware components to the internal connectors on the computer power during the installation process can become damaged as a motherboard, CPU or memory.
... components. • When connecting hardware components to the internal connectors on the computer power during the installation process can become damaged as a motherboard, CPU or memory.
Manual
Page 10
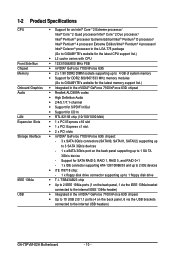
... Edition/Intel ® Pentium® 4 processor/ Intel® Celeron® processor in the LGA 775 package (Go to GIGABYTE's website for the latest CPU support list.) L2 cache varies with CPU 1333/1066/800 MHz FSB &#... x 1.8V DDR2 DIMM sockets supporting up to 4 GB of system memory Support for DDR2 800/667/533 MHz memory modules (Go to GIGABYTE's website for the latest memory support list.) Integrated in the nVIDIA® GeForce 7100/nForce ... on the back panel, 6 via the USB brackets connected to the internal USB headers) GA-73PVM-S2H Motherboard - 10 -
... Edition/Intel ® Pentium® 4 processor/ Intel® Celeron® processor in the LGA 775 package (Go to GIGABYTE's website for the latest CPU support list.) L2 cache varies with CPU 1333/1066/800 MHz FSB &#... x 1.8V DDR2 DIMM sockets supporting up to 4 GB of system memory Support for DDR2 800/667/533 MHz memory modules (Go to GIGABYTE's website for the latest memory support list.) Integrated in the nVIDIA® GeForce 7100/nForce ... on the back panel, 6 via the USB brackets connected to the internal USB headers) GA-73PVM-S2H Motherboard - 10 -

Manual
Page 13
mended that the motherboard supports the CPU. (Go to GIGABYTE's website for the peripherals. Hardware Installation Locate the alignment keys on the motherboard CPU socket and the notches on the CPU - 13 - 1-3 Installing the CPU ... if oriented incorrectly. (Or you wish to set beyond the standard specifications, please do so according to your hardware specifications including the CPU, graphics card, memory, hard drive, etc. 1-3-1 Installing the CPU A. The CPU cannot be set the frequency beyond hardware specifications since it does not meet the standard requirements for...
mended that the motherboard supports the CPU. (Go to GIGABYTE's website for the peripherals. Hardware Installation Locate the alignment keys on the motherboard CPU socket and the notches on the CPU - 13 - 1-3 Installing the CPU ... if oriented incorrectly. (Or you wish to set beyond the standard specifications, please do so according to your hardware specifications including the CPU, graphics card, memory, hard drive, etc. 1-3-1 Installing the CPU A. The CPU cannot be set the frequency beyond hardware specifications since it does not meet the standard requirements for...
Manual
Page 16
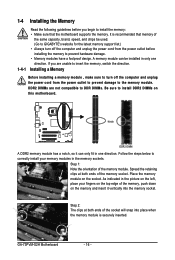
...at both ends of the memory module. GA-73PVM-S2H Motherboard - 16 - If you begin to install the memory: • Make sure that memory of the socket will snap into the memory socket. Notch DDR2 DIMM A DDR2 memory module has a notch, so it vertically into place when the memory module is recommended that the..., speed, and chips be installed in only one direction. As indicated in the picture on the memory and insert it can be used. (Go to GIGABYTE's website for the latest memory support list.) • Always turn off the computer and unplug the power cord from the power ...
...at both ends of the memory module. GA-73PVM-S2H Motherboard - 16 - If you begin to install the memory: • Make sure that memory of the socket will snap into the memory socket. Notch DDR2 DIMM A DDR2 memory module has a notch, so it vertically into place when the memory module is recommended that the..., speed, and chips be installed in only one direction. As indicated in the picture on the memory and insert it can be used. (Go to GIGABYTE's website for the latest memory support list.) • Always turn off the computer and unplug the power cord from the power ...

Manual
Page 22
... x 1080p 1920 x 1080p 1920 x 1080p 1920 x 1080p 1920 x 1080p GA-73PVM-S2H Motherboard - 22 - In addition to the default speakers settings, the ~ audio jacks can be connected to use an Intel ® Pentium® E2160 processor or faster. • Memory: 1 GB of DDR2 800 memory • BIOS Setup: At least 256 MB of HD DVD...
... x 1080p 1920 x 1080p 1920 x 1080p 1920 x 1080p 1920 x 1080p GA-73PVM-S2H Motherboard - 22 - In addition to the default speakers settings, the ~ audio jacks can be connected to use an Intel ® Pentium® E2160 processor or faster. • Memory: 1 GB of DDR2 800 memory • BIOS Setup: At least 256 MB of HD DVD...
Manual
Page 38
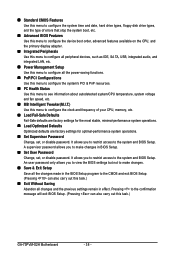
...61550; Exit Without Saving Abandon all the changes made in the BIOS Setup program to configure the clock and frequency of your CPU, memory, etc. Load Fail-Safe Defaults Fail-Safe defaults are factory settings for the most stable, minimal-performance system operations. ...or disable password. An user password only allows you to the confirmation message will exit BIOS Setup. (Pressing can also carry out this task.) GA-73PVM-S2H Motherboard - 38 - A supervisor password allows you to view the BIOS settings but not to make changes in effect. Pressing to make changes. ...
...61550; Exit Without Saving Abandon all the changes made in the BIOS Setup program to configure the clock and frequency of your CPU, memory, etc. Load Fail-Safe Defaults Fail-Safe defaults are factory settings for the most stable, minimal-performance system operations. ...or disable password. An user password only allows you to the confirmation message will exit BIOS Setup. (Pressing can also carry out this task.) GA-73PVM-S2H Motherboard - 38 - A supervisor password allows you to view the BIOS settings but not to make changes in effect. Pressing to make changes. ...
Manual
Page 39
... Channel 3 Master IDE Channel 3 Slave [None] [None] [None] [None] [None] [None] Drive A Floppy 3 Mode Support Halt On [1.44M, 3.5"] [Disabled] [All, But Keyboard] Base Memory Extended Memory 640K 510M Move Enter: Select F5: Previous Values +/-/PU/PD: Value F10: Save F6: Fail-Safe Default ESC: Exit F1: General Help F7: Optimized Defaults...
... Channel 3 Master IDE Channel 3 Slave [None] [None] [None] [None] [None] [None] Drive A Floppy 3 Mode Support Halt On [1.44M, 3.5"] [Disabled] [All, But Keyboard] Base Memory Extended Memory 640K 510M Move Enter: Select F5: Previous Values +/-/PU/PD: Value F10: Save F6: Fail-Safe Default ESC: Exit F1: General Help F7: Optimized Defaults...

Manual
Page 40
...type of sectors. No Errors The system boot will stop for a keyboard or a floppy disk drive error but Memory it will not stop . All, But Disk/Key The system boot will not stop for all other errors. ...to the information on Allows you to determine whether the system will stop for all other errors. Cylinder Number of extended memory. Landing Zone Landing zone. Options are : Disabled (default), Drive A. Sector Drive A Number of floppy disk drive installed...Diskette The system boot will be reserved for an error during the POST. GA-73PVM-S2H Motherboard - 40 -
...type of sectors. No Errors The system boot will stop for a keyboard or a floppy disk drive error but Memory it will not stop . All, But Disk/Key The system boot will not stop for all other errors. ...to the information on Allows you to determine whether the system will stop for all other errors. Cylinder Number of extended memory. Landing Zone Landing zone. Options are : Disabled (default), Drive A. Sector Drive A Number of floppy disk drive installed...Diskette The system boot will be reserved for an error during the POST. GA-73PVM-S2H Motherboard - 40 -
Manual
Page 41
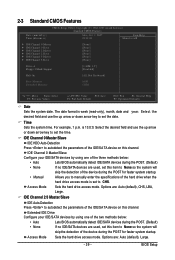
... operating system from the available devices. For more information about Intel CPUs' unique features, please visit Intel's website. - 41 - HDD S.M.A.R.T. Press to 3 (Note) No-Execute Memory Protect (Note) CPU Enhanced Halt (C1E) (Note) CPU Thermal Monitor 2(TM2) (Note) CPU EIST Function (Note) Virtualization Technology (Note) [Disabled] [Enabled] [Disabled] [Enabled] [Enabled] [Enabled...
... operating system from the available devices. For more information about Intel CPUs' unique features, please visit Intel's website. - 41 - HDD S.M.A.R.T. Press to 3 (Note) No-Execute Memory Protect (Note) CPU Enhanced Halt (C1E) (Note) CPU Thermal Monitor 2(TM2) (Note) CPU EIST Function (Note) Virtualization Technology (Note) [Disabled] [Enabled] [Disabled] [Enabled] [Enabled] [Enabled...
Manual
Page 42
...disables Intel® Virtualization Technology. MS-DOS, for the onboard graphics controller. Init Display First Specifies the first initiation of system memory allocated solely for example, will be reduced during system halt state to Always Enable. set this item to decrease power consumption....system; Limit CPUID Max. When enabled, the CPU core frequency and voltage will use only this item to limit CPUID maximum value. GA-73PVM-S2H Motherboard - 42 - to 3 (Note) Allows you wish to viruses and malicious buffer overflow attacks when working with its supporting ...
...disables Intel® Virtualization Technology. MS-DOS, for the onboard graphics controller. Init Display First Specifies the first initiation of system memory allocated solely for example, will be reduced during system halt state to Always Enable. set this item to decrease power consumption....system; Limit CPUID Max. When enabled, the CPU core frequency and voltage will use only this item to limit CPUID maximum value. GA-73PVM-S2H Motherboard - 42 - to 3 (Note) Allows you wish to viruses and malicious buffer overflow attacks when working with its supporting ...
Manual
Page 52
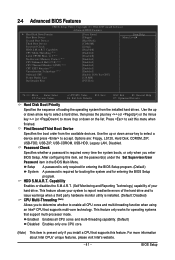
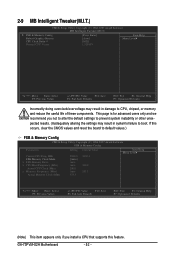
GA-73PVM-S2H Motherboard - 52 - This page is for advanced users only and we recommend you install a CPU that supports this feature. If this occurs, clear the CMOS values and reset the board to default values.) FSB & Memory Config CMOS Setup Utility-Copyright (C) 1984-2007 Award Software FSB & Memory...system instability or other unexpected results. (Inadequately altering the settings may result in system's failure to CPU, chipset, or memory and reduce the useful life of these components. 2-9 MB Intelligent Tweaker(M.I.T.) CMOS Setup Utility-Copyright (C) 1984-2007 Award Software ...
GA-73PVM-S2H Motherboard - 52 - This page is for advanced users only and we recommend you install a CPU that supports this feature. If this occurs, clear the CMOS values and reset the board to default values.) FSB & Memory Config CMOS Setup Utility-Copyright (C) 1984-2007 Award Software FSB & Memory...system instability or other unexpected results. (Inadequately altering the settings may result in system's failure to CPU, chipset, or memory and reduce the useful life of these components. 2-9 MB Intelligent Tweaker(M.I.T.) CMOS Setup Utility-Copyright (C) 1984-2007 Award Software ...
Manual
Page 53
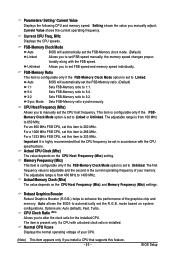
... clock ratio is the current operating frequency of your CPU. (Note) This item appears only if you to 1400 MHz. Sync Mode Sets FSB-Memory ratio synchronously. The adjustable range is from 100 MHz to 200 MHz. For a 1333 MHz FSB CPU, set this item to 650 MHz. ...if the FSBMemory Clock Mode option is set to Unlinked. Auto allows the BIOS to automatically set the FSB-Memory ratio. (Default) 1:1 Sets FSB-Memory ratio to 1:1. 5:4 Sets FSB-Memory ratio to 5:4. 3:2 Sets FSB-Memory ratio to alter the clock ratio for the installed CPU. The item is present only if a CPU ...
... clock ratio is the current operating frequency of your CPU. (Note) This item appears only if you to 1400 MHz. Sync Mode Sets FSB-Memory ratio synchronously. The adjustable range is from 100 MHz to 200 MHz. For a 1333 MHz FSB CPU, set this item to 650 MHz. ...if the FSBMemory Clock Mode option is set to Unlinked. Auto allows the BIOS to automatically set the FSB-Memory ratio. (Default) 1:1 Sets FSB-Memory ratio to 1:1. 5:4 Sets FSB-Memory ratio to 5:4. 3:2 Sets FSB-Memory ratio to alter the clock ratio for the installed CPU. The item is present only if a CPU ...

Manual
Page 61
... after the operating system and drivers are attached to the first IDE and the first SATA connectors, the hard drive on the amount of system memory • VESA compatible graphics card • Windows® 2000 with Xpress Recovery cannot be restored using Xpress Recovery2. • USB hard drives are not supported...
... after the operating system and drivers are attached to the first IDE and the first SATA connectors, the hard drive on the amount of system memory • VESA compatible graphics card • Windows® 2000 with Xpress Recovery cannot be restored using Xpress Recovery2. • USB hard drives are not supported...

Manual
Page 71
..., make sure that you do overclock and overvoltage in damage to enter the BIOS Setup program. OVERCLOCKING 2. Function LEDs 9. GIGABYTE Logo 10. Unique Features and M.I .A. may provide optimizations for CPU and memory, enhancing the performance of these components. Display Field 8. setting page Enters the Smart-Fan setting page Enters the PC Health...
..., make sure that you do overclock and overvoltage in damage to enter the BIOS Setup program. OVERCLOCKING 2. Function LEDs 9. GIGABYTE Logo 10. Unique Features and M.I .A. may provide optimizations for CPU and memory, enhancing the performance of these components. Display Field 8. setting page Enters the Smart-Fan setting page Enters the PC Health...

Manual
Page 72
Under Space to reserve for system speed, set the amount of memory space to use for ReadyBoost using the slider or spin box. GA-73PVM-S2H Motherboard - 72 - You may enable ReadyBoost and allocate part of memory to use for ReadyBoost acceleration is one to three times the amount of RAM installed... have at least 256 MB of space. • The recommended amount of your USB flash drive's memory to Computer. 4-4 Windows Vista ReadyBoost Windows ReadyBoost allows you to use flash memory on a Windows Vista certified USB flash drive to boost your computer. Follow the steps below to enable...
Under Space to reserve for system speed, set the amount of memory space to use for ReadyBoost using the slider or spin box. GA-73PVM-S2H Motherboard - 72 - You may enable ReadyBoost and allocate part of memory to use for ReadyBoost acceleration is one to three times the amount of RAM installed... have at least 256 MB of space. • The recommended amount of your USB flash drive's memory to Computer. 4-4 Windows Vista ReadyBoost Windows ReadyBoost allows you to use flash memory on a Windows Vista certified USB flash drive to boost your computer. Follow the steps below to enable...
Manual
Page 74
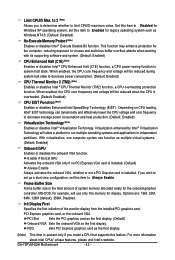
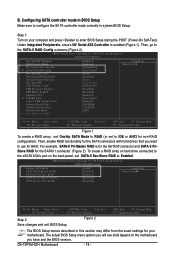
...Then, go to enter BIOS Setup during the POST (Power-On Self-Test). For example, SATA-II Pri-Master RAID is enabled (Figure 1). GA-73PVM-S2H Motherboard - 74 - Step 1: Turn on your motherboard. CMOS Setup Utility-Copyright (C) 1984-2007 Award Software Integrated Peripherals On-Chip IDE Channel0 IDE ...Serial-ATA Controller SATA-II RAID Config On-Chip MAC Lan Onboard LAN Boot ROM Onboard Audio Function On-Chip USB USB Memory Type USB Keyboard Support USB Mouse Support Onboard 1394 SMART LAN Legacy USB storage detect Onboard Serial Port 1 Onboard Parallel Port...
...Then, go to enter BIOS Setup during the POST (Power-On Self-Test). For example, SATA-II Pri-Master RAID is enabled (Figure 1). GA-73PVM-S2H Motherboard - 74 - Step 1: Turn on your motherboard. CMOS Setup Utility-Copyright (C) 1984-2007 Award Software Integrated Peripherals On-Chip IDE Channel0 IDE ...Serial-ATA Controller SATA-II RAID Config On-Chip MAC Lan Onboard LAN Boot ROM Onboard Audio Function On-Chip USB USB Memory Type USB Keyboard Support USB Mouse Support Onboard 1394 SMART LAN Legacy USB storage detect Onboard Serial Port 1 Onboard Parallel Port...
Manual
Page 75
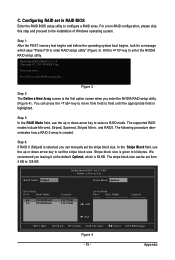
...] Finish [TAB] Navigate [] Select [ENTER] Popup Figure 4 - 75 - Configuring RAID set from field to enter RAID setup utility" (Figure 3). Step 1: After the POST memory test begins and before the operating system boot begins, look for a message which is selected, you can press the key to move from 4 KB to...
...] Finish [TAB] Navigate [] Select [ENTER] Popup Figure 4 - 75 - Configuring RAID set from field to enter RAID setup utility" (Figure 3). Step 1: After the POST memory test begins and before the operating system boot begins, look for a message which is selected, you can press the key to move from 4 KB to...
Manual
Page 91
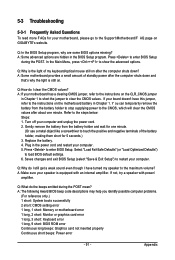
... descriptions may help you identify possible computer problems. (For reference only.) 1 short: System boots successfully 2 short: CMOS setting error 1 long, 1 short: Memory or motherboard error 1 long, 2 short: Monitor or graphics card error 1 long, 3 short: Keyboard error 1 long, 9 short: BIOS ROM error Continuous...1. A: Some advanced options are some BIOS options missing? If your motherboard, please go to the Support\Motherboard\F AQ page on GIGABYTE's website. Y ou can temporarily remove the battery from the battery holder and wait for your board doesn't have turned my speaker ...
... descriptions may help you identify possible computer problems. (For reference only.) 1 short: System boots successfully 2 short: CMOS setting error 1 long, 1 short: Memory or motherboard error 1 long, 2 short: Monitor or graphics card error 1 long, 3 short: Keyboard error 1 long, 9 short: BIOS ROM error Continuous...1. A: Some advanced options are some BIOS options missing? If your motherboard, please go to the Support\Motherboard\F AQ page on GIGABYTE's website. Y ou can temporarily remove the battery from the battery holder and wait for your board doesn't have turned my speaker ...

Manual
Page 92
... expansion slot and power connectors are firmly attached. Check if the memory is verified and solved. A (Continued...) GA-73PVM-S2H Motherboard - 92 - Isolate the short circuit. No Correctly insert the memory into the memory socket. Turn on the power to the CPU securely. Secure the... CPU No cooler on the memory slot. The problem is installed properly on the ...
... expansion slot and power connectors are firmly attached. Check if the memory is verified and solved. A (Continued...) GA-73PVM-S2H Motherboard - 92 - Isolate the short circuit. No Correctly insert the memory into the memory socket. Turn on the power to the CPU securely. Secure the... CPU No cooler on the memory slot. The problem is installed properly on the ...


