Manual
Page 5
... 5 ...69 4-4 Windows Vista ReadyBoost 70 Chapter 5 Appendix ...71 5-1 Configuring SATA Hard Drive(s 71 5-1-1 Configuring the Onboard SATA Controller 71 5-1-2 Making a SATA RAID/AHCI Driver Diskette 76 5-1-3 Installing the SATA RAID/AHCI Driver and Operating System 77 5-2 ConfiguringAudio Input and Output 82 5-2-1 Configuring 2/4/5.1-Channel Audio 82 5-2-2 Installing the S/PDIF Out Cable (Optional 85...
... 5 ...69 4-4 Windows Vista ReadyBoost 70 Chapter 5 Appendix ...71 5-1 Configuring SATA Hard Drive(s 71 5-1-1 Configuring the Onboard SATA Controller 71 5-1-2 Making a SATA RAID/AHCI Driver Diskette 76 5-1-3 Installing the SATA RAID/AHCI Driver and Operating System 77 5-2 ConfiguringAudio Input and Output 82 5-2-1 Configuring 2/4/5.1-Channel Audio 82 5-2-2 Installing the S/PDIF Out Cable (Optional 85...
Manual
Page 10
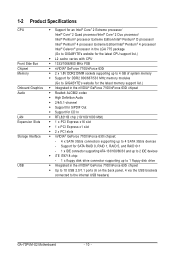
... for S/PDIF Out Š Support for SATA RAID 0, RAID 1, RAID 5, and RAID 0+1 - 1 x IDE connector supporting ATA-133/100/66/33 and up to 2 IDE devices Š iTE IT8718 chip: - 1 x floppy disk drive connector supporting up to the internal USB headers) GA-73PVM-S2 Motherboard - 10 - 1-2 Product Specifications CPU Front...174; 4 processor Extreme Edition/Intel® Pentium® 4 processor/ Intel® Celeron® processor in the LGA 775 package (Go to GIGABYTE's website for the latest CPU support list.) Š L2 cache varies with CPU Š 1333/1066/800 MHz FSB Š nVIDIA®...
... for S/PDIF Out Š Support for SATA RAID 0, RAID 1, RAID 5, and RAID 0+1 - 1 x IDE connector supporting ATA-133/100/66/33 and up to 2 IDE devices Š iTE IT8718 chip: - 1 x floppy disk drive connector supporting up to the internal USB headers) GA-73PVM-S2 Motherboard - 10 - 1-2 Product Specifications CPU Front...174; 4 processor Extreme Edition/Intel® Pentium® 4 processor/ Intel® Celeron® processor in the LGA 775 package (Go to GIGABYTE's website for the latest CPU support list.) Š L2 cache varies with CPU Š 1333/1066/800 MHz FSB Š nVIDIA®...
Manual
Page 23
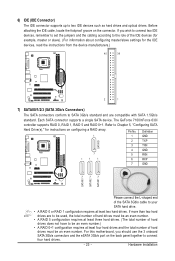
If more than two hard drives are compatible with SATA 1.5Gb/s standard. The GeForce 7100/nForce 630i controller supports RAID 0, RAID 1, RAID 5 and RAID 0+1. If you should use the 3 onboard SATA 3Gb/s connectors and the eSATA 3Gb/s port on the back panel together to ...1 7) SATAII0/1/2/3 (SATA 3Gb/s Connectors) The SATA connectors conform to SATA 3Gb/s standard and are to your SATA hard drive. • A RAID 0 or RAID 1 configuration requires at least four hard drives and the total number of the IDE devices (for example, master or slave). (For information about configuring...
If more than two hard drives are compatible with SATA 1.5Gb/s standard. The GeForce 7100/nForce 630i controller supports RAID 0, RAID 1, RAID 5 and RAID 0+1. If you should use the 3 onboard SATA 3Gb/s connectors and the eSATA 3Gb/s port on the back panel together to ...1 7) SATAII0/1/2/3 (SATA 3Gb/s Connectors) The SATA connectors conform to SATA 3Gb/s standard and are to your SATA hard drive. • A RAID 0 or RAID 1 configuration requires at least four hard drives and the total number of the IDE devices (for example, master or slave). (For information about configuring...
Manual
Page 40
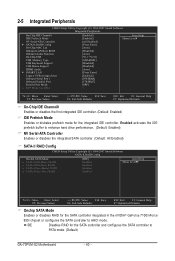
... ESC: Exit F1: General Help F7: Optimized Defaults Onchip SATA Mode Enables or disables RAID for the SATA controller integrated in the nVIDIA® GeForce 7100/nForce 630i chipset or configures the SATA controller to PATA mode. (Default) GA-73PVM-S2 Motherboard - 40 - 2-5 Integrated Peripherals CMOS Setup Utility-Copyright (C) 1984-2007 Award Software Integrated...
... ESC: Exit F1: General Help F7: Optimized Defaults Onchip SATA Mode Enables or disables RAID for the SATA controller integrated in the nVIDIA® GeForce 7100/nForce 630i chipset or configures the SATA controller to PATA mode. (Default) GA-73PVM-S2 Motherboard - 40 - 2-5 Integrated Peripherals CMOS Setup Utility-Copyright (C) 1984-2007 Award Software Integrated...

Manual
Page 41
.... USB Memory Type Specifies the type of memory allocated for the second SATA 3Gb/s connector (SATAII1). SATA-II Pri-Master RAID Enables or disables RAID for the fourth SATA 3Gb/s connector (SATAII3). This item is configurable only if the Onchip SATA Mode item is an interface... specification that allows the storage driver to RAID. (Default: Enabled) SATA-II Pri-Slave RAID Enables or disables RAID for USB devices. V1.1+V2.0 V1.1 Disabled Enables the integrated USB 1.1 and USB 2.0 controllers. (Default) ...
.... USB Memory Type Specifies the type of memory allocated for the second SATA 3Gb/s connector (SATAII1). SATA-II Pri-Master RAID Enables or disables RAID for the fourth SATA 3Gb/s connector (SATAII3). This item is configurable only if the Onchip SATA Mode item is an interface... specification that allows the storage driver to RAID. (Default: Enabled) SATA-II Pri-Slave RAID Enables or disables RAID for USB devices. V1.1+V2.0 V1.1 Disabled Enables the integrated USB 1.1 and USB 2.0 controllers. (Default) ...

Manual
Page 55
... driver disk. • After "Xpress Install" installs all the drivers and after system restarts, if a popup dialog box still appears asking for installation of the RAID controller driver, please insert the motherboard driver disk and select to install the driver automatically in the screen shot below. (If the driver Autorun screen...
... driver disk. • After "Xpress Install" installs all the drivers and after system restarts, if a popup dialog box still appears asking for installation of the RAID controller driver, please insert the motherboard driver disk and select to install the driver automatically in the screen shot below. (If the driver Autorun screen...
Manual
Page 59
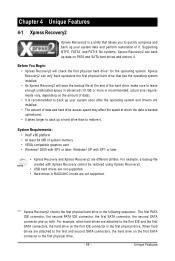
... - For example, a backup file created with Xpress Recovery cannot be restored using Xpress Recovery2. • USB hard drives are not supported. • Hard drives in RAID/AHCI mode are installed. • The amount of data and hard drive access speed may affect the speed at the end of it . Unique Features...
... - For example, a backup file created with Xpress Recovery cannot be restored using Xpress Recovery2. • USB hard drives are not supported. • Hard drives in RAID/AHCI mode are installed. • The amount of data and hard drive access speed may affect the speed at the end of it . Unique Features...
Manual
Page 64
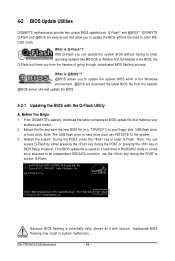
...BIOS Setup. However, if the BIOS update file is Q-Flash ? GA-73PVM-S2 Motherboard - 64 - During the POST, press the key to update the system BIOS while in system malfunction. What is saved to a hard drive in RAID/AHCI mode or a hard drive attached to an independent IDE/SATA... the system. GA-73PVM-S2 F1a . . . . : BIOS Setup/Q-Flash : XpressRecovery2 : Boot Menu : Qflash 11/21/2007-NF73-6A61NG05C-00 Because BIOS flashing is @BIOSTM? @BIOS allows you can access Q-Flash by either pressing the key during the POST to -use FAT32/16/12 file system. 3. GIGABYTE Q-Flash and...
...BIOS Setup. However, if the BIOS update file is Q-Flash ? GA-73PVM-S2 Motherboard - 64 - During the POST, press the key to update the system BIOS while in system malfunction. What is saved to a hard drive in RAID/AHCI mode or a hard drive attached to an independent IDE/SATA... the system. GA-73PVM-S2 F1a . . . . : BIOS Setup/Q-Flash : XpressRecovery2 : Boot Menu : Qflash 11/21/2007-NF73-6A61NG05C-00 Because BIOS flashing is @BIOSTM? @BIOS allows you can access Q-Flash by either pressing the key during the POST to -use FAT32/16/12 file system. 3. GIGABYTE Q-Flash and...

Manual
Page 65
.../updating the BIOS. • Do not remove the floppy disk, USB flash drive, or hard drive when the system is saved to a hard drive in RAID/AHCI mode or a hard drive attached to an independent IDE/SATA controller, use the up or down arrow key to select Update BIOS from Drive...
.../updating the BIOS. • Do not remove the floppy disk, USB flash drive, or hard drive when the system is saved to a hard drive in RAID/AHCI mode or a hard drive attached to an independent IDE/SATA controller, use the up or down arrow key to select Update BIOS from Drive...

Manual
Page 71
... on the motherboard. Installing SATA hard drive(s) in BIOS Setup. Configure SATA controller mode in your SATA RAID drives, please go to GIGABYTE's website to an available SATA port on the SATA controller. (Note 2) Required when the SATA controller is recommended that you may prepare only one end... of the SATA signal cable to the rear of the SATA hard drive and the other end to download the Windows Vista SATA RAID ...
... on the motherboard. Installing SATA hard drive(s) in BIOS Setup. Configure SATA controller mode in your SATA RAID drives, please go to GIGABYTE's website to an available SATA port on the SATA controller. (Note 2) Required when the SATA controller is recommended that you may prepare only one end... of the SATA signal cable to the rear of the SATA hard drive and the other end to download the Windows Vista SATA RAID ...

Manual
Page 72
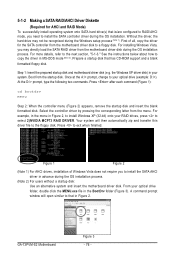
... Under Integrated Peripherals, ensure NV Serial-ATA Controller is for the SATAII0 connector and SATA-II PriSlave RAID for RAID. For example, SATA-II Pri-Master RAID is enabled (Figure 1). GA-73PVM-S2 Motherboard - 72 - Then, go to IDE or AHCI for the SATA connectors with hard drives ...that you have and the BIOS version. Then, enable RAID functionality for non-RAID configuration). Step 1: Turn on the motherboard you...
... Under Integrated Peripherals, ensure NV Serial-ATA Controller is for the SATAII0 connector and SATA-II PriSlave RAID for RAID. For example, SATA-II Pri-Master RAID is enabled (Figure 1). GA-73PVM-S2 Motherboard - 72 - Then, go to IDE or AHCI for the SATA connectors with hard drives ...that you have and the BIOS version. Then, enable RAID functionality for non-RAID configuration). Step 1: Turn on the motherboard you...
Manual
Page 73
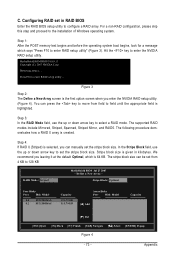
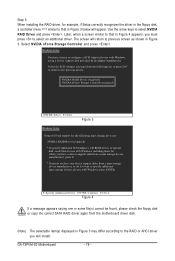
....0.0.11 Copyright (C) 2007 NVIDIA Corp. Detecting arrays ... Press F10 to enter the NVIDIA RAID setup utility. The following procedure demonstrates how a RAID 0 array is given in RAID BIOS Enter the RAID BIOS setup utility to the installation of Windows operating system. C. Hit the key to ... Figure 3 Step 2: The Define a New Array screen is 64 KB. You can press the key to move from 4 KB to enter RAID setup utility" (Figure 3). Stripe Block: Optimal Free Disks Port Disk Model 0.0 ST3120026AS 0.2 ST3120026AS Capacity 111.79GB 111.79GB Array Disks Port Disk...
....0.0.11 Copyright (C) 2007 NVIDIA Corp. Detecting arrays ... Press F10 to enter the NVIDIA RAID setup utility. The following procedure demonstrates how a RAID 0 array is given in RAID BIOS Enter the RAID BIOS setup utility to the installation of Windows operating system. C. Hit the key to ... Figure 3 Step 2: The Define a New Array screen is 64 KB. You can press the key to move from 4 KB to enter RAID setup utility" (Figure 3). Stripe Block: Optimal Free Disks Port Disk Model 0.0 ST3120026AS 0.2 ST3120026AS Capacity 111.79GB 111.79GB Array Disks Port Disk...

Manual
Page 74
... [F6] Back [F7] Finish [TAB] Navigate [KL] Select [ENTER] Popup Figure 6 GA-73PVM-S2 Motherboard - 74 - prompt appears. Press to move to reduce drive errors.) RAID Mode: Striped MediaShield BIOS Jul 27 2007 - RAID Mode: Striped MediaShield BIOS Jul 27 2007 - Define a New Array - Stripe Block: Optimal ... ] Del [ESC] Quit [F6] Back [F7] Finish [TAB] Navigate [KL] Select [ENTER] Popup Figure 5 Step 6: After assigning the RAID drives, press . The Free Disks block displays the information about the SATA hard drives that you wish to be overwritten. Step 5: Next, select the ...
... [F6] Back [F7] Finish [TAB] Navigate [KL] Select [ENTER] Popup Figure 6 GA-73PVM-S2 Motherboard - 74 - prompt appears. Press to move to reduce drive errors.) RAID Mode: Striped MediaShield BIOS Jul 27 2007 - RAID Mode: Striped MediaShield BIOS Jul 27 2007 - Define a New Array - Stripe Block: Optimal ... ] Del [ESC] Quit [F6] Back [F7] Finish [TAB] Navigate [KL] Select [ENTER] Popup Figure 5 Step 6: After assigning the RAID drives, press . The Free Disks block displays the information about the SATA hard drives that you wish to be overwritten. Step 5: Next, select the ...

Manual
Page 75
... the "Delete array?" message appears, press to confirm or to cancel. Array List - message appears, press to clear or to cancel. To exit the NVIDIA RAID setup utility, press in the main menu or + in the Array Detail screen. After that, the Array List screen appears, displaying the... RAID array that the boot device is defined in the BIOS.) Boot BBS MediaShield BIOS Jul 27 2007 - This indicates that you can proceed to the ...
... the "Delete array?" message appears, press to confirm or to cancel. Array List - message appears, press to clear or to cancel. To exit the NVIDIA RAID setup utility, press in the main menu or + in the Array Detail screen. After that, the Array List screen appears, displaying the... RAID array that the boot device is defined in the BIOS.) Boot BBS MediaShield BIOS Jul 27 2007 - This indicates that you can proceed to the ...
Manual
Page 76
...driver, the hard drive may directly load the SATA RAID driver from the motherboard driver disk during the OS installation process. Boot from the menu. Your system will open similar to install the SATA AHCI driver in Figure 2. GA-73PVM-S2 Motherboard Figure 3 - 76 - At the D:\> prompt...Vista does not require you may not be recognized during the Windows setup process (Note 1). From your system. 5-1-2 Making a SATA RAID/AHCI Driver Diskette (Required for the SATA controller from the motherboard driver disk to install the SATA controller driver during the OS installation....
...driver, the hard drive may directly load the SATA RAID driver from the motherboard driver disk during the OS installation process. Boot from the menu. Your system will open similar to install the SATA AHCI driver in Figure 2. GA-73PVM-S2 Motherboard Figure 3 - 76 - At the D:\> prompt...Vista does not require you may not be recognized during the Windows setup process (Note 1). From your system. 5-1-2 Making a SATA RAID/AHCI Driver Diskette (Required for the SATA controller from the motherboard driver disk to install the SATA controller driver during the OS installation....

Manual
Page 77
... determine the type of some files being loaded before you see the message "Press F6 if you have chosen to install a third party SCSI or RAID driver. Figure 1 Step 2: When a screen similar to that you need to manually specify an adapter. S=Specify Additional Device ENTER=Continue F3=Exit Figure 2 ...install Windows Vista/XP onto your system to boot from a mass storage device manufacturer, or do not want to install a 3rd party SCSI or RAID driver" (Figure 1). Currently, Setup will be a few moments of one or more mass storage devices installed in your system, or you have ...
... determine the type of some files being loaded before you see the message "Press F6 if you have chosen to install a third party SCSI or RAID driver. Figure 1 Step 2: When a screen similar to that you need to manually specify an adapter. S=Specify Additional Device ENTER=Continue F3=Exit Figure 2 ...install Windows Vista/XP onto your system to boot from a mass storage device manufacturer, or do not want to install a 3rd party SCSI or RAID driver" (Figure 1). Currently, Setup will be a few moments of one or more mass storage devices installed in your system, or you have ...
Manual
Page 78
The screen will install. GA-73PVM-S2 Motherboard - 78 - Use the arrow keys to previous screen ... for use with Windows, using a device support disk provided by an adapter manufacturer. Step 3: When installing the RAID driver, for example, if Setup correctly recognizes the driver in the floppy disk, a controller menu (Note) similar... to specify additional mass storage devices for use with Windows, press ENTER. NVIDIA RAID Driver (required) NVIDIA nForce Storage Controller (required) ENTER=Select F3=Exit Figure 3 Windows Setup Setup will appear...
The screen will install. GA-73PVM-S2 Motherboard - 78 - Use the arrow keys to previous screen ... for use with Windows, using a device support disk provided by an adapter manufacturer. Step 3: When installing the RAID driver, for example, if Setup correctly recognizes the driver in the floppy disk, a controller menu (Note) similar... to specify additional mass storage devices for use with Windows, press ENTER. NVIDIA RAID Driver (required) NVIDIA nForce Storage Controller (required) ENTER=Select F3=Exit Figure 3 Windows Setup Setup will appear...

Manual
Page 79
... with Windows, press ENTER. Enter= Continue R=Repair F3=Exit Figure 6 - 79 - Appendix The driver installation will load support for the following mass storage device(s): NVIDIA RAID Driver (required) NVIDIA nForce Storage Controller (required) * To specify additional SCSI adapters, CD-ROM drives, or special disk controllers for use with Windows, including those...
... with Windows, press ENTER. Enter= Continue R=Repair F3=Exit Figure 6 - 79 - Appendix The driver installation will load support for the following mass storage device(s): NVIDIA RAID Driver (required) NVIDIA nForce Storage Controller (required) * To specify additional SCSI adapters, CD-ROM drives, or special disk controllers for use with Windows, including those...

Manual
Page 80
...(The procedure below assumes that below appears (RAID hard drive(s) will not be sure to run the .exe file to install the SATA AHCI driver in your system.) Step 1: Restart your floppy disk (Figure 8). (You should go to GIGABYTE's website to boot from the Windows Vista ...setup disk and perform standard OS installation steps. When a screen similar to that only one RAID array exists in advance during the OS installation process. GA-73PVM-S2 Motherboard - 80 - Finally, insert the floppy disk...
...(The procedure below assumes that below appears (RAID hard drive(s) will not be sure to run the .exe file to install the SATA AHCI driver in your system.) Step 1: Restart your floppy disk (Figure 8). (You should go to GIGABYTE's website to boot from the Windows Vista ...setup disk and perform standard OS installation steps. When a screen similar to that only one RAID array exists in advance during the OS installation process. GA-73PVM-S2 Motherboard - 80 - Finally, insert the floppy disk...

Manual
Page 81
Appendix Figure 9 Step 4: After the driver is loaded, the screen will show the RAID hard drive. Select the RAID hard drive onto which you want to install the operating system and then press Next to continue the OS installation (Figure 10). Figure 10 - 81 - Step 3: When a screen as shown in Figure 9 appears, select NVIDIA nForce RAID Controller and press Next.
Appendix Figure 9 Step 4: After the driver is loaded, the screen will show the RAID hard drive. Select the RAID hard drive onto which you want to install the operating system and then press Next to continue the OS installation (Figure 10). Figure 10 - 81 - Step 3: When a screen as shown in Figure 9 appears, select NVIDIA nForce RAID Controller and press Next.


