
Manual
Page 3
... in this manual may be reproduced, copied, translated, transmitted, or published in the use GIGABYTE's unique features, read or download the information on/from the Support&Downloads\Motherboard\Technology Guide page on your motherboard revision before updating motherboard BIOS, drivers, or when looking for technical information. All rights reserved. Disclaimer Information in this...
... in this manual may be reproduced, copied, translated, transmitted, or published in the use GIGABYTE's unique features, read or download the information on/from the Support&Downloads\Motherboard\Technology Guide page on your motherboard revision before updating motherboard BIOS, drivers, or when looking for technical information. All rights reserved. Disclaimer Information in this...
Manual
Page 5
... 55 3-2 SoftwareApplications 56 3-3 Driver CD Information 56 3-4 Hardware Information 57 3-5 Contact Us ...57 Chapter 4 Unique Features 59 4-1 Xpress Recovery2 59 4-2 BIOS Update Utilities 64 4-2-1 Updating the BIOS with the Q-Flash Utility 64 4-2-2 Updating the BIOS with the @BIOS Utility 67 4-3 EasyTune 5 ...69 4-4 Windows Vista ReadyBoost 70 Chapter 5 Appendix ...71 5-1 Configuring SATA Hard Drive(s 71 5-1-1 Configuring the Onboard...
... 55 3-2 SoftwareApplications 56 3-3 Driver CD Information 56 3-4 Hardware Information 57 3-5 Contact Us ...57 Chapter 4 Unique Features 59 4-1 Xpress Recovery2 59 4-2 BIOS Update Utilities 64 4-2-1 Updating the BIOS with the Q-Flash Utility 64 4-2-2 Updating the BIOS with the @BIOS Utility 67 4-3 EasyTune 5 ...69 4-4 Windows Vista ReadyBoost 70 Chapter 5 Appendix ...71 5-1 Configuring SATA Hard Drive(s 71 5-1-1 Configuring the Onboard...
Manual
Page 31
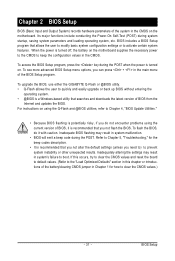
... caution. For instructions on . To flash the BIOS, do not encounter problems using the Q-Flash and @BIOS utilities, refer to Chapter 4, "BIOS Update Utilities." • Because BIOS flashing is potentially risky, if you need to) to clear the CMOS values.) - 31 - To upgrade the BIOS, use either the GIGABYTE Q-Flash or @BIOS utility. • Q-Flash allows the user...
... caution. For instructions on . To flash the BIOS, do not encounter problems using the Q-Flash and @BIOS utilities, refer to Chapter 4, "BIOS Update Utilities." • Because BIOS flashing is potentially risky, if you need to) to clear the CMOS values.) - 31 - To upgrade the BIOS, use either the GIGABYTE Q-Flash or @BIOS utility. • Q-Flash allows the user...

Manual
Page 52
...BIOS default settings. Always load the Optimized defaults after updating the BIOS or after clearing the CMOS values. 2-10 Load Fail-Safe Defaults CMOS Setup Utility-Copyright (C) 1984-2007 Award Software ` Standard CMOS Features Load Fail-Safe Defaults ` Advanced BIOS...Setup Utility-Copyright (C) 1984-2007 Award Software ` Standard CMOS Features Load Fail-Safe Defaults ` Advanced BIOS Features Load Optimized Defaults ` Integrated Peripherals Set Supervisor Password ` Power Management Setup Set User Password `...key to operate in optimum state. GA-73PVM-S2 Motherboard - 52 -
...BIOS default settings. Always load the Optimized defaults after updating the BIOS or after clearing the CMOS values. 2-10 Load Fail-Safe Defaults CMOS Setup Utility-Copyright (C) 1984-2007 Award Software ` Standard CMOS Features Load Fail-Safe Defaults ` Advanced BIOS...Setup Utility-Copyright (C) 1984-2007 Award Software ` Standard CMOS Features Load Fail-Safe Defaults ` Advanced BIOS Features Load Optimized Defaults ` Integrated Peripherals Set Supervisor Password ` Power Management Setup Set User Password `...key to operate in optimum state. GA-73PVM-S2 Motherboard - 52 -
Manual
Page 64
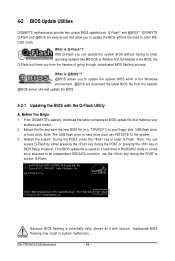
.../16/12 file system. 3. Restart the system. During the POST, press the key to update the system BIOS while in BIOS Setup. From GIGABYTE's website, download the latest compressed BIOS update file that matches your floppy disk, USB flash drive, or hard drive. GA-73PVM-S2 Motherboard - 64 - What is potentially risky, please do it with the Q-Flash Utility...
.../16/12 file system. 3. Restart the system. During the POST, press the key to update the system BIOS while in BIOS Setup. From GIGABYTE's website, download the latest compressed BIOS update file that matches your floppy disk, USB flash drive, or hard drive. GA-73PVM-S2 Motherboard - 64 - What is potentially risky, please do it with the Q-Flash Utility...

Manual
Page 65
Step 1: 1. Select the BIOS update file and press . appears, press to the main menu. Updating the BIOS When updating the BIOS, choose the location where the BIOS file is updating the BIOS. Step 3: When the update process is complete, press any keEyStCo:Rcoensetitnue F10:Power Off - 65 - Select Floppy A and ...USB flash drive or hard drives using FAT32/16/12 file system. • If the BIOS update file is displayed on the screen. In the main menu of the system reading the BIOS file from Drive Sa0vefilBeI(Os)SfotounDdrive KL:Move ESC:Reset :Power Off Total size : ...
Step 1: 1. Select the BIOS update file and press . appears, press to the main menu. Updating the BIOS When updating the BIOS, choose the location where the BIOS file is updating the BIOS. Step 3: When the update process is complete, press any keEyStCo:Rcoensetitnue F10:Power Off - 65 - Select Floppy A and ...USB flash drive or hard drives using FAT32/16/12 file system. • If the BIOS update file is displayed on the screen. In the main menu of the system reading the BIOS file from Drive Sa0vefilBeI(Os)SfotounDdrive KL:Move ESC:Reset :Power Off Total size : ...

Manual
Page 66
... Q-Flash and reboot the system. As the system boots, you should see the new BIOS version is complete after a BIOS update, so we recommend that you reload BIOS defaults. GA-73PVM-S2 Motherboard - 66 - Step 4: Press and then to CMOS and exit BIOS Setup. System will re-detect all peripherals devices after the system restarts. The procedure is...
... Q-Flash and reboot the system. As the system boots, you should see the new BIOS version is complete after a BIOS update, so we recommend that you reload BIOS defaults. GA-73PVM-S2 Motherboard - 66 - Step 4: Press and then to CMOS and exit BIOS Setup. System will re-detect all peripherals devices after the system restarts. The procedure is...
Manual
Page 67
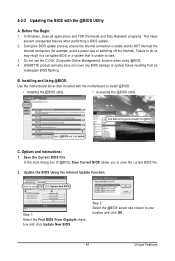
... performing a BIOS update. 2. C. During the BIOS update process, ensure the Internet connection is unable to start. 3. Do not use the C.O.M. (Corporate Online Management) function when using @BIOS. 4. GIGABYTE product warranty does not cover any BIOS damage or system failure resulting from an inadequate BIOS flashing. Click Start>All Programs>GIGABYTE>@BIOS Select @BIOS and click Install. Update the BIOS Using the Internet Update Function...
... performing a BIOS update. 2. C. During the BIOS update process, ensure the Internet connection is unable to start. 3. Do not use the C.O.M. (Corporate Online Management) function when using @BIOS. 4. GIGABYTE product warranty does not cover any BIOS damage or system failure resulting from an inadequate BIOS flashing. Click Start>All Programs>GIGABYTE>@BIOS Select @BIOS and click Install. Update the BIOS Using the Internet Update Function...
Manual
Page 68
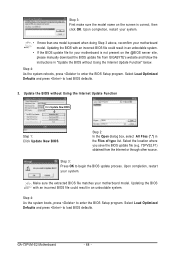
... 3: Press OK to load BIOS defaults. 3. GA-73PVM-S2 Motherboard - 68 - Update the BIOS without Using the Internet Update Function" below. Step 2: In the Open dialog box, select All Files (*.*) in "Update the BIOS without Using the Internet Update Function Click Update New BIOS Step 1: Click Update New BIOS. Select the location where you save the BIOS update file (e.g. 73PVS2.F1) obtained from GIGABYTE's website and follow...
... 3: Press OK to load BIOS defaults. 3. GA-73PVM-S2 Motherboard - 68 - Update the BIOS without Using the Internet Update Function" below. Step 2: In the Open dialog box, select All Files (*.*) in "Update the BIOS without Using the Internet Update Function Click Update New BIOS Step 1: Click Update New BIOS. Select the location where you save the BIOS update file (e.g. 73PVS2.F1) obtained from GIGABYTE's website and follow...


