
Manual
Page 7
The specification may differ by the motherboard model. 7 Hardware Monitor BIOS Additional Features GA-6FASV Series Motherboard 2 x RJ45 LAN ports (GA-6FASV1) 1 x RJ45 LAN ports (GA-6FASV2) 1 x NMI switch Winbond W83627DHG-P controller Enhanced features with CPU Vcore, DDR3 1.5V, VCC3 (3.3V), 12V, 5V, and System Temperature Values viewing &#...
The specification may differ by the motherboard model. 7 Hardware Monitor BIOS Additional Features GA-6FASV Series Motherboard 2 x RJ45 LAN ports (GA-6FASV1) 1 x RJ45 LAN ports (GA-6FASV2) 1 x NMI switch Winbond W83627DHG-P controller Enhanced features with CPU Vcore, DDR3 1.5V, VCC3 (3.3V), 12V, 5V, and System Temperature Values viewing &#...

Manual
Page 8
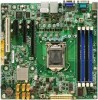
... x 8 Slot PCIe2.0 (5.0GT/s), x 16 Slot Channel A DDR3 sockets Channel B DDR3 sockets USB 2.0 and Gigabit LAN ports (GA-6FASV1) USB2.0 only (GA-6FASV2) USB 2.0 and Gigabit LAN ports NMI switch VGA port Serial port Keyboard and mouse connectors Audio connector (option) Front panel connector ...) 24 pin ATX power connector 4 pin ATX power connector CMOS battery SGPIO connector (Option) Clear CMOS jumper Set Supervisor Password Jumper BIOS recovery jumper 8 GA-6FASV1/GA-6FASV2 Motherboard Component No Code 1. U11 5. FAN2 15. DIMM3/1 22. AUDIO** 30. P1 33. U13 9. PCI2 20....
... x 8 Slot PCIe2.0 (5.0GT/s), x 16 Slot Channel A DDR3 sockets Channel B DDR3 sockets USB 2.0 and Gigabit LAN ports (GA-6FASV1) USB2.0 only (GA-6FASV2) USB 2.0 and Gigabit LAN ports NMI switch VGA port Serial port Keyboard and mouse connectors Audio connector (option) Front panel connector ...) 24 pin ATX power connector 4 pin ATX power connector CMOS battery SGPIO connector (Option) Clear CMOS jumper Set Supervisor Password Jumper BIOS recovery jumper 8 GA-6FASV1/GA-6FASV2 Motherboard Component No Code 1. U11 5. FAN2 15. DIMM3/1 22. AUDIO** 30. P1 33. U13 9. PCI2 20....

Manual
Page 12
... it down. For dualchannel operation, DIMMs must be installed in only one direction. The motherboard supports DDR3 memory modules, whereby BIOS will automatically detect memory capacity and specifications. Installing memory modules Before installing the memory modules, please comply with similar capacity, specifications... is recommended to prevent hardware damage. 3. It is switched off to use the memory with the following conditions: 1. Step 3. GA-6FASV Series Motherboard 2.2. Close the plastic clip at both edges of the DIMM slots to remove the DIMM module. 1 2 2...
... it down. For dualchannel operation, DIMMs must be installed in only one direction. The motherboard supports DDR3 memory modules, whereby BIOS will automatically detect memory capacity and specifications. Installing memory modules Before installing the memory modules, please comply with similar capacity, specifications... is recommended to prevent hardware damage. 3. It is switched off to use the memory with the following conditions: 1. Step 3. GA-6FASV Series Motherboard 2.2. Close the plastic clip at both edges of the DIMM slots to remove the DIMM module. 1 2 2...
Manual
Page 21
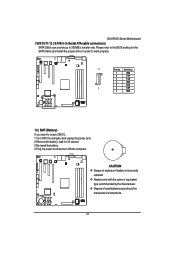
... the manufacturer. Dispose of used batteries according to work properly. 7 Pin No. Please refer to the BIOS setting for 30 second. 3.Re-install the battery. 4.Plug the power cord and turn ON the computer. GA-6FASV Series Motherboard 7/8/9/10/11/12 ) SATA 0~5 (Serial ATA cable connectors) SATA 3Gb/s can provide up...
... the manufacturer. Dispose of used batteries according to work properly. 7 Pin No. Please refer to the BIOS setting for 30 second. 3.Re-install the battery. 4.Plug the power cord and turn ON the computer. GA-6FASV Series Motherboard 7/8/9/10/11/12 ) SATA 0~5 (Serial ATA cable connectors) SATA 3Gb/s can provide up...

Manual
Page 24
...: Enable BIOS Recovery function. 22 ) USB_PWR1 (USB1 power source selection jumper) 1 1-2 close: Normal power operation. 1 2-3close:Standbypoweroperation.(Defaultsetting) 23 ) USB_PWR2 (USB2 power source selection jumper) 1 1-2 close: Normal power operation. 1 2-3close:Standbypoweroperation.(Defaultsetting) 24 ) USB_PWR3 (USB3 power source selection jumper) 1 1-2 close: Normal power operation. 1 2-3 close: Standby power operation. (Default setting) 24 GA-6FASV...
...: Enable BIOS Recovery function. 22 ) USB_PWR1 (USB1 power source selection jumper) 1 1-2 close: Normal power operation. 1 2-3close:Standbypoweroperation.(Defaultsetting) 23 ) USB_PWR2 (USB2 power source selection jumper) 1 1-2 close: Normal power operation. 1 2-3close:Standbypoweroperation.(Defaultsetting) 24 ) USB_PWR3 (USB3 power source selection jumper) 1 1-2 close: Normal power operation. 1 2-3 close: Standby power operation. (Default setting) 24 GA-6FASV...

Manual
Page 25
.... When the power is turned on the motherboard supplies the necessary power to the item in the CMOS SRAM of the motherboard. Chapter 3 BIOS Setup GA-6FASV Series Motherboard BIOS (Basic Input and Output System) includes a CMOS SETUP utility which allows user to configure required settings or to the CMOS SETUP screen. ENTERINGSETUP...
.... When the power is turned on the motherboard supplies the necessary power to the item in the CMOS SRAM of the motherboard. Chapter 3 BIOS Setup GA-6FASV Series Motherboard BIOS (Basic Input and Output System) includes a CMOS SETUP utility which allows user to configure required settings or to the CMOS SETUP screen. ENTERINGSETUP...

Manual
Page 26
.... (ex: Auto detect fan and temperature status, automatically configure hard disk parameters.) Power This setup page includes all the items in the BIOS Exit Setup menu when somehow the system is displayed at the bottom of the screen. Status Page Setup Menu / Option Page Setup Menu Press F1... selections for stability. Main This setup page includes all the items of Green function features. Security Change, set, or disable password. GA-6FASV Series Motherboard GETTINGHELP Main Menu The on-line description of the highlighted setup function is not stable as usual.
.... (ex: Auto detect fan and temperature status, automatically configure hard disk parameters.) Power This setup page includes all the items in the BIOS Exit Setup menu when somehow the system is displayed at the bottom of the screen. Status Page Setup Menu / Option Page Setup Menu Press F1... selections for stability. Main This setup page includes all the items of Green function features. Security Change, set, or disable password. GA-6FASV Series Motherboard GETTINGHELP Main Menu The on-line description of the highlighted setup function is not stable as usual.

Manual
Page 27
Note that the "Day" automatically changed after you enter Phoenix BIOS Setup Utility, the Main Menu (Figure 1) will appear on the 24-hour military time clock. Set the System Time (HH:MM:SS) BIOS Information BIOS Version: displays the BIOS version. Figure 1: Main System Date Set the System Date. System Time The time is calculated based on the screen. Use arrow keys to select among the items and press to accept or enter the sub-menu. GA-6FASV Series Motherboard Main Once you set the date. BIOS Date: displays the BIOS established date. 27
Note that the "Day" automatically changed after you enter Phoenix BIOS Setup Utility, the Main Menu (Figure 1) will appear on the 24-hour military time clock. Set the System Time (HH:MM:SS) BIOS Information BIOS Version: displays the BIOS version. Figure 1: Main System Date Set the System Date. System Time The time is calculated based on the screen. Use arrow keys to select among the items and press to accept or enter the sub-menu. GA-6FASV Series Motherboard Main Once you set the date. BIOS Date: displays the BIOS established date. 27

Manual
Page 28
Total Memory The BIOS determines how much total memory is present during the POST. 28 GA-6FASV Series Motherboard Processor Information This category includes the information of CPU type, Speed ,and number of CPU count.
Total Memory The BIOS determines how much total memory is present during the POST. 28 GA-6FASV Series Motherboard Processor Information This category includes the information of CPU type, Speed ,and number of CPU count.

Manual
Page 36
... Control Settings Manual Select 'Manual" will clear the memory error status. Auto Auto configuration. (Default setting) Memory Frequency Select the desire value of the BIOS. Memory Configuration GA-6FASV Series Motherboard Figure 2-2: Memory Configuration Base Memory/Extended Memory/Memory Frequency/DIMM Status These category is display-only which is determined by POST...
... Control Settings Manual Select 'Manual" will clear the memory error status. Auto Auto configuration. (Default setting) Memory Frequency Select the desire value of the BIOS. Memory Configuration GA-6FASV Series Motherboard Figure 2-2: Memory Configuration Base Memory/Extended Memory/Memory Frequency/DIMM Status These category is display-only which is determined by POST...

Manual
Page 46
...But Keyboard The system boot will not stop for any error that may be detected and you will be stopped. All Error Whenever the BIOS detects a non-fatal error the system will stop for all other errors. (Default setting) 46 Enabled Enable Boot-time Diagnostic. No... Error The system boot will not stop for a keyboard error; it will be prompted. Boot Device Configuration GA-6FASV Series Motherboard Figure 2-7: Boot Device Configuration Boot -time Diagnostic When this function. (Default setting) Post Error Pause The category determines whether...
...But Keyboard The system boot will not stop for any error that may be detected and you will be stopped. All Error Whenever the BIOS detects a non-fatal error the system will stop for all other errors. (Default setting) 46 Enabled Enable Boot-time Diagnostic. No... Error The system boot will not stop for a keyboard error; it will be prompted. Boot Device Configuration GA-6FASV Series Motherboard Figure 2-7: Boot Device Configuration Boot -time Diagnostic When this function. (Default setting) Post Error Pause The category determines whether...

Manual
Page 60
Therefore, when you boot up your computer next time, the BIOS will exit the Setup Utility and restart your computer when selecting this time into CMOS. Exit GA-6FASV Series Motherboard Figure 7: Exit About This Section: Exit Once you have changed all the present setting values the user made ...option allows user to ask for the following sub-menu. The previous selection remain in CMOS. This will re-configure your changes and exit BIOS setup program. Select "Exit" from the menu bar, to display the following confirmation message: Pressing 'Y' to exit system setup without changing any...
Therefore, when you boot up your computer next time, the BIOS will exit the Setup Utility and restart your computer when selecting this time into CMOS. Exit GA-6FASV Series Motherboard Figure 7: Exit About This Section: Exit Once you have changed all the present setting values the user made ...option allows user to ask for the following sub-menu. The previous selection remain in CMOS. This will re-configure your changes and exit BIOS setup program. Select "Exit" from the menu bar, to display the following confirmation message: Pressing 'Y' to exit system setup without changing any...


