Manual
Page 8
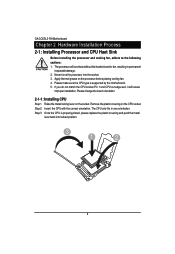
... in one orientation. Apply thermal grease on the CPU socket. Never force the processor into locked position. 3 1 2 8 Step 2 Insert the CPU with the correct orientation. Step 3 Once the CPU is supported by the motherboard. 5. English GA-3CESL3-RH Motherboard Chapter 2 Hardware Installation Process 2-1: Installing Processor and CPU Haet Sink Before installing the processor and...
... in one orientation. Apply thermal grease on the CPU socket. Never force the processor into locked position. 3 1 2 8 Step 2 Insert the CPU with the correct orientation. Step 3 Once the CPU is supported by the motherboard. 5. English GA-3CESL3-RH Motherboard Chapter 2 Hardware Installation Process 2-1: Installing Processor and CPU Haet Sink Before installing the processor and...
Manual
Page 9
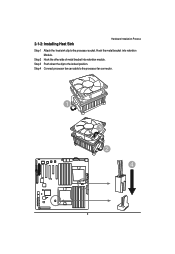
Step 3 Push down the clip to the processor fan connector. 1 3 2 4 9 Step 4 Connect processor fan can cable to the locked position. Hook the metal bracket into retention module. Step 2 Hook the other side of metal bracket into retention Module. 2-1-2: Installing Heat Sink Hardware Installation Process Step 1 Attach the heat sink clip to the processor socket.
Step 3 Push down the clip to the processor fan connector. 1 3 2 4 9 Step 4 Connect processor fan can cable to the locked position. Hook the metal bracket into retention module. Step 2 Hook the other side of metal bracket into retention Module. 2-1-2: Installing Heat Sink Hardware Installation Process Step 1 Attach the heat sink clip to the processor socket.