Gigabyte GA-X99-SOC Force Support and Manuals
Get Help and Manuals for this Gigabyte item
View All Support Options Below
Free Gigabyte GA-X99-SOC Force manuals!
Problems with Gigabyte GA-X99-SOC Force?
Ask a Question
Free Gigabyte GA-X99-SOC Force manuals!
Problems with Gigabyte GA-X99-SOC Force?
Ask a Question
Popular Gigabyte GA-X99-SOC Force Manual Pages
User Manual - Page 1
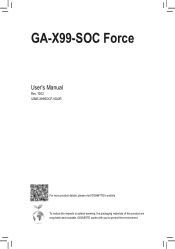
GA-X99-SOC Force
User's Manual
Rev. 1002 12ME-X99SOCF-1002R
For more product details, please visit GIGABYTE's website. To reduce the impacts on global warming, the packaging materials of this product are recyclable and reusable. GIGABYTE works with you to protect the environment.
User Manual - Page 2

Motherboard GA-X99-SOC Force
Aug. 22, 2014
Motherboard GA-X99-SOC Force
Aug. 22, 2014
User Manual - Page 4

...-X99-SOC Force Motherboard Block Diagram 8
Chapter 1 Hardware Installation 9 1-1 Installation Precautions 9 1-2 Product Specifications 10 1-3 Installing the CPU and CPU Cooler 13
1-3-1 Installing the CPU...13 1-3-2 Installing the CPU Cooler 15 1-4 Installing the Memory 16 1-4-1 4 Channel Memory Configuration 16 1-4-2 Installing a Memory 17 1-5 Installing an Expansion Card 18 1-6 Setting...
User Manual - Page 6

... (Part No. 12CF1-1CM001-3*R)
- 6 - The box contents are subject to 3 power cable (2x4 ATX 12V) 55 One OC Brace
The box contents above are for reference only and the actual items shall depend on the product package you obtain.
Box Contents
55 GA-X99-SOC Force motherboard 55 Motherboard driver disk 55 User's Manual 55 Quick Installation Guide 55...
User Manual - Page 7

...DDR4_4_2B
AUDIO
PCIE_1
Intel® GbE PCIE_5 LAN
PCIE_4
M2_20G
PCIE_6 GA-X99-SOC Force
PCIE_2
CODEC
PCIE_7
System Sensor
Temperature 2
PCIE_3
BAT
LED_CON2
+_+_
...X99
iTE® Super I/O B_BIOS M_BIOS
BBIOS_LED CLR_CMOS MBIOS_LED
sSATA3 31 20
F_AUDIO SYS_FAN2 OC_PAN
F_USB2
SPDIF_O
THB_C
COMA
F_USB1
F_USB30
SYS_FAN3 F_PANEL System Temperature
Sensor 1
(Note) For debug code...
User Manual - Page 8
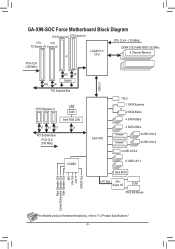
GA-X99-SOC Force Motherboard Block Diagram
1 PCI Express x16 2 PCI Express x8...SATA 6Gb/s
Intel® GbE LAN
4 SATA 6Gb/s
x1 x1 x1
x1
PCI Express Bus
PCIe CLK (100 MHz)
Intel® X99
4 SATA 6Gb/s
Renesas® uPD720210 Hub
Renesas® uPD720210 Hub
4 USB 3.0/2.0 4 USB 3.0/2.0
2 USB 3.0/2.0
CODEC
8 USB 2.0/1.1... information/limitation(s), refer to "1-2 Product Specifications." - 8 -
User Manual - Page 18
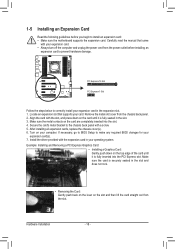
... cover from the slot. Secure the card's metal bracket to install an expansion card: •• Make sure the motherboard supports the expansion card. If necessary, go to BIOS Setup to correctly install your expansion card in the expansion slot. 1.
Carefully read the manual that supports your card.
1-5 Installing an Expansion Card
Read the following guidelines before...
User Manual - Page 20
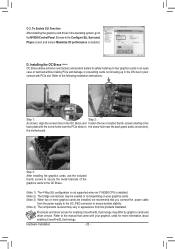
... metal brackets of the graphics cards to the manual that you connect the power cable
from
back plate with PCIe slot. Refer to the OC Brace.
(Note 1) The 4-Way SLI configuration is not supported when an i7-5820K CPU is enabled.
D. Refer to the following installation instructions:
Step 1:
Step 2:
As shown, align the screw...
User Manual - Page 23

...change hardware components or conduct hardware testing. FF__ UU
FF__
- 23 -
Hardware Installation The Clear Battery button has the same function
as removing the battery from the ... After system restart, go to BIOS Setup to load factory defaults (select Load Optimized Defaults) or manually configure the BIOS settings (refer to Chapter 2, "BIOS Setup," for five minutes before using the...
User Manual - Page 36

Hardware Installation
- 36 -
To clear the CMOS values, use a metal object like a screwdriver to touch the two pins ...clearing the CMOS values.
•• After system restart, go to BIOS Setup to load factory defaults (select Load Optimized Defaults) or manually configure the BIOS settings (refer to Chapter 2, "BIOS Setup," for more information).
B S_ B
19) SUBZ (Temp Sensor Ports)
You...
User Manual - Page 39

... default settings (unless you not flash the BIOS. BIOS includes a BIOS Setup program that you need to) to prevent system instability or other unexpected results. When the power is turned on the motherboard supplies the necessary power to the CMOS to activate certain system features. To upgrade the BIOS, use either the GIGABYTE Q-Flash...
User Manual - Page 47

...specifications. (Default: Auto)
&& No. Auto sets the power limit according to the CPU specifications. (Default: Auto)
&& Core Current Limit (Amps) Allows you to enable in order to set a current limit for operating systems that support... Power Limit (Watts) Allows you install a CPU that supports this feature. Auto lets the BIOS automatically configure this setting. (Default: Auto)
(Note)
...
User Manual - Page 81
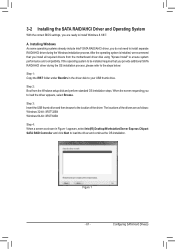
...to be installed requires that you install all required drivers from the Windows setup disk and perform standard OS installation steps.
3-2 Installing the SATA RAID/AHCI Driver and Operating System
With the correct BIOS settings, you provide additional SATA RAID/AHCI driver during the Windows installation process. Step 2: Boot from the motherboard driver disk using "Xpress Install" to your...
User Manual - Page 88

...
Update BIOS From Drive.
•• The Save BIOS to Drive option allows you make the selection. Insert the USB flash drive containing the BIOS file into the computer. In the main menu of Q-Flash, use the key during the POST to select.
Step 1: 1. Select USB Flash Drive.
Q-Flash
Model Name : X99-SOC Force BIOS...
User Manual - Page 113
... hardware specification.)
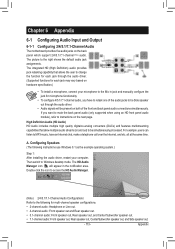
Center/Subwoofer Speaker Out
Rear Speaker Out
Line In Front Speaker Out Mic In
•• To install a ...to the following instructions use Windows 8.1 as the example operating system.)
Step 1: After installing the audio driver, restart your ...driver. (Supported functions for each jack may vary based on both of the audio jacks to the Mic in jack and manually...
Gigabyte GA-X99-SOC Force Reviews
We have not received any reviews for Gigabyte yet.