Gigabyte GA-Z87M-D3HP Support and Manuals
Get Help and Manuals for this Gigabyte item
View All Support Options Below
Free Gigabyte GA-Z87M-D3HP manuals!
Problems with Gigabyte GA-Z87M-D3HP?
Ask a Question
Free Gigabyte GA-Z87M-D3HP manuals!
Problems with Gigabyte GA-Z87M-D3HP?
Ask a Question
Popular Gigabyte GA-Z87M-D3HP Manual Pages
User Manual - Page 1
GA-Z87M-D3HP
User's Manual
Rev. 1001 12ME-Z87MD3P-1001R
User Manual - Page 2
Motherboard GA-Z87M-D3HP
May 31, 2013
Motherboard GA-Z87M-D3HP
May 31, 2013
User Manual - Page 4
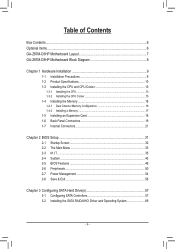
Table of Contents
Box Contents...6 Optional Items...6 GA-Z87M-D3HP Motherboard Layout 7 GA-Z87M-D3HP Motherboard Block Diagram 8
Chapter 1 Hardware Installation 9 1-1 Installation Precautions 9 1-2 Product Specifications 10 1-3 Installing the CPU and CPU Cooler 13
1-3-1 Installing the CPU...13 1-3-2 Installing the CPU Cooler 15 1-4 Installing the Memory 16 1-4-1 Dual Channel Memory ...
User Manual - Page 6
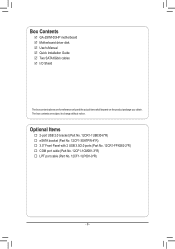
.... 12CF1-3SATPW-4*R) …… 3.5" Front Panel with 2 USB 3.0/2.0 ports (Part No. 12CR1-FPX582-2*R) …… COM port cable (Part No. 12CF1-1CM001-3*R) …… LPT port cable (Part No. 12CF1-1LP001-0*R)
- 6 - Box Contents
55 GA-Z87M-D3HP motherboard 55 Motherboard driver disk 55 User's Manual 55 Quick Installation Guide 55 Two SATA 6Gb/s cables 55 I/O Shield
The box contents above...
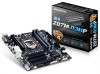
User Manual - Page 7
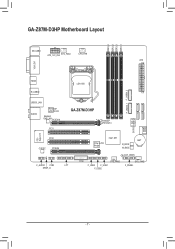
... DDR3_2 DDR3_3 DDR3_1
KB_USB3
ATX_12V_2X4 SYS_FAN1
CPU_FAN
ATX
VGA_DVI
HDMI R_USB30
LGA1150
F_USB30_1 F_USB30_2
USB30_LAN
AUDIO
Renesas® uPD720210 Realtek® GbE LAN PCIEX16
PCI1
GA-Z87M-D3HP
Renesas® uPD720210
5 4
3 2
1 0
SATA3
iTE® Super I/O
PCI2
CODEC
PCIEX4
F_AUDIO COM
LPT
SPDIF_O
Intel® Z87 BAT
PCIe to PCI Bridge
B_BIOS M_BIOS
CLR_CMOS...
User Manual - Page 8
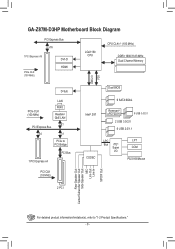
GA-Z87M-D3HP Motherboard Block Diagram
PCI Express Bus x16
1 PCI Express x16
PCIe CLK (100 MHz)
DVI-D HDMI
LGA1150 CPU
CPU CLK+/- (100 MHz)
DDR3 1600/1333 ...
Rear Speaker Out Center/Subwoofer Speaker Out
Side Speaker Out MIC
Line Out Line In
S/PDIF Out
For detailed product information/limitation(s), refer to "1-2 Product Specifications." - 8 -
User Manual - Page 18
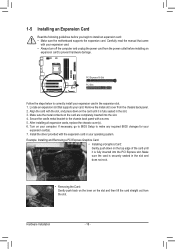
...; Make sure the motherboard supports the expansion card.
Locate an expansion slot that came
with the slot, and press down on the card until it is fully seated in the expansion slot. 1. If necessary, go to BIOS Setup to correctly install your computer. Hardware Installation
- 18 - Install the driver provided with a screw. 5. Example: Installing and Removing a PCI...
User Manual - Page 29
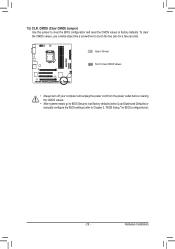
... power outlet before clearing the CMOS values.
•• After system restart, go to BIOS Setup to load factory defaults (select Load Optimized Defaults) or manually configure the BIOS settings (refer to Chapter 2, "BIOS Setup," for a few seconds.
Hardware Installation To clear the CMOS values, use a metal object like a screwdriver to factory defaults. 15) CLR_CMOS...
User Manual - Page 31
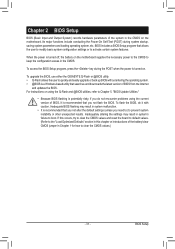
... BIOS, it with caution. For instructions on . Inadequate BIOS flashing may result in system's failure to boot. BIOS Setup When the power is turned off, the battery on the motherboard. To flash the BIOS, do not encounter problems using the Q-Flash and @BIOS utilities, refer to Chapter 5, "BIOS Update Utilities."
•• Because BIOS...
User Manual - Page 37
...: Auto)
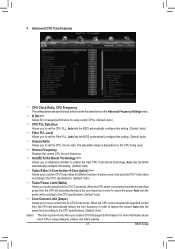
&& Turbo Ratio (1-Core Active~4-Core Active) (Note) Allows you to set the CPU Turbo ratios for CPU Turbo mode. BIOS Setup Auto sets the power limit according to the CPU specifications. (Default: Auto)
&& Core Current Limit (Amps) Allows you to set a power limit for different number of active cores. Auto lets the BIOS automatically...
User Manual - Page 69
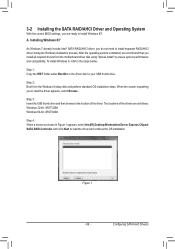
When the screen requesting you install all required drivers from the Windows 8 setup disk and perform standard OS installation steps. Step 3: Insert the USB thumb drive and then browse to the location of the drivers are ready to install Windows 8/7. Step 2: Boot from the motherboard driver disk using "Xpress Install" to ensure system performance and compatibility. The locations of...
User Manual - Page 75
...
GIGABYTE motherboards provide two unique BIOS update tools, Q-Flash™ and @BIOS™. What is DualBIOS™? With Q-Flash you to your motherboard
model. 2. Motherboards that matches your USB flash drive or hard drive. During the POST, press the key to a hard drive in system malfunction.
- 75 - Embedded in BIOS Setup. Extract the file...
User Manual - Page 76
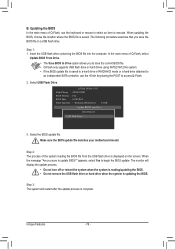
...Model Name : Z87M-D3HP BIOS Version : F1a BIOS Date : 03/28/2013 Flash Type/Size : Winbond 25X/Q Series
16MB
Update BIOS From Drive
SaSveeleBcItODSetvoicDe rive Return to update BIOS?" Select the BIOS update file. The monitor will restart after the update process is updating... only supports USB flash drive or hard drives using FAT32/16/12 file system. •• If the BIOS update file ...
User Manual - Page 89
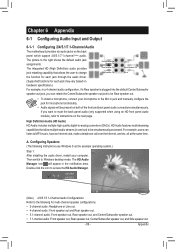
...streams (in and out) to the following instructions use Windows 8 as the example operating system.)
Step 1: After installing the audio driver, restart your microphone to the right shows the... on
hardware specification.)
For example, in the notification area. The picture to the Mic in jack and manually configure the jack for each jack through the audio driver.
(Supported functions for ...
User Manual - Page 92

...the Microphone screen.
6-1-3 Configuring Microphone Recording
Step 1: After installing the audio driver, the HD Audio Manager icon will appear in jack (pink) on the front panel. Do not mute the recording volume, or you set the Microphone Boost level. Step 4: To raise the ... to the Mic in jack (pink) on the right of the Recording Volume slider and set the volumes at the same time.
Gigabyte GA-Z87M-D3HP Reviews
We have not received any reviews for Gigabyte yet.