

User Manual
Page 3
... be reproduced, copied, translated, transmitted, or published in any form or by any means without prior notice. No part of GIGABYTE. Example: Documentation Classifications In order to their respective owners. Copyright © 2013 GIGA-BYTE TECHNOLOGY CO., LTD. For product-...related information, check on our website at: http://www.gigabyte.com Identifying Your Motherboard Revision The revision number on your motherboard revision before updating motherboard BIOS, drivers, or when looking for technical information. For example, "REV: 1.0" means the revision...
... be reproduced, copied, translated, transmitted, or published in any form or by any means without prior notice. No part of GIGABYTE. Example: Documentation Classifications In order to their respective owners. Copyright © 2013 GIGA-BYTE TECHNOLOGY CO., LTD. For product-...related information, check on our website at: http://www.gigabyte.com Identifying Your Motherboard Revision The revision number on your motherboard revision before updating motherboard BIOS, drivers, or when looking for technical information. For example, "REV: 1.0" means the revision...

User Manual
Page 5
Chapter 3 Configuring SATA Hard Drive(s 57 3-1 Configuring SATA Controllers 57 3-2 Installing the SATA RAID/AHCI Driver and Operating System 69 Chapter 4 Drivers Installation 73 4-1 Chipset Drivers 73 4-2 Application Software 74 4-3 Information...74 Chapter 5 Unique Features 75 5-1 BIOS Update Utilities 75 5-1-1 Updating the BIOS with the Q-Flash Utility 75 5-1-2 Updating the BIOS ...
Chapter 3 Configuring SATA Hard Drive(s 57 3-1 Configuring SATA Controllers 57 3-2 Installing the SATA RAID/AHCI Driver and Operating System 69 Chapter 4 Drivers Installation 73 4-1 Chipset Drivers 73 4-2 Application Software 74 4-3 Information...74 Chapter 5 Unique Features 75 5-1 BIOS Update Utilities 75 5-1-1 Updating the BIOS with the Q-Flash Utility 75 5-1-2 Updating the BIOS ...

User Manual
Page 6
.... 12CF1-3SATPW-4*R) †† 3.5" Front Panel with 2 USB 3.0/2.0 ports (Part No. 12CR1-FPX582-2*R) †† HDMI-to change without notice. Box Contents 55 G1.Sniper M5 motherboard 55 Motherboard driver disk 55 User's Manual 55 Quick Installation Guide 55 Four SATA cables 55 I/O Shield 55 One 2-Way SLI bridge connector 55 One IC extractor...
.... 12CF1-3SATPW-4*R) †† 3.5" Front Panel with 2 USB 3.0/2.0 ports (Part No. 12CR1-FPX582-2*R) †† HDMI-to change without notice. Box Contents 55 G1.Sniper M5 motherboard 55 Motherboard driver disk 55 User's Manual 55 Quick Installation Guide 55 Four SATA cables 55 I/O Shield 55 One 2-Way SLI bridge connector 55 One IC extractor...

User Manual
Page 18
... fully inserted into the slot. 4. If necessary, go to BIOS Setup to the chassis back panel with the expansion card in the slot. 3. Install the driver provided with a screw. 5. Hardware Installation - 18 -
... fully inserted into the slot. 4. If necessary, go to BIOS Setup to the chassis back panel with the expansion card in the slot. 3. Install the driver provided with a screw. 5. Hardware Installation - 18 -

User Manual
Page 19
...the Catalyst Control Center. Step 3: Plug the display cable into the graphics card on top of the cards. C. Configuring the Graphics Card Driver C-1. Browse to Performance\AMD CrossFireX™ Configuration and ensure the Enable CrossFireX™ check box is recommended (Refer to the NVIDIA Control ... Surround, Physx screen and ensure Maximize 3D performance is enabled. (Note) The bridge connector(s) may differ by graphics cards and driver version. 1-6 Setting up AMD CrossFire™/NVIDIA® SLI™ Configuration A. A power supply with two or above PCI Express x16 slots and...
...the Catalyst Control Center. Step 3: Plug the display cable into the graphics card on top of the cards. C. Configuring the Graphics Card Driver C-1. Browse to Performance\AMD CrossFireX™ Configuration and ensure the Enable CrossFireX™ check box is recommended (Refer to the NVIDIA Control ... Surround, Physx screen and ensure Maximize 3D performance is enabled. (Note) The bridge connector(s) may differ by graphics cards and driver version. 1-6 Setting up AMD CrossFire™/NVIDIA® SLI™ Configuration A. A power supply with two or above PCI Express x16 slots and...
User Manual
Page 21
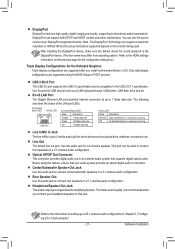
... data rate Activity LED: State Description Blinking Data transmission or receiving is occurring Off No data transmission or receiving is recommended that you install motherboard drivers in devices such as a USB keyboard/mouse, USB printer, USB flash drive and etc. Use this jack. Optical S/PDIF Out Connector This connector provides digital...
... data rate Activity LED: State Description Blinking Data transmission or receiving is occurring Off No data transmission or receiving is recommended that you install motherboard drivers in devices such as a USB keyboard/mouse, USB printer, USB flash drive and etc. Use this jack. Optical S/PDIF Out Connector This connector provides digital...
User Manual
Page 52
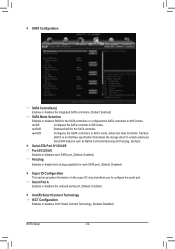
Advanced Host Controller Interface (AHCI) is an interface specification that allows the storage driver to enable advanced Serial ATA features such as Native Command Queuing and hot plug. (Default) `` Serial ATA Port 0/1/2/3/4/5 && Port 0/1/2/3/4/5 Enables or disables each SATA port. (...
Advanced Host Controller Interface (AHCI) is an interface specification that allows the storage driver to enable advanced Serial ATA features such as Native Command Queuing and hot plug. (Default) `` Serial ATA Port 0/1/2/3/4/5 && Port 0/1/2/3/4/5 Enables or disables each SATA port. (...
User Manual
Page 57
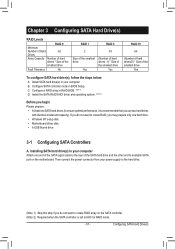
...your computer. Then connect the power connector from your computer Attach one hard drive. •• Windows 8/7 setup disk. •• Motherboard driver disk. •• A USB thumb drive 3-1 Configuring SATA Controllers A. Configure a RAID array in your power supply to the hard drive. ...Required when the SATA controller is recommended that you use two hard drives with identical model and capacity). C. Install the SATA RAID/AHCI driver and operating system. (Note 2) Before you begin Please prepare: •• At least two SATA hard drives (to ensure optimal ...
...your computer. Then connect the power connector from your computer Attach one hard drive. •• Windows 8/7 setup disk. •• Motherboard driver disk. •• A USB thumb drive 3-1 Configuring SATA Controllers A. Configure a RAID array in your power supply to the hard drive. ...Required when the SATA controller is recommended that you use two hard drives with identical model and capacity). C. Install the SATA RAID/AHCI driver and operating system. (Note 2) Before you begin Please prepare: •• At least two SATA hard drives (to ensure optimal ...
User Manual
Page 65
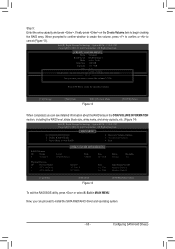
... the specified volume. [hi]-Change [TAB]-Next [ESC]-Previous Menu Figure 13 [ENTER]-Select When completed, you can proceed to install the SATA RAID/AHCI driver and operating system. - 65 - All Rights Reserved. [ CREATE VOLUME MENU ] Name : Volume0 RAID Level : RAID0(Stripe) Disks : Select Disks Strip Size : 128 MB Capacity : 111...
... the specified volume. [hi]-Change [TAB]-Next [ESC]-Previous Menu Figure 13 [ENTER]-Select When completed, you can proceed to install the SATA RAID/AHCI driver and operating system. - 65 - All Rights Reserved. [ CREATE VOLUME MENU ] Name : Volume0 RAID Level : RAID0(Stripe) Disks : Select Disks Strip Size : 128 MB Capacity : 111...
User Manual
Page 69
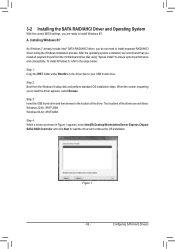
...that you are as follows: Windows 32-bit: \iRST\32Bit Windows 64-bit: \iRST\64Bit Step 4: When a screen as shown in the driver disk to load the driver and continue the OS installation Figure 1 - 69 - To install Windows 8, refer to the steps below: Step 1: Copy the IRST folder ... Chipset SATA RAID Controller and click Next to your USB thumb drive. 3-2 Installing the SATA RAID/AHCI Driver and Operating System With the correct BIOS settings, you install all required drivers from the Windows 8 setup disk and perform standard OS installation steps. Step 3: Insert the USB thumb ...
...that you are as follows: Windows 32-bit: \iRST\32Bit Windows 64-bit: \iRST\64Bit Step 4: When a screen as shown in the driver disk to load the driver and continue the OS installation Figure 1 - 69 - To install Windows 8, refer to the steps below: Step 1: Copy the IRST folder ... Chipset SATA RAID Controller and click Next to your USB thumb drive. 3-2 Installing the SATA RAID/AHCI Driver and Operating System With the correct BIOS settings, you install all required drivers from the Windows 8 setup disk and perform standard OS installation steps. Step 3: Insert the USB thumb ...
User Manual
Page 71
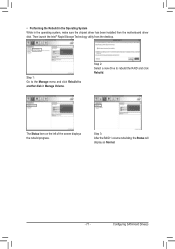
... will display as Normal. - 71 - Then launch the Intel® Rapid Storage Technology utility from the motherboard driver disk. Step 2: Select a new drive to another disk in the operating system, make sure the chipset driver has been installed from the desktop. The Status item on the left of the screen displays the...
... will display as Normal. - 71 - Then launch the Intel® Rapid Storage Technology utility from the motherboard driver disk. Step 2: Select a new drive to another disk in the operating system, make sure the chipset driver has been installed from the desktop. The Status item on the left of the screen displays the...
User Manual
Page 73
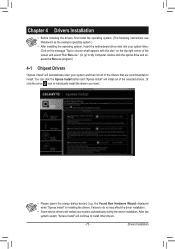
... restart your optical drive. the Found New Hardware Wizard) displayed when "Xpress Install" is installing the drivers. Drivers Installation Or click the arrow icon to install. After the system restart, "Xpress Install" will continue to do so may affect... the driver installation. •• Some device drivers will install all of the selected drivers. Failure to install other drivers. - 73 - Chapter 4 Drivers Installation •• Before installing the drivers, first install the operating system. (The following instructions use...
... restart your optical drive. the Found New Hardware Wizard) displayed when "Xpress Install" is installing the drivers. Drivers Installation Or click the arrow icon to install. After the system restart, "Xpress Install" will continue to do so may affect... the driver installation. •• Some device drivers will install all of the selected drivers. Failure to install other drivers. - 73 - Chapter 4 Drivers Installation •• Before installing the drivers, first install the operating system. (The following instructions use...

User Manual
Page 74
The Contact page provides contact information of the GIGABYTE Taiwan headquarter. Drivers Installation - 74 - You can click the URL on this page to link to the GIGABYTE website to begin the installation. 4-3 Information This page provides detailed information on the drivers on the GIGABYTE headquarter or worldwide branch offices. 4-2 Application Software This page displays the apps that GIGABYTE develops and some free software. You can select the apps you want and click the Install icon to check more information on the driver disk.
The Contact page provides contact information of the GIGABYTE Taiwan headquarter. Drivers Installation - 74 - You can click the URL on this page to link to the GIGABYTE website to begin the installation. 4-3 Information This page provides detailed information on the drivers on the GIGABYTE headquarter or worldwide branch offices. 4-2 Application Software This page displays the apps that GIGABYTE develops and some free software. You can select the apps you want and click the Install icon to check more information on the driver disk.

User Manual
Page 79
...App Center icon in APP Center may also differ depending on your system, check related udpates online, and download the apps, drivers, and BIOS. Supported functions of GIGABYTE apps that help you get the most from your computer after the installation is closed, you can select an app to ...run or click Live Update to update an app online. Unique Features Running the APP Center Insert the motherboard driver disk. Figure 1 If...
...App Center icon in APP Center may also differ depending on your system, check related udpates online, and download the apps, drivers, and BIOS. Supported functions of GIGABYTE apps that help you get the most from your computer after the installation is closed, you can select an app to ...run or click Live Update to update an app online. Unique Features Running the APP Center Insert the motherboard driver disk. Figure 1 If...

User Manual
Page 85
A. XHD With GIGABYTE XHD (Note 1), users can quickly configure a RAID-ready system for complex and time-consuming configurations. . An Intel® Chipset motherboard supporting RAID 2. Using XHD Select XHD and click Create RAID 0 or Create RAID 1 based on your data before using the XHD utility. - 85 - Intel® SATA controller driver installed B. Intel...
A. XHD With GIGABYTE XHD (Note 1), users can quickly configure a RAID-ready system for complex and time-consuming configurations. . An Intel® Chipset motherboard supporting RAID 2. Using XHD Select XHD and click Create RAID 0 or Create RAID 1 based on your data before using the XHD utility. - 85 - Intel® SATA controller driver installed B. Intel...

User Manual
Page 89
... Killer Network Manager in All apps>Qualcomm Atheros Killer Network Manager or click on the icon in the notification area (Note 1). After installing the LAN driver, you want and move the cursor to access the Internet. It also displays your system performance. When the cursor changes to a double-headed arrow, drag...
... Killer Network Manager in All apps>Qualcomm Atheros Killer Network Manager or click on the icon in the notification area (Note 1). After installing the LAN driver, you want and move the cursor to access the Internet. It also displays your system performance. When the cursor changes to a double-headed arrow, drag...

User Manual
Page 90
... TCP Protocol settings if needed. Click Start to begin to measure the speed your Internet service provider provides. Note: After installing the LAN driver from the motherboard driver disk and restarting your computer, the Killer Network Manager screen will begin testing (make sure your wired network connection and Internet provided speed. The...
... TCP Protocol settings if needed. Click Start to begin to measure the speed your Internet service provider provides. Note: After installing the LAN driver from the motherboard driver disk and restarting your computer, the Killer Network Manager screen will begin testing (make sure your wired network connection and Internet provided speed. The...

User Manual
Page 91
... Recon3Di. Line In/Mic In Front Speaker Out Center/Subwoofer Speaker Out Rear Speaker Out Headphone/ Speaker Out 6-2-2 Creative Software Suite After installing the audio driver, you want to enable the EAX effects and add it to the following for your games to launch Creative Alchemy. Steps: Go to All apps...
... Recon3Di. Line In/Mic In Front Speaker Out Center/Subwoofer Speaker Out Rear Speaker Out Headphone/ Speaker Out 6-2-2 Creative Software Suite After installing the audio driver, you want to enable the EAX effects and add it to the following for your games to launch Creative Alchemy. Steps: Go to All apps...
User Manual
Page 102
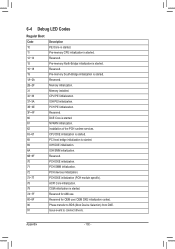
...-memory South-Bridge initialization is started. CPU PEI initialization. DXE Core is started. NVRAM initialization. PCH DXE initialization (PCH module specific). Phase transfer to connect drivers. Installation of the PCH runtime services. ACPI Core initialization. Reserved for OEM use . Memory initialization. Reserved for AMI use (OEM DXE initialization codes). Appendix - 102...
...-memory South-Bridge initialization is started. CPU PEI initialization. DXE Core is started. NVRAM initialization. PCH DXE initialization (PCH module specific). Phase transfer to connect drivers. Installation of the PCH runtime services. ACPI Core initialization. Reserved for OEM use . Memory initialization. Reserved for AMI use (OEM DXE initialization codes). Appendix - 102...


