
Manual
Page 9
... the motherboard circuit or its components. • Make sure there are no leftover screws or metal components placed on the motherboard or within the computer casing. • Do not place the computer system on an uneven surface. • Do not place the computer system in a high-temperature environment. • Turning on...
... the motherboard circuit or its components. • Make sure there are no leftover screws or metal components placed on the motherboard or within the computer casing. • Do not place the computer system on an uneven surface. • Do not place the computer system in a high-temperature environment. • Turning on...

Manual
Page 59
...will show "No". 2-8 PC Health Status CMOS Setup Utility-Copyright (C) 1984-2010 Award Software PC Health Status Reset Case Open Status Case Opened Vcore DDR15V +3.3V +5V +12V Current CPU Temperature Current System Temperature Current SYSTEM1 Temp. Current SYSTEM3 Temp. To... clear the chassis intrusion status record, set Reset Case Open Status to Enabled, save the settings to the motherboard CI header. BIOS Setup Enabled clears the record of previous...
...will show "No". 2-8 PC Health Status CMOS Setup Utility-Copyright (C) 1984-2010 Award Software PC Health Status Reset Case Open Status Case Opened Vcore DDR15V +3.3V +5V +12V Current CPU Temperature Current System Temperature Current SYSTEM1 Temp. Current SYSTEM3 Temp. To... clear the chassis intrusion status record, set Reset Case Open Status to Enabled, save the settings to the motherboard CI header. BIOS Setup Enabled clears the record of previous...

Manual
Page 61
... CMOS to BIOS F12: Load CMOS from BIOS Press on this item and then press the key to load the safest BIOS default settings. In case system instability occurs, you may try to operate in optimum state. BIOS Setup
... CMOS to BIOS F12: Load CMOS from BIOS Press on this item and then press the key to load the safest BIOS default settings. In case system instability occurs, you may try to operate in optimum state. BIOS Setup

Manual
Page 71
D. The RESTORE option will not be present if no backup is removed, no backup image file will be present in Disk Management and hard drive space will be freed up. Exiting Xpress Recovery2 Select REBOOT to your hard drive in Xpress Recovery2 Select RESTORE to restore the backup to exit Xpress Recovery2. - 71 - Using the Restore Function in case the system breaks down. E. F. Removing the Backup Step 1: If you wish to remove the backup file, select REMOVE. Unique Features Step 2: After the backup file is created before.
D. The RESTORE option will not be present if no backup is removed, no backup image file will be present in Disk Management and hard drive space will be freed up. Exiting Xpress Recovery2 Select REBOOT to your hard drive in Xpress Recovery2 Select RESTORE to restore the backup to exit Xpress Recovery2. - 71 - Using the Restore Function in case the system breaks down. E. F. Removing the Backup Step 1: If you wish to remove the backup file, select REMOVE. Unique Features Step 2: After the backup file is created before.
Manual
Page 82
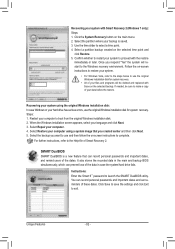
... computer. 4. Select Repair your language and click Next. 3. SMART DualBIOS SMART DualBIOS is saved. 3. You can prevent loss of the data in case the system/hard drive fails. Unique Features - 82 - Use the time slider to boot from the original Windows installation disk. 2. Select a partition...a time point. 4. Confirm whether to restart your system to make a copy of your computer using the original Windows installation disk: In case Windows or your hard drive has serious errors, use the original Windows installation disk for system recovery. • All of these dates. Select...
... computer. 4. Select Repair your language and click Next. 3. SMART DualBIOS SMART DualBIOS is saved. 3. You can prevent loss of the data in case the system/hard drive fails. Unique Features - 82 - Use the time slider to boot from the original Windows installation disk. 2. Select a partition...a time point. 4. Confirm whether to restart your system to make a copy of your computer using the original Windows installation disk: In case Windows or your hard drive has serious errors, use the original Windows installation disk for system recovery. • All of these dates. Select...

Manual
Page 107
... Yes Choose the RAID level: RAID0: Stripes data (performance). Step 3: Click Yes to show the recovery drive in the operating system. Recovery Volume Options in case the master drive detects a virus, you can restore the recovery drive data to complete and exit the RAID Configuration Utility. Enable Only Recovery Disk 2. Step...
... Yes Choose the RAID level: RAID0: Stripes data (performance). Step 3: Click Yes to show the recovery drive in the operating system. Recovery Volume Options in case the master drive detects a virus, you can restore the recovery drive data to complete and exit the RAID Configuration Utility. Enable Only Recovery Disk 2. Step...

