User Manual (English (14.7 MB))
Page 1
imagination at work GE Digital Camera X Series : X5 User Manual Getting Started Basic operation Camera function controls Playback Using the Menus Camera connectivity Appendix
imagination at work GE Digital Camera X Series : X5 User Manual Getting Started Basic operation Camera function controls Playback Using the Menus Camera connectivity Appendix
User Manual (English (14.7 MB))
Page 3
...this may make it . Do not remove memory card without turning the digital camera off to recognize the picture when the camera is in summer. • In a place where the camera is on the camera. We suggest you carry the camera suddenly from your PC, as moisture or extreme temperatures, which may ... to the sunlight or subject to the PC's hard disk first. Do not place the camera on a wet surface or places where dripping water or sand may condense inside the camera, turn off the digital camera when a writing process is subject to deform, disassemble or modify the batteries. Do not...
...this may make it . Do not remove memory card without turning the digital camera off to recognize the picture when the camera is in summer. • In a place where the camera is on the camera. We suggest you carry the camera suddenly from your PC, as moisture or extreme temperatures, which may ... to the sunlight or subject to the PC's hard disk first. Do not place the camera on a wet surface or places where dripping water or sand may condense inside the camera, turn off the digital camera when a writing process is subject to deform, disassemble or modify the batteries. Do not...
User Manual (English (14.7 MB))
Page 4
... only the type of this GE digital camera. Using other types of batteries may damage the camera and invalidate the warranty. • Do not touch the camera lens. • Please not expose the camera to service the camera yourself. • Do not drop or knock the camera. BEFORE YOU START Preface Thank...not take apart or attempt to harsh environments such as its components may shorten the life of your camera or damage the batteries. • Do not use or store the camera in a safe place for future reference. Copyright © Copyright 2010 General Imaging Company All rights reserved...
... only the type of this GE digital camera. Using other types of batteries may damage the camera and invalidate the warranty. • Do not touch the camera lens. • Please not expose the camera to service the camera yourself. • Do not drop or knock the camera. BEFORE YOU START Preface Thank...not take apart or attempt to harsh environments such as its components may shorten the life of your camera or damage the batteries. • Do not use or store the camera in a safe place for future reference. Copyright © Copyright 2010 General Imaging Company All rights reserved...
User Manual (English (14.7 MB))
Page 5
...warm up slowly to room temperature. • Always place camera in a vibration-free surface. Every effort has been made to ensure that the contents of time. • Do not use your GE digital camera. To clean, wipe the camera with instructions on how to use abrasive cleansers, alcohol-based,... or solventbased cleaners to clean the camera. Symbols used to help you with a slightly damp soft cloth. • ...
...warm up slowly to room temperature. • Always place camera in a vibration-free surface. Every effort has been made to ensure that the contents of time. • Do not use your GE digital camera. To clean, wipe the camera with instructions on how to use abrasive cleansers, alcohol-based,... or solventbased cleaners to clean the camera. Symbols used to help you with a slightly damp soft cloth. • ...
User Manual (English (14.7 MB))
Page 22
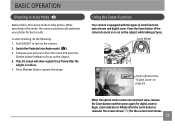
...picture on the LCD screen and press the Shutter button halfway to turn on the subject while taking pictures. Zoom Wheel Zoom indicator (See "Digital Zoom" on page 51) When the optical zoom reaches its maximum value, release the Zoom button and then press again for the current .... 19 Press the Zoom button of zoom functions: optical zoom and digital zoom. The screen shows ( ) for digital zoom to zoom in or out on the camera. 2. Using the Zoom Function Your camera is equipped with two types of the camera to begin. Press Shutter fully to take photos. BASIC OPERATION Shooting ...
...picture on the LCD screen and press the Shutter button halfway to turn on the subject while taking pictures. Zoom Wheel Zoom indicator (See "Digital Zoom" on page 51) When the optical zoom reaches its maximum value, release the Zoom button and then press again for the current .... 19 Press the Zoom button of zoom functions: optical zoom and digital zoom. The screen shows ( ) for digital zoom to zoom in or out on the camera. 2. Using the Zoom Function Your camera is equipped with two types of the camera to begin. Press Shutter fully to take photos. BASIC OPERATION Shooting ...
User Manual (English (14.7 MB))
Page 75
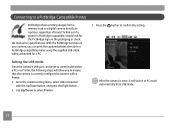
... menu, select USB connection with either a PC or a Printer, the following steps will switch to PC mode automatically from a memory card in a digital camera directly to a printer, regardless of brand. To find out if a printer is reset, it will allow you can print the captured photos directly to a PictBridge ...
... menu, select USB connection with either a PC or a Printer, the following steps will switch to PC mode automatically from a memory card in a digital camera directly to a printer, regardless of brand. To find out if a printer is reset, it will allow you can print the captured photos directly to a PictBridge ...

User Manual (English (14.7 MB))
Page 80
The "Remove USB cable" message will be displayed. 2. Disconnect the USB cable from the PictBridge menu. Print DPOF (Digital Print Order Format) To use DPOF printing, you must make the selection of photos for printing using the DPOF settings beforehand. See "DPOF" section on page 56. 1. Select Print DPOF from the camera and printer. 77 Select Yes to print or exit, then press button again. The following screen appears. Exit To exit the PictBridge menu, select Exit.
The "Remove USB cable" message will be displayed. 2. Disconnect the USB cable from the PictBridge menu. Print DPOF (Digital Print Order Format) To use DPOF printing, you must make the selection of photos for printing using the DPOF settings beforehand. See "DPOF" section on page 56. 1. Select Print DPOF from the camera and printer. 77 Select Yes to print or exit, then press button again. The following screen appears. Exit To exit the PictBridge menu, select Exit.


