Use and Care Manual
Page 1
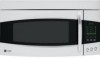
... the model and serial numbers here: Model Serial Find these numbers on a label on the left front when the door is open. Spacemaker Microwave Oven ge.com Safety Instructions 2-7 Operating Instructions Care and Cleaning 37-40 Cooking Features 12-18 Defrosting Features 21-27 Easy Guide™ Menu System . . . . . ....9 Help Features 34 Home Screen 10 Microwave Oven Features . . . . . .8 Microwave Terms 36 Options 28-32 Other Features 33, 35 Power Levels 11 Reheating Features 19-20 Troubleshooting Tips 41 Consumer Support Consumer Support . . .
... the model and serial numbers here: Model Serial Find these numbers on a label on the left front when the door is open. Spacemaker Microwave Oven ge.com Safety Instructions 2-7 Operating Instructions Care and Cleaning 37-40 Cooking Features 12-18 Defrosting Features 21-27 Easy Guide™ Menu System . . . . . ....9 Help Features 34 Home Screen 10 Microwave Oven Features . . . . . .8 Microwave Terms 36 Options 28-32 Other Features 33, 35 Power Levels 11 Reheating Features 19-20 Troubleshooting Tips 41 Consumer Support Consumer Support . . .
Use and Care Manual
Page 3
...; To reduce the risk of the microwave oven surface when the microwave oven is not working properly or if it must be grounded. If the power cord is undercooked after the first countdown, use . - IMPORTANT SAFETY INSTRUCTIONS WARNING! To reduce the risk of burns, electric shock, fire, injury ... cleaning instructions in the Care and Cleaning of the microwave oven section of this product near a sink, or in similar locations. • Keep power cord away from General Electric. • Do not cover or block any appliance, close supervision is opened, the fire may be serviced only by...
...; To reduce the risk of the microwave oven surface when the microwave oven is not working properly or if it must be grounded. If the power cord is undercooked after the first countdown, use . - IMPORTANT SAFETY INSTRUCTIONS WARNING! To reduce the risk of burns, electric shock, fire, injury ... cleaning instructions in the Care and Cleaning of the microwave oven section of this product near a sink, or in similar locations. • Keep power cord away from General Electric. • Do not cover or block any appliance, close supervision is opened, the fire may be serviced only by...
Use and Care Manual
Page 7
...appliance. Filter Kits JX81H-Recirculating Charcoal Filter Kit Filter kits are shielded from interference from electronic products, including microwaves. Available at ge.com. IMPORTANT SAFETY INSTRUCTIONS WARNING! For installation between cabinets only; Consult a qualified electrician or service technician if the grounding instructions...-in a risk of electric shock by providing an escape wire for ordering by phone or at extra cost from the power cord. See the back cover for the electric current. not for end-of circuit breaker. Do not under any circumstances...
...appliance. Filter Kits JX81H-Recirculating Charcoal Filter Kit Filter kits are shielded from interference from electronic products, including microwaves. Available at ge.com. IMPORTANT SAFETY INSTRUCTIONS WARNING! For installation between cabinets only; Consult a qualified electrician or service technician if the grounding instructions...-in a risk of electric shock by providing an escape wire for ordering by phone or at extra cost from the power cord. See the back cover for the electric current. not for end-of circuit breaker. Do not under any circumstances...
Use and Care Manual
Page 9
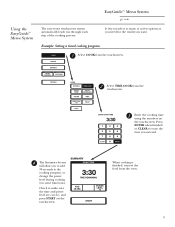
EasyGuide™ Menu System ge.com It lets you select as many or as few options as you need for the results you to add 30 seconds to the cooking program, or change the power level during cooking (on some functions). Enter the cooking time using the numbers on the touchscreen. The ...™ Menu System The easy-to-use touchscreen system automatically leads you entered. Press ENTER when finished or CLEAR to make sure the time and power level are correct, and press START on the touchscreen. Select TIME COOK from the oven. 9 Example: Setting a timed cooking program Select COOK from the ...
EasyGuide™ Menu System ge.com It lets you select as many or as few options as you need for the results you to add 30 seconds to the cooking program, or change the power level during cooking (on some functions). Enter the cooking time using the numbers on the touchscreen. The ...™ Menu System The easy-to-use touchscreen system automatically leads you entered. Press ENTER when finished or CLEAR to make sure the time and power level are correct, and press START on the touchscreen. Select TIME COOK from the oven. 9 Example: Setting a timed cooking program Select COOK from the ...
Use and Care Manual
Page 11
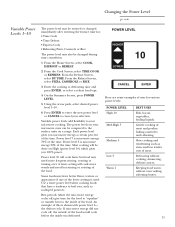
... transfer heat to the inside was defrosted. Keeping food warm without cooking; Changing the Power Level ge.com Variable Power Levels 1-10 The power level may be entered or changed immediately after entering the feature time for various power levels: POWER LEVEL High 10 Med-High 7 Medium 5 Low 3 Warm 1 BEST USES Fish...periods (when the microwave energy cycles off , the outside of the food would cook before the inside of the time. Use a lower power level when cooking foods that have better flavor, texture or appearance if one of the food. softening butter. 11 From the Reheat Screen...
... transfer heat to the inside was defrosted. Keeping food warm without cooking; Changing the Power Level ge.com Variable Power Levels 1-10 The power level may be entered or changed immediately after entering the feature time for various power levels: POWER LEVEL High 10 Med-High 7 Medium 5 Low 3 Warm 1 BEST USES Fish...periods (when the microwave energy cycles off , the outside of the food would cook before the inside of the time. Use a lower power level when cooking foods that have better flavor, texture or appearance if one of the food. softening butter. 11 From the Reheat Screen...
Use and Care Manual
Page 12
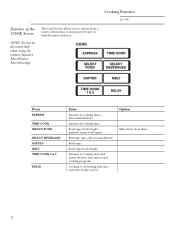
Amount of cooking time- Food type. Amount of cooking time and power level for first and second cooking programs. Cooking or defrosting function and time of day to microwave by time or with the sensor features. Option ... Enter Amount of cooking time. Starts immediately! Food type, food weight/ quantity (some food types) Beverage type-Starts immediately! Food type, food weight. Cooking Features ge.com Features of functions to start. The Cook Screen allows you to choose from a variety of the COOK Screen NOTE: Do not use the metal...
Amount of cooking time- Food type. Amount of cooking time and power level for first and second cooking programs. Cooking or defrosting function and time of day to microwave by time or with the sensor features. Option ... Enter Amount of cooking time. Starts immediately! Food type, food weight/ quantity (some food types) Beverage type-Starts immediately! Food type, food weight. Cooking Features ge.com Features of functions to start. The Cook Screen allows you to choose from a variety of the COOK Screen NOTE: Do not use the metal...
Use and Care Manual
Page 13
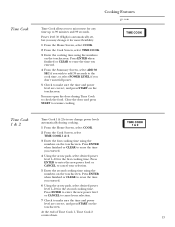
...ENTER when finished or CLEAR to erase the time you entered. 6 Using the arrow pads, select desired power level 1-10 for the first cooking time. Press ENTER to enter the new power level or CANCEL to cancel your selection. 5 Enter the second cooking time using the numbers on the touchscreen.... Press ENTER when finished or CLEAR to erase the time you entered. 4 Using the arrow pads, select desired power level 1-10 for the second cooking time. Time Cook Cooking Features ge.com Time Cook allows you to microwave for more flexibility. 1 From the Home Screen, select COOK. 2 From ...
...ENTER when finished or CLEAR to erase the time you entered. 6 Using the arrow pads, select desired power level 1-10 for the first cooking time. Press ENTER to enter the new power level or CANCEL to cancel your selection. 5 Enter the second cooking time using the numbers on the touchscreen.... Press ENTER when finished or CLEAR to erase the time you entered. 4 Using the arrow pads, select desired power level 1-10 for the second cooking time. Time Cook Cooking Features ge.com Time Cook allows you to microwave for more flexibility. 1 From the Home Screen, select COOK. 2 From ...
Use and Care Manual
Page 20
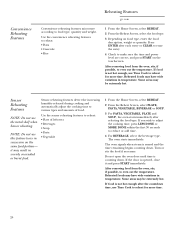
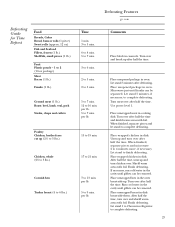
..., select the beverage type. After removing food from the oven, stir, if possible, to reheat: • Pizza • Casserole • Rice Reheating Features ge.com 1 From the Home Screen, select REHEAT. 2 From the Reheat Screen, select the food type. 3 Depending on the same food portion- Some areas may... food. Sensor reheating features detect the increasing humidity released during cooking and automatically adjust the cooking time to make sure the time and power level are correct, and press START on the touchscreen. If you wish to adjust the cooking time, press LESS DONE or MORE ...
..., select the beverage type. After removing food from the oven, stir, if possible, to reheat: • Pizza • Casserole • Rice Reheating Features ge.com 1 From the Home Screen, select REHEAT. 2 From the Reheat Screen, select the food type. 3 Depending on the same food portion- Some areas may... food. Sensor reheating features detect the increasing humidity released during cooking and automatically adjust the cooking time to make sure the time and power level are correct, and press START on the touchscreen. If you wish to adjust the cooking time, press LESS DONE or MORE ...

Use and Care Manual
Page 22
...the Home Screen, select DEFROST. 2 From the Defrost Screen, select BY TIME. 3 Enter the defrosting time using the numbers on the touchscreen. Power level 7 cuts the total defrosting time in all areas. However, food will need more even defrosting of harmful bacteria. • When defrosted,... food should be cool but can defrost small items quickly by Time Defrosting Features ge.com Allows you entered. 4 Check to a microwavesafe dish. • For more frequent attention than one hour after defrosting. Closed packages...
...the Home Screen, select DEFROST. 2 From the Defrost Screen, select BY TIME. 3 Enter the defrosting time using the numbers on the touchscreen. Power level 7 cuts the total defrosting time in all areas. However, food will need more even defrosting of harmful bacteria. • When defrosted,... food should be cool but can defrost small items quickly by Time Defrosting Features ge.com Allows you entered. 4 Check to a microwavesafe dish. • For more frequent attention than one hour after defrosting. Closed packages...
Use and Care Manual
Page 23
...warm areas with foil. Place unwrapped hen in the cavity until franks can be removed. Finish defrosting. per lb. 5 to 4 minutes more, if necessary. Use power level 1. Let stand to 13 min. Finish defrosting. Run cool water in the oven breast-side-up (21⁄2 to 3 lbs.) Chicken, whole (21&#...8260;2 to 3 lbs.) Cornish hen Turkey breast (4 to 6 lbs.) Defrosting Features ge.com Time 1 min. 3 to 5 min. 6 to 8 min. 5 to 7 min. 3 to 6 min. 2 to 5 min. 2 to 5 min. 5 to 7 min. 12 to 16 min. Turn over after...
...warm areas with foil. Place unwrapped hen in the cavity until franks can be removed. Finish defrosting. per lb. 5 to 4 minutes more, if necessary. Use power level 1. Let stand to 13 min. Finish defrosting. Run cool water in the oven breast-side-up (21⁄2 to 3 lbs.) Chicken, whole (21&#...8260;2 to 3 lbs.) Cornish hen Turkey breast (4 to 6 lbs.) Defrosting Features ge.com Time 1 min. 3 to 5 min. 6 to 8 min. 5 to 7 min. 3 to 6 min. 2 to 5 min. 2 to 5 min. 5 to 7 min. 12 to 16 min. Turn over after...

Use and Care Manual
Page 24
...Shield any warm areas with small pieces of a pound) 0.1 0.2 0.3 0.4 0.5 0.6 0.7 0.8 0.9 1 Lb. Quick Defrost automatically sets the defrosting times and power levels for foods weighing one pound. • Remove meat from package and place on microwave-safe dish. • If the oven signals "TURN FOOD OVER...pounds and ounces, the ounces must be converted to complete defrosting. Defrosting by Weight Defrosting Features ge.com Defrosting by Weight automatically sets the defrosting times and power levels to give even defrosting results for meats, poultry and fish weighing up to make sure the...
...Shield any warm areas with small pieces of a pound) 0.1 0.2 0.3 0.4 0.5 0.6 0.7 0.8 0.9 1 Lb. Quick Defrost automatically sets the defrosting times and power levels for foods weighing one pound. • Remove meat from package and place on microwave-safe dish. • If the oven signals "TURN FOOD OVER...pounds and ounces, the ounces must be converted to complete defrosting. Defrosting by Weight Defrosting Features ge.com Defrosting by Weight automatically sets the defrosting times and power levels to give even defrosting results for meats, poultry and fish weighing up to make sure the...
Use and Care Manual
Page 25
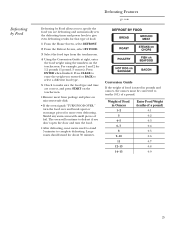
...BACK to select a different food type. 5 Check to make sure the food type and time are defrosting and automatically sets the defrosting times and power levels to give even defrosting results for more even defrosting. Weight of Food in pounds and ounces, the ounces must be converted to tenths (0.1) of... foil. Defrosting by Food Defrosting Features ge.com Defrosting by Food allows you to specify the food you are correct, and press START on the touchscreen. • Remove meat from the ...
...BACK to select a different food type. 5 Check to make sure the food type and time are defrosting and automatically sets the defrosting times and power levels to give even defrosting results for more even defrosting. Weight of Food in pounds and ounces, the ounces must be converted to tenths (0.1) of... foil. Defrosting by Food Defrosting Features ge.com Defrosting by Food allows you to specify the food you are correct, and press START on the touchscreen. • Remove meat from the ...
Use and Care Manual
Page 33
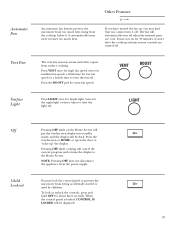
... vent fan removes steam and other vapors from surface cooking. Press the touchscreen or HOME, or open the door to prevent the microwave from the power supply. The fan will cancel the current program and returns the display to turn the light off. Press the BOOST pad for about three seconds..., press and hold OFF for extra fan speed. It automatically turns on , you may lock the control panel to "wake up" the display. Other Features ge.com If you have turned the fan on if it .
... vent fan removes steam and other vapors from surface cooking. Press the touchscreen or HOME, or open the door to prevent the microwave from the power supply. The fan will cancel the current program and returns the display to turn the light off. Press the BOOST pad for about three seconds..., press and hold OFF for extra fan speed. It automatically turns on , you may lock the control panel to "wake up" the display. Other Features ge.com If you have turned the fan on if it .
Use and Care Manual
Page 39
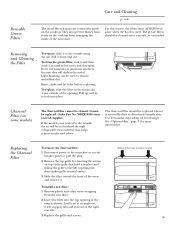
...charcoal filter should be replaced. Replacing the Charcoal Filter To remove the charcoal filter: 1 Disconnect power at the outside , the air will darken the metal. Reusable Grease Filters Care and Cleaning ge.com The metal filters trap grease released by removing the screws on 2 side support tabs ... dirt. See "Optional Kits", page 7, for more information. To install a new filter: 1 Remove plastic and other outer wrapping from your GE supplier. To clean the grease filter, soak it and then swish it dry before replacing. Remove grille screws to 12 months, depending on the...
...charcoal filter should be replaced. Replacing the Charcoal Filter To remove the charcoal filter: 1 Disconnect power at the outside , the air will darken the metal. Reusable Grease Filters Care and Cleaning ge.com The metal filters trap grease released by removing the screws on 2 side support tabs ... dirt. See "Optional Kits", page 7, for more information. To install a new filter: 1 Remove plastic and other outer wrapping from your GE supplier. To clean the grease filter, soak it and then swish it dry before replacing. Remove grille screws to 12 months, depending on the...

Use and Care Manual
Page 40
... Cooktop Light/ Night Light Replace the burned-out bulb with a 120 volt, 20-watt halogen bulb (WB36X10213), available from your GE supplier. 1 To replace the bulb(s), first disconnect the power at the main fuse or circuit breaker panel or pull the plug. 2 Remove the screw at the right edge of the light... top opening. 4 Pinch the clips that hold it in place and lift the socket out. 5 Remove the bulb from your GE supplier. 1 To replace the oven light, first disconnect the power at the main fuse or circuit breaker panel or pull the plug. 2 Remove the top grille by taking out the screws...
... Cooktop Light/ Night Light Replace the burned-out bulb with a 120 volt, 20-watt halogen bulb (WB36X10213), available from your GE supplier. 1 To replace the bulb(s), first disconnect the power at the main fuse or circuit breaker panel or pull the plug. 2 Remove the screw at the right edge of the light... top opening. 4 Pinch the clips that hold it in place and lift the socket out. 5 Remove the bulb from your GE supplier. 1 To replace the oven light, first disconnect the power at the main fuse or circuit breaker panel or pull the plug. 2 Remove the top grille by taking out the screws...
Use and Care Manual
Page 41
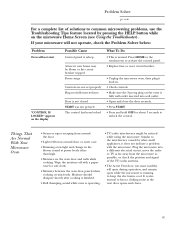
...models) will not start "CONTROL IS LOCKED" appears on the display Possible Cause Control panel is running, to keep the electronics cool. Problem Solver ge.com For a complete list of the TV/radio antenna. • The Active Vent door (on the microwave Home Screen (see Using the Troubleshooter).... from around the door. • Light reflection around door or outer case. • Dimming oven light and change in the blower sound at power levels other small appliances, it back in your microwave will not operate, check the Problem Solver below: Problem Oven will open during operation, and...
...models) will not start "CONTROL IS LOCKED" appears on the display Possible Cause Control panel is running, to keep the electronics cool. Problem Solver ge.com For a complete list of the TV/radio antenna. • The Active Vent door (on the microwave Home Screen (see Using the Troubleshooter).... from around the door. • Light reflection around door or outer case. • Dimming oven light and change in the blower sound at power levels other small appliances, it back in your microwave will not operate, check the Problem Solver below: Problem Oven will open during operation, and...

Installation Instructions
Page 3
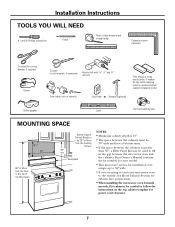
... TO AVOID SEVERE OR FATAL SHOCK. DO NOT, UNDER ANY CIRCUMSTANCES, CUT, DEFORM OR REMOVE ANY OF THE PRONGS FROM THE POWER CORD. Wire size must be capable of supporting the cabinet load, in addition to the added weight of this 63-85 pound ...noted (under ELECTRICAL REQUIREMENTS), a qualified electrician should have it is properly grounded. The installer must perform a ground continuity check on the power outlet box before beginning the installation to insure that two people install this kilowatt rating. Installation Instructions IMPORTANT SAFETY INSTRUCTIONS This product requires a...
... TO AVOID SEVERE OR FATAL SHOCK. DO NOT, UNDER ANY CIRCUMSTANCES, CUT, DEFORM OR REMOVE ANY OF THE PRONGS FROM THE POWER CORD. Wire size must be capable of supporting the cabinet load, in addition to the added weight of this 63-85 pound ...noted (under ELECTRICAL REQUIREMENTS), a qualified electrician should have it is properly grounded. The installer must perform a ground continuity check on the power outlet box before beginning the installation to insure that two people install this kilowatt rating. Installation Instructions IMPORTANT SAFETY INSTRUCTIONS This product requires a...
Installation Instructions
Page 7
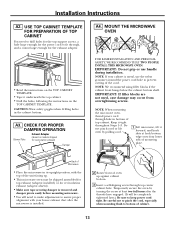
...;. • The space between the cabinets must be 30″ wide and free of Cabinet Needs to be used on the top cabinet template for power cord clearance. 7
...;. • The space between the cabinets must be 30″ wide and free of Cabinet Needs to be used on the top cabinet template for power cord clearance. 7
Installation Instructions
Page 13
... position, with your cabinet is installed. 2 Rotate front of cabinet. 13 Installation Instructions A2. NOTE: When mounting the microwave oven, thread power cord through top center cabinet hole. Do not pinch cord or lift oven by turning the screw at back bottom edge onto four lower tabs... the instructions on models shipped for recirculation exhaust) Damper A4. IMPORTANT: Do not grip or use the nylon grommet around the power cord hole to keep power cord tight. USE TOP CABINET TEMPLATE FOR PREPARATION OF TOP CABINET You need to drill holes for the top support screws, a...
... position, with your cabinet is installed. 2 Rotate front of cabinet. 13 Installation Instructions A2. NOTE: When mounting the microwave oven, thread power cord through top center cabinet hole. Do not pinch cord or lift oven by turning the screw at back bottom edge onto four lower tabs... the instructions on models shipped for recirculation exhaust) Damper A4. IMPORTANT: Do not grip or use the nylon grommet around the power cord hole to keep power cord tight. USE TOP CABINET TEMPLATE FOR PREPARATION OF TOP CABINET You need to drill holes for the top support screws, a...
Installation Instructions
Page 16
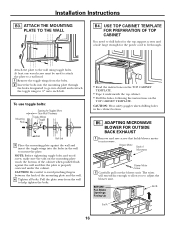
... wall and insert the toggle wings into drywall and reattach the toggle wings to microwave. B5. To use toggle bolts: Mounting Plate Spacing for the power cord to fit through the holes designated to go into the holes in the cabinet bottom. USE TOP CABINET TEMPLATE FOR PREPARATION OF TOP CABINET...
... wall and insert the toggle wings into drywall and reattach the toggle wings to microwave. B5. To use toggle bolts: Mounting Plate Spacing for the power cord to fit through the holes designated to go into the holes in the cabinet bottom. USE TOP CABINET TEMPLATE FOR PREPARATION OF TOP CABINET...


